Minecraft Bedrock Edition Black Concrete Visible Texture Pack
Mineways Main Documentation
To get started, read this quick step by step or watch this video (and watch this one for some pro tips). For problems, see the Windows troubleshooting guide; let me know if you're still stuck. Check the quick reference page for a brief rundown of mouse and keyboard controls, menu and export options, and what the files included with Mineways each do. Read this for the process I go through when exporting for 3D printing.
Normally you can just hit "OK" on the export dialog and things will work fine. Read on if you want to understand how to make your models less expensive, use different texture packs, and otherwise tailor you want to see printed out. What follows is extensive documentation about each part of the export and print process. If you don't want to wade through it all, at least search this page for the phrase "Key tip", as these bits are particularly useful.
Subscribe to the Mineways mailing list - it's for only important announcements, such as new version releases.
- Installation - simple!
- Opening Worlds and Schematics - how to view your world.
- Mapping - lots of ways to change the view and what you see.
- Selecting a Region - define a 3D box in your world for export.
- Exporting Models and Maps - basics of exporting.
- Out of memory? - here are some options.
- Displaying with G3D - free viewer ideal for most Mineways rendering exports.
- Color Schemes - change object colors or make them invisible.
- "My Model's Too Expensive!" - how to keep it cheap.
- Export Options - rendering-related export options shown on the giant dialog.
- Material Export
- Texture Export
- Custom Terrain
- Blurry Textures
- Wavefront OBJ File Export Options
- Custom Material
- Create Composite Overlay Faces
- Center Model Around the Origin
- Tree Leaves Solid
- Exporting to 3D print - in-depth coverage of 3D print options.
- ChannelMixer and TileMaker - how to make your own custom texture terrainExt.png files.
- Rendering Tips - help for importing to different renderers.
- Blender
- Omniverse Create
- Cinema 4D
- Houdini
- 3DS MAX
- Maya
- Publish to Sketchfab - how to make your creations immediately available to all.
- 3D Print Services - Shapeways, Sculpteo, and more
- Shapeways - two key tricks to use the site effectively.
- Sculpteo - some options you may not know.
- Zebra Imaging - make a color hologram.
- Looking Glass Factory - make a Lucite block with your model embedded in it.
- Scripting - how to automate and simplify many Minecraft processes.
- Related Resources - model viewers, world editors, and worlds to try out
- Stuff to Print and Render - where to get models and worlds.
- Other Packages - other model exporters and related software.
- Minecraft Bedrock Support - how to convert Bedrock worlds for use in Mineways.
- Keyboard Shortcut Keys - along with quick descriptions of various features.
- Block Types Supported - how various block types are exported.
- Version History
- Wish List
- Nightmare List
- Links - useful links to Mineways-related information.
- Credits - who did what.
Installation
Installation is trivial: download and unzip (using 7-Zip or other decompressor) to some directory, like the desktop.
Uninstall: just delete the directory. If you created color schemes, there will be a few small entries in the registry, If you are fanatical and want to clean these out, delete the ColorSchemes directory at "Computer\HKEY_CURRENT_USER\Software\<your name here>\Mineways", or delete the Mineways directory there altogether.
Double-click the mineways.exe to run the program.
Opening Worlds and Schematics
There are many ways to open a Minecraft world or schematic file in Mineways. If one doesn't work for you, try the next.
File | Open World: In the "File" menu header there is "Open World". Click (or hover) and move to the right to select your world. These are the worlds in your "%appdata%\.minecraft\saves" directory. The worlds are listed by their (not necessarily unique) given names on the left, their folder on the right, and arranged alphabetically by these folders. If you want to specify a different directory for where your world saves are located, use the "-s" option on the command line on startup; see the command line options.
If you want to export some particular block, use File | Open and select the "[Block Test World]" - this is an internally-generated "world" of blocks, with each block type listed from west to east in block ID order (for 1.12 and earlier; for 1.13 on I've assigned values greater than 255 in a somewhat sensible fashion), and with variants shown from north to south by their data values. To select a single block, find it, right-click it, then hit "[" to move the bottom level up by one, thus selecting only the block itself and not the surrounding grass.
Here's a view of a small portion of [Block Test World] exported to OBJ and rendered with Cinema 4D:
If you can't find your world in the list, you can select "Find your world..." at the bottom, which is the same as doing...
File | Open...: This option is for opening schematic files and worlds. Navigate to wherever your schematic or world is stored and select the level.dat file. On Windows, the default folder for world save files is "%appdata%\.minecraft\saves"; for Mac it's "~/Library/Application Support/minecraft/saves/". Worth saying again: you can also load a world by dragging and dropping its level.dat file on to Mineways. Another pro tip: if you save or rename your schematic file to have the world "repeat" in it, e.g., rename "eiffel.schematic" to "eiffelRepeat.schematic", the schematic will load and be repeated across the map, with a minimum one block gap between each model. This can be useful if you want to create a single 3D print file that has multiple copies of the model. Also, for schematics, only, Control-A will select the whole schematic model.
NOTE: the new schematic file format introduced by FAWE for 1.13 data is currently not supported in Mineways. See this issue report for more information; short version: save the schematic to a world using WorldEdit or similar, since Mineways can read worlds.
File | Import Settings: If you've previously exported a model from your world or schematic, you can select this data file (.OBJ, .WRL, or for STL export, the .TXT file generated) with Import Settings. Doing so will not only open your world, but will also set all the previous export settings you used to make this export file, including the color scheme and the terrain file chosen. Alternately, you can simply drag and drop one of these files on to Mineways to load it.
When you import a file's settings, the settings affect only the particular file type. For example, if you read in a WRL file for 3D printing, its settings will not affect OBJ rendering export (or even OBJ 3D printing export, for export settings specific to OBJ files, such as material output). This feature is backward compatible to Mineways 2.0, though features added since then will be given default values. The two exceptions are that the "Create a ZIP" and "create files themselves" export settings are not changed when settings are imported.
One other extremely useful type of file that Import Settings can read in is a script file. You can create script files to automatically perform all sorts of operations, including special ways of modifying blocks during export. See the scripting documentation for more information.
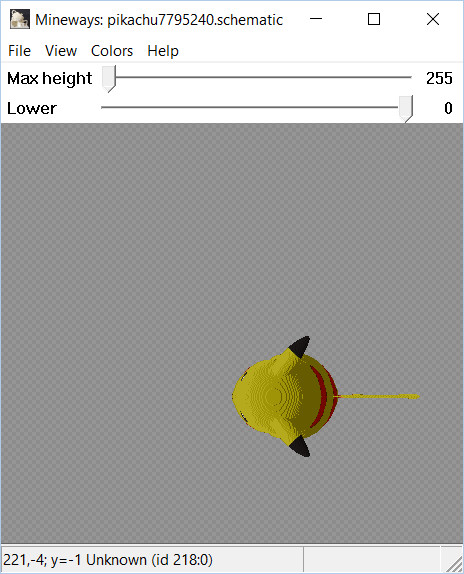
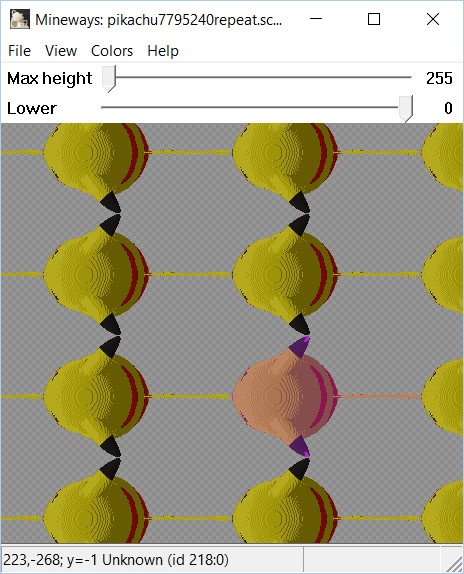
The first image is a schematic pikachu7795240.schematic loaded via "File | Open..." In the second the schematic is renamed pikachu7795240repeat.schematic and loaded. The word "repeat" in the file name tips off Mineways to repeat the object. Also, I typed Control-A to select a single copy of the schematic.
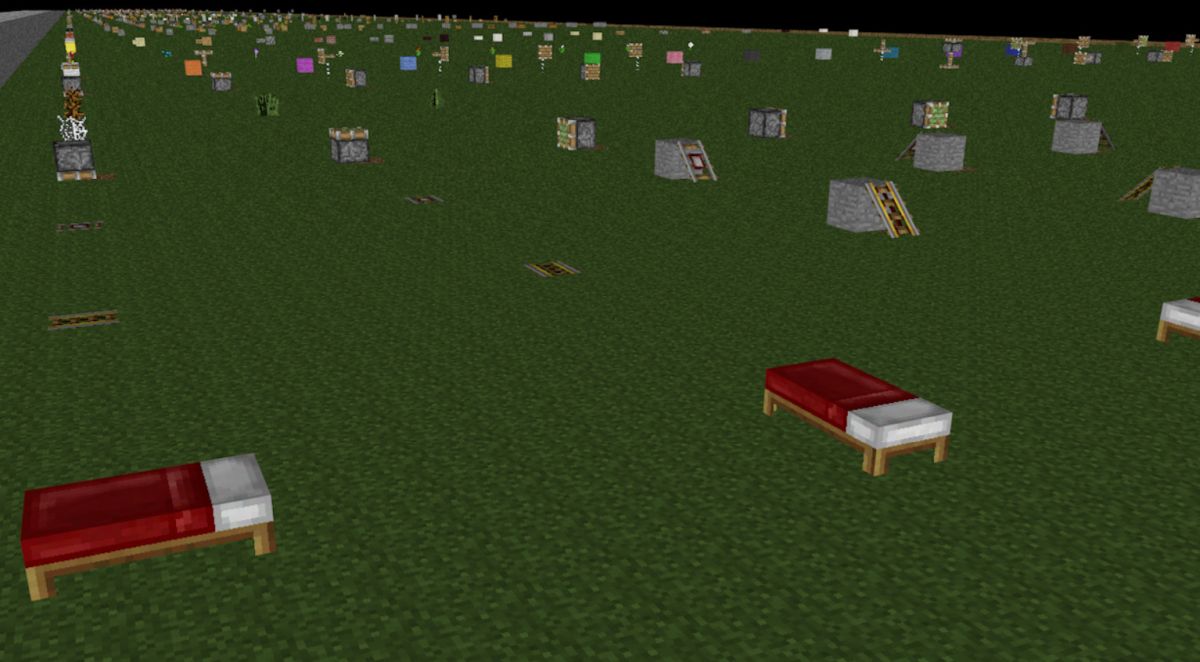
Here is a 3x3 set of objects output and viewed with G3D:

Mapping
Here's basic map use:
- Press F3 to take you to your (single player) player's location.
- Scroll around by dragging with the left mouse button, WASD keys, or arrow keys.
- Zoom in on an area by the mouse scroll wheel, Page Up/Page Down keys, or Q/E keys.
- Mouse over a block and look at the bottom of the screen to see its location and ID. (Note that a coordinate like "-76" means "-75 to -76"; "4" means "4 to 5"). "Y" is the height.
- Use the slider at the top of the window to slice away all blocks above the given altitude.
- You can play Minecraft while using Mineways. In Mineways press the "r" key to load your world again, showing whatever changes you made.
- Search the menu for other options. Some quick notes on these less-descriptive options:
- The "hide obscured" option removes all blocks above the first air found in caves, making it easier to see the caves themselves. This option is turned on when first viewing the Nether.
Selecting a Region
To create a 3D file for viewing or printing you first select a 3D box in your world. Whatever is in this box is exported. Hold down the right mouse button (or left mouse and Control key) and drag to define a selection area. Key tip: once a region is defined, you can then use the right mouse button to select an edge or corner and drag to fine-tune the rectangle. Hit the space bar to automatically adjust the depth to something reasonable, if need be. Pro users: Using the mousewheel with the Control key down changes the depth; using it with Shift down changes the visible height (this second mode can be slow, since the map is regenerated).
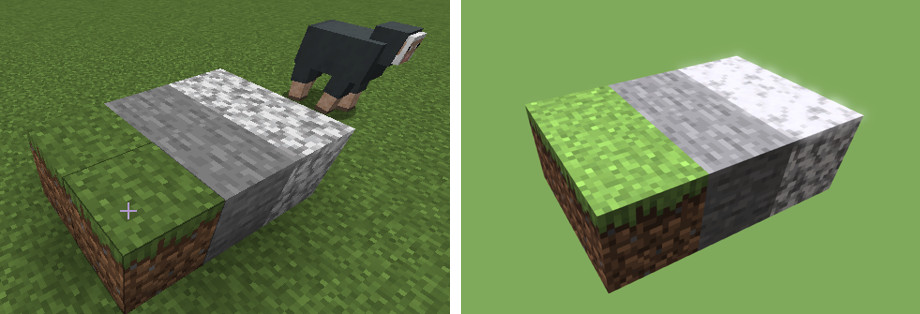
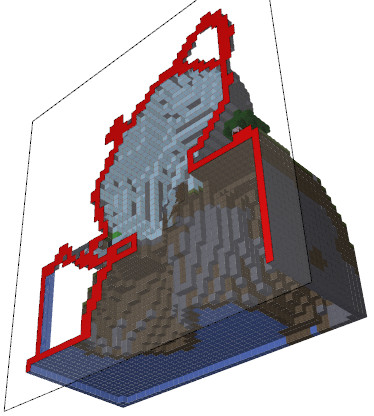
Once you make a selection, you may get a dialog as shown below. Mineways will detect when what you see is not what you'll get. It will ask if you want to set the depth so that everything you can see from above that you have selected will be exported.
Example Region Selection:
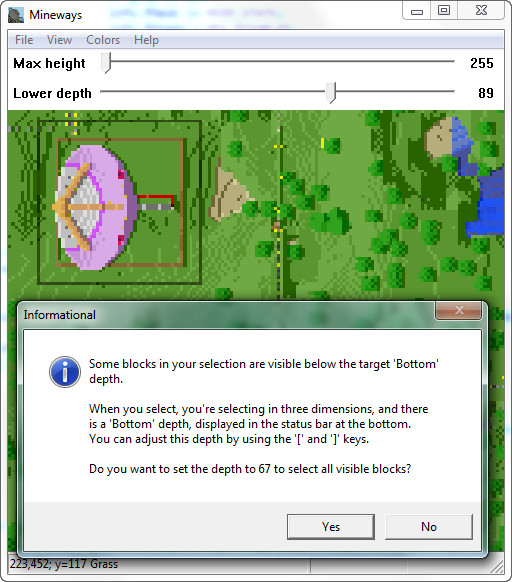 At first, the selected area excludes some terrain visible from above, as the current depth is too high.
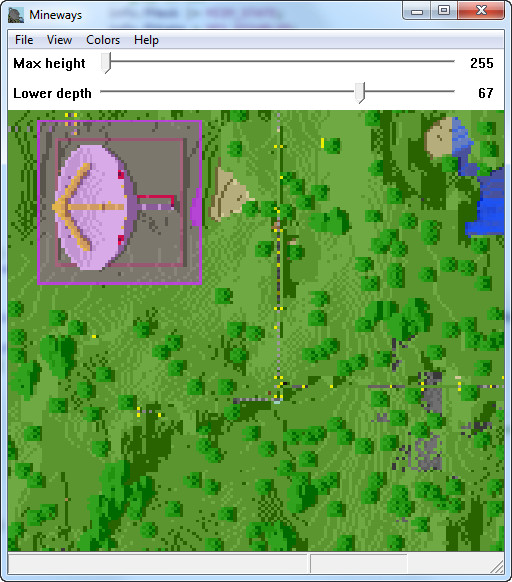
Choosing "yes" lowers this depth and adjusts the slider
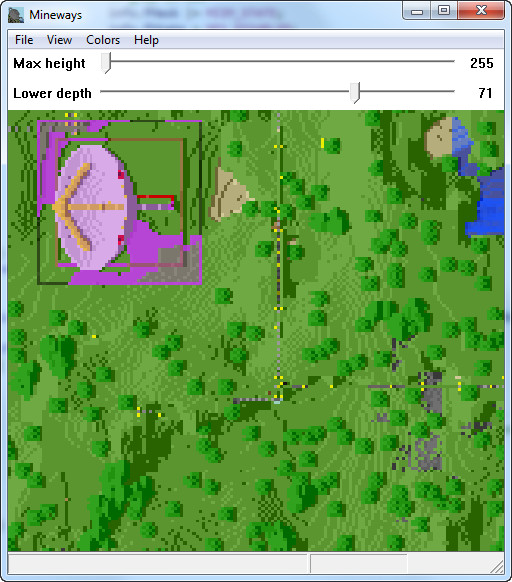
Note that sometimes the adjusted depth becomes too low, for example when the selection includes a deep hole. In photo above, the depth has been increased to the point where some terrain is now unselected. Bright pink shows terrain exactly at this depth.
By default, the heights used for the rectangular block are from y=63 (sea level) to y=255. The upper slider determines the visibility height, but usually you'll leave this one alone. You'll normally use it for viewing or selecting areas fully underground or in the Nether (or poking around your map to look for diamonds and other hidden treasures).
The selected export depth can be changed in a number of ways, even when no area is selected. The Depth slider is the simplest way to modify this value. If you click the middle mouse button on a location, the depth is set to its height. The [ and ] keys shift the depth by one, and so are useful for tuning. The spacebar will also select a reasonable depth for your selection volume, based on visibility (water is considered invisible, so that the bottom of lakes will be solid). Holding shift while tapping the spacebar will treat water and glass as opaque, useful for 3D printing. To micro-adjust the Height, use the < and > keys (with or without holding Shift). See the full shortcut key list for more options.
Key tip: to see what you're doing, export the model and view with a viewer. I usually work by adjusting the box size and export options in Mineways, export, then viewing the file in G3D (which reloads the viewed file when you tap the "r" key) or, for .WRL files, MeshLab (unfortunately, their Alt-R reload doesn't clear out the previously-loaded file) to see the results.
Exporting Models and Maps
If you want to render the model, select "Export for Rendering" from the File menu, or use Control-R, and save your file. The resulting file(s) can then be imported into a huge variety of 3D modelers and viewers, e.g., Blender. See this section for instructions for various popular modelers.
You can select "Export Model for 3D Printing", Control-P, to create a model suitable for sending to a 3D printer. Even if you don't have a 3D printer, you can still get it printed, usually for a reasonable price. See the next section for how to get going.
The big difference between rendering and printing is that 3D print models must be solid and well-formed. Currently Mineways treats all blocks as solid, full blocks: half-steps or stairs are treated as blocks, as is every other block. There is also no transparency for the materials, since printers do not currently support this type of creation. Models for rendering can, when full texturing is on, include billboard models for flowers, saplings, crops, and other elements. Note that the billboard locations are added in comments to the output .OBJ and .WRL files. In this way, a dedicated modeler could substitute his own elaborate grass, flower, or other models in place of the simple billboards Minecraft provides.
To make your model immediately viewable on the web in 3D, choose the third option "Publish to Sketchfab." Mineways directly uploads your model to the Sketchfab site and makes it displayable to everyone. It's fun and easy, honestly. Go here for detailed instructions.
The next option is "Export Schematic", which allows you to then import your model to another world by using WorldEdit or MCEdit. Note that Mineways can read any old-style schematic file by using "File | Open...".
Schematic files are commonly used to share constructions among builders. Tools such as WorldEdit or MCEdit can be used to import them into other worlds, make duplicates, and many other operations. You can also upload and share these files on sites such as Planet Minecraft. Signs will not have text, chests will lose their contents, objects such as paintings are not exported, and heads are turned into pumpkins. Currently no export options beyond the dimensions and the rotation angle affect schematic export in Mineways, and the rotation angle only partially works, mostly for full blocks that do not have any orientation. In other words, the orientation angle will rotate the model as a whole, but each individual block will not be rotated: stair steps and signs will still go the old direction, rails get "interesting," and so on. I'd avoid it... Also, 1.13 and newer elements will export as grass blocks and a warning is issued, since the standard schematic format does not support these.
"Export Map" is simple: whatever area you have selected is exported to a PNG-format image file, named as you wish. The zoom level affects the result, though will differ slightly from what you see on the screen for boring reasons. While you can manually export any portion of the map manually, the real power is from using scripting. You can make a simple text file to specify more than one map. Each map can be set to display a different part of your world, or even a different layer, by adjusting the maximum Y height. See (and run) the sample file "scripting/make_map_tiles.mwscript" for an example that creates four adjacent 1000x1000 maps centered around location 0,0. If you want to edit these maps, consider using ImageMagick, which lets you perform all sorts of annotations and much more.
See the file "scripting/make_slice_maps.mwscript" for making a series of layers that you can turn into an animation. You can then make animations like this (and at a slower speed):

Out of memory?
Under "Help", the "give more export memory" frees memory as possible while exporting. This option can allow you to export a large model you normally couldn't, at the cost of slower map update and export. What it does is unloads all stored world chunks (the 16x16x256 high pieces of your world) when exporting, reloading these after export. Also, the chunks loaded get reduced in size, which can help showing large maps on extremely limited machines (such as Windows 32). If that fails, you can use scripting to export your world as separate "hunks."
Displaying with G3D
Once you have a model for rendering, you might want to preview it before importing it to 3D modeler. If you are using Wavefront OBJ files (the default), I recommend the free G3D viewer (pro tip: hold the Alt key down and use WASD to move fast in G3D). This viewer now recognizes a special tag in the OBJ's material description that makes Mineways models display with the classic blocky Minecraft look. If you use VRML or STL files, MeshLab is a fine free viewer for these other formats for 3D printing (however, it does not handle transparency and cutouts well, so is poor for viewing renderings).
Download this special version of G3D here. Unzip and run, then drop your .OBJ file on to the window to view it. Simpler yet, you can set up your Windows system to view .OBJ files with G3D when double-clicked. Just run register-G3D-viewer64-run-as-administrator.bat one time as administrator (see these instructions to learn how).
Camera controls: WASD for normal movement, ZC for up and down, QE for swivel. Hold down Shift to go more slowly, Alt to go fast. Escape to quit.
Aside from being a lovely renderer, G3D has additional features such as making a screenshot (F4) and recording a video (F6). Press F11 to see various developer features. The master G3D site is here.
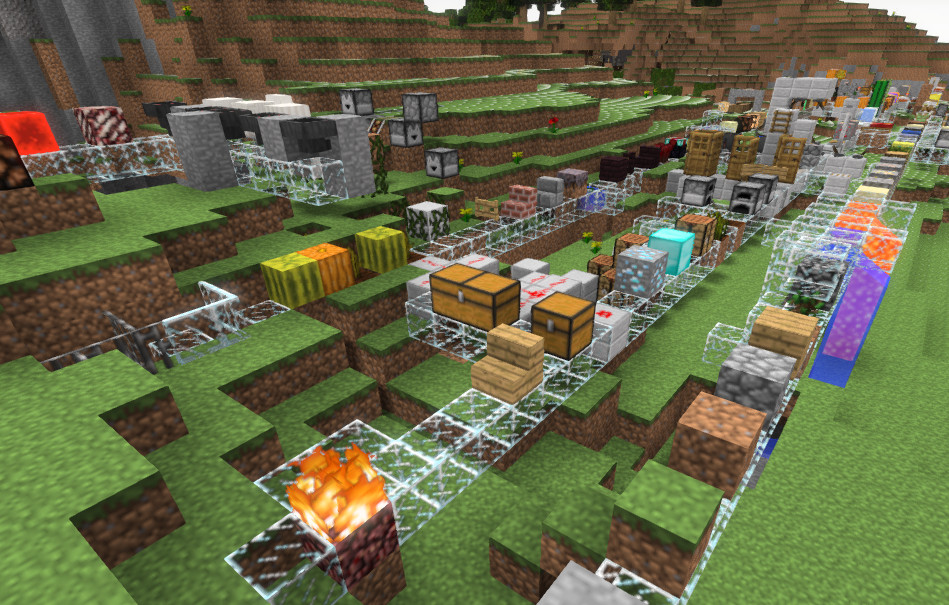
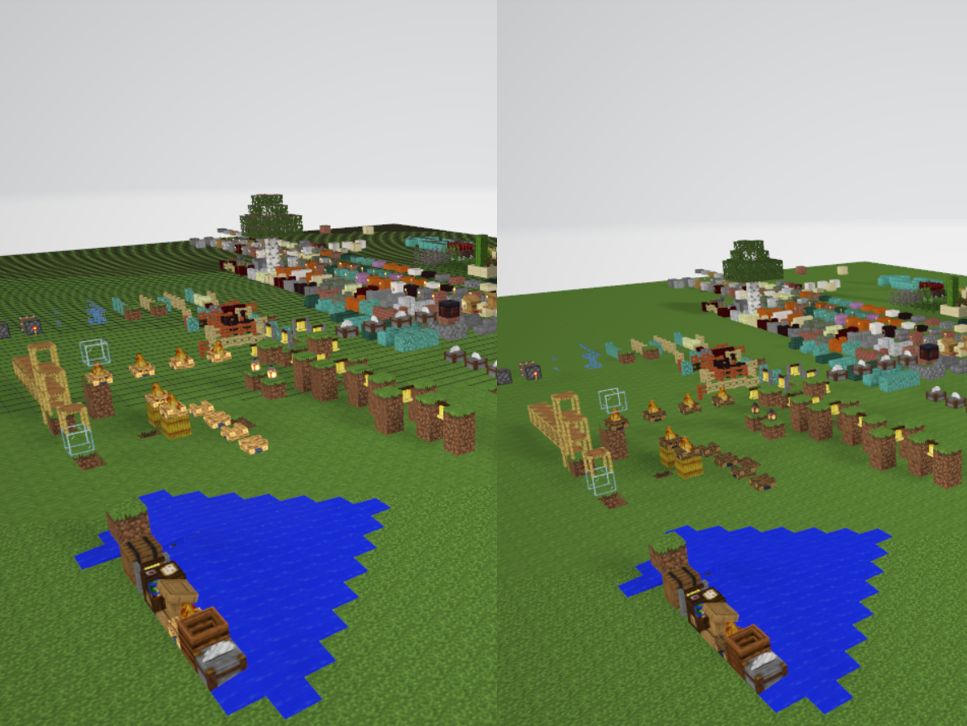
Here's an example, side to side, of a lot of the blocks in Minecraft.
G3D displaying an OBJ rendering file:
Color Schemes
Color schemes allows you to change the color for many blocks, and - extremely useful for 3D printing and some rendering applications - remove any blocks you want from view. One tip: you can eliminate all glass from your model by setting its alpha to 0 in a color scheme. This part of this video shows how to use color schemes to do this.
Note: with the new file format introduced with Minecraft 1.13, the whole "blocks from 0-255" way of listing block types is not valid for newer blocks. Mineways still uses a form of this internally, so the feature is still in place. Also, Mineways has evolved to provide colors for different colored blocks of the same type. For example, the various different wool blocks will display using their colors. Changing the color of the wool block using a color scheme will change only the white wool version of the block. Color schemes still have their uses, such as for removing some blocks from view and from export. Color schemes use my internal block type numbering system for blocks from 1.13 on. If you get flaky problems with older color schemes, at worst you can always run REGEDIT and delete the ColorSchemes directory at "Computer\HKEY_CURRENT_USER\Software\<your name here>\Mineways".
How to use a color scheme: From the menu, Add a new color scheme, then Edit it. Change the name "Color Scheme" at the top of the dialog that pops up to something useful, then select any block type to edit it. Color is given in hexadecimal color format. You can use MWSnap (old but free), FastStone Capture (new but costs $20), or other programs to find the hexadecimal (e.g., #787878) color value of any pixel on your screen. 'Alpha' says how opaque a block will appear on the screen, with 255 meaning fully opaque and 0 meaning fully transparent (invisible). Blocks with an alpha of 0 will be deleted when exporting. You can turn off export of all blocks by using the "Hide All Blocks" button. This feature allows you to create separate parts, e.g., a glass roof could be created by then turning on just glass export. The "Hide Tree Blocks" hides all log and leaf blocks, making printing of 3D terrain simpler (trees are sometimes hard to print well).
Changing the color will affect the 3D print model's color for only the "solid material colors" and "richer color textures" export modes; "full color texture patterns" (the default on the export dialog) will not be affected (except water, a little bit). To change full color textures' colors, you need to edit the input terrainExt.png itself. See Creating Your Own Terrain Files.
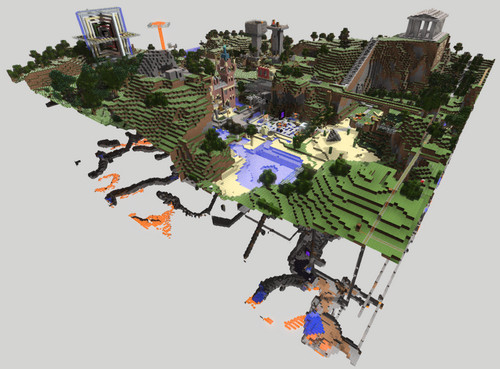
"My Model's Too Expensive!"
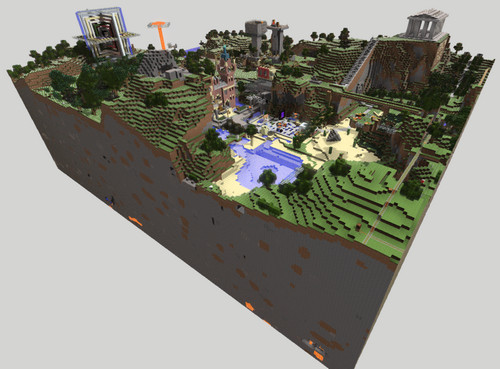
If you export to 3D print and upload to Shapeways, you might be surprised to find that the price is sometimes just shy of a used car. For example, this model of our spawn area is 15 x 9.8 inches in size (about 190 x 125 blocks, 2 mm wide), and costs $633.14. Expensive models happen because either the model is too small, or too large. The problem with models with only a few blocks in them is that you'll then scale it up to see it: each block itself is then massive. You have to pay for each block's volume. Mineways can't help you much there, you'll need to use a CAD program to hollow out your object manually. Shapeways has a tutorial on hollowing.
The more common problem you can hit is the blocks are not small enough. This happens with larger models, those 100+ hour darlings you sweated over in Minecraft. The cause is that, by default, Mineways exports the model to print at a safe size. Colored sandstone has a thin wall dimension of 2 millimeters. This means if some wall in your model is less than 2 mm thick, it is in danger of breaking into pieces if printed in color.
Rule of thumb: colored sandstone has a cost of $6 for every thousand blocks printed at the default 2 mm/block. There's a fixed cost of $3 per model, and $6.50 shipping. For example, if you want to spend $50, at this scale your model can have about 6750 blocks, after subtracting the fixed costs.
There are some solutions to the price problem:
- Switch to the white and flexible physical material. Choose this material in the options dialog on export and the thin wall minimum drops to 0.7 mm. This brings the price (and size) of your model down, from about $6.00 per thousand blocks to $0.48 per thousand. You do lose color printout, but can paint the model yourself. Your model should print safely.
- Print it smaller and cross your fingers. Change "Make each block 2 mm high" to "Make each block 1 mm high", for example: at 1 mm/block, you can print 8 times as many blocks as 2 mm/block: $0.75 per thousand blocks. I like this scale a lot, it's cute. Two examples: World in a Bowl and Sentinel Castle. If you don't have any tree trunks (which at 1 mm will snap right off), thin walls, or other filigree, the model should be fine. You can remove trees from your model by using a color scheme that makes leaves and logs invisible. See this video, which shows how to make glass blocks invisible; just do the same with logs and leaves. At worst, at 1 mm other little bits might break off. Companion cubes will print with no problems, models of ships with thin masts and lanyards are much less likely to survive. Keep going smaller until you like the price, or simpler yet, just choose the scaling option "Aim for a cost of $25.00" or whatever you want. Note that Shapeways itself might refuse to print your model if they believe some parts are too thin to support the structure; here's an example where Shapeways decided the support struts were not thick enough.
- Learn more about the options below. Proper use of "fill bubbles" and "super-hollow" can easily combine to reduce your costs by 2/3rds. "Seal off entrances" and "Fill in isolated tunnels" can also help. These options are extremely useful for going to a smaller scale but still having thick enough walls. The strategy I like is to have the interior of the building get filled with blocks by using "fill bubbles" and then have "super-hollow" remove most of these blocks, leaving a shell that's thick enough to print. Long and short, don't print what you can't see.
By the way, I hear "it would be cheaper using LEGOs" a fair bit. LEGO blocks cost around 4-5 cents a block, 2 mm colored sandstone 3D printed blocks run about 6/10th of a cent. There are advantages to LEGOs (larger, reusable, fun to make) and disadvantages (no textures, not perfect cubes), but LEGO cost is not an advantage.
By default, Wavefront OBJ *.obj (and *.mtl) files are exported for rendering, VRML97 (aka VRML2) for 3D printing. Here's the rundown of the various file types you can select, including some subtleties about each. If you want to export to the glTF format, one indirect way is to upload to Sketchfab, make the model downloadable, then download from there.
OBJ, absolute: Wavefront OBJ is an old format, so is commonly supported as an import format for a huge range of applications. If you export materials, a corresponding *.mtl file is output; if you export textures, one or more *.png files are also created. The .obj and .mtl files are text files, so can be edited or processed further. By selecting "absolute" for the OBJ file, indices are absolute (positive), the norm. This is the format to use for export for upload to Sculpteo. See other export choices in the OBJ file export options documentation.
OBJ, relative: relative indices are used on faces. These allow you to concatenate two or more OBJ files into a single OBJ file.
Binary STL: This file format is commonly used by 3D printers. It normally is used for single-color materials, but the exporter will use either the Materialise Magics or VisCAM format to attach colors to triangles - see this article. I recommend using VisCAM's variant, as MeshLab will then display the proper model colors. When STL files, binary or ASCII, are exported a corresponding *.txt file is generated with information about the model. This same data is included in the beginning of the *.obj and *.wrl files themselves. This text file can be read back into Mineways using "Import Settings" to set everything back the way it was set before.
ASCII text STL: A variant for 3D printers, the file generated is considerably larger than the binary form and cannot include color. The main advantage is that this file type is a simple text file and so can be easily edited. The format is trivial and so can provide a raw set of triangles for a model.
VRML97: Also known as VRML2 or VRML 2.0. While this format has been superseded by X3D, it is commonly supported by a wide range of packages. That said, its main reason for existence here is that it's the only file format that Shapeways uses for colored models. The *.wrl and *.png file created are put into a zip file and uploaded to Shapeways for printing - see more about this process below. The VRML file produced is tailored toward making a single texture for printing. Note: Shapeways will properly preview all VRML output modes other than "solid material colors", where it has a limit of 16 different colors. These colored models will print fine, however. VRML97: Also known as VRML2 or VRML 2.0. While this format has been superseded by X3D, it is commonly supported by a wide range of packages. That said, its main reason for existence here is that it's the only file format that Shapeways uses for colored models. The *.wrl and *.png file created are put into a zip file and uploaded to Shapeways for printing - see more about this process below. The VRML file produced is tailored toward making a single texture for printing. Note: Shapeways will properly preview all VRML output modes other than "solid material colors", where it has a limit of 16 different colors. These colored models will print fine, however.
Export options
There is a bewildering dialog that pops up on export, with a ton of options. You can blithely ignore this dialog and always just click OK (or the Enter key). However, some of the options are extremely useful, so plow on if you want to make sure your model is good enough, smart enough, and gosh darn it people will like it.
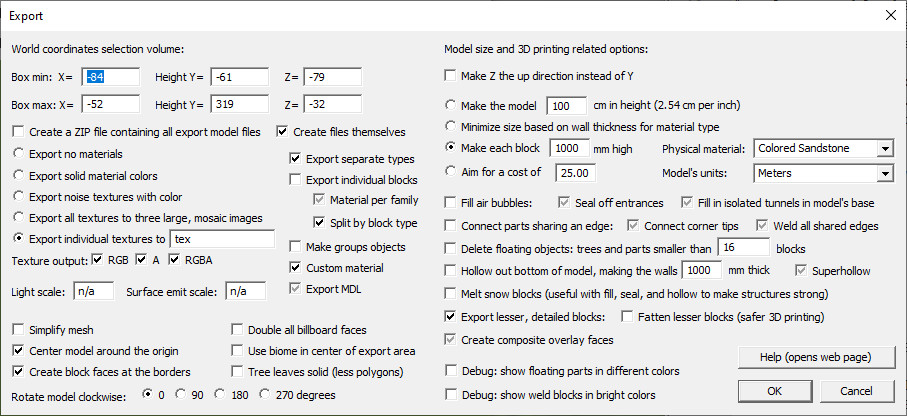
World coordinates selection: you can see and change the 3D volume of space to export from your world. If you want to know the location of a place in your world, use the F3 key when playing Minecraft. Note that negative values like -5.239 will round down to -6. Also note that your Y-value altitude is one higher than where your feet are located, and so two higher than the ground beneath you.
Key tip: If you exported a model in an earlier session and want to use the same settings for another export, read the model file (.OBJ, .WRL, or for STL the .TXT file) with the "Import Settings" command from the "File" Menu.
Create a ZIP: like it says, when exporting for 3D printing a ZIP file of the exported files is created, ready for upload for 3D printing at Shapeways or other service.
Create files themselves: the exported files themselves are also made available for previewing. By default, this option is off for VRML 3D printing, on for everything else. This is done because too often the .wrl file got uploaded to Shapeways; you must upload the .zip file.
Material Export
Remember that for any format you can turn off a block from being output (and being visible) by setting its alpha to zero in your own color scheme.
On the left of the dialog are texture options:
- "Export no materials" option is just that.
- "Export solid material colors" will give solid swatches of color for each material. The color scheme's colors controls these.
- "Export noise textures with color" gives textures that have some noise in them. For the OBJ file format the difference is that a PNG texture file is output; VRML97 always exports a texture for any material option. The color scheme's colors controls these. Rarely used or useful, but gives a different look.
- "Export all textures to three large images" creates three large images - RGB/A/RGBA - of all possible textures needed - see additional note following this list. This option requires the terrainExt.png file, reading this file to create full textures for each block, as possible. The color scheme affects only the water color: the higher the alpha set, the more of the base color you define is combined with the water texture. So, for a deeper blue, you can define the two water colors (note there's a "stationary water") as dark blue or even black and a high alpha, e.g., 200.
- "Export individual textures to" can be used only when exporting OBJ and USDA files for rendering. It is like "Export all textures to three large images," above, except that instead of exporting the three RGB/A/RGBA textures, single images are exported for the block faces, by default to a subdirectory "textures". This option creates many more textures, but can be considerably faster since not all textures are exported. These textures are similar to Minecraft's block textures, though possibly modified to improve how alpha cutouts look. This mode allows you to later modify and swap individual textures in other applications such as Blender. It also is a better option for exporting high resolution texture resource packs (where the block faces are 256x256 or larger), as having a single, large texture (as generated by the other options above) can be too large for systems such as Blender. Since each texture is separate, mipmapping works correctly for distant blocks. Various options are ignored in this mode, such as the various OBJ grouping and material options and the composite overlay faces checkbox. Note that if you want to manually upload an OBJ with separate image textures, Sketchfab has a 100 texture image upload limit (and you may need to uncomment "map_d" in the materials file). Finally, if you make a zip and do not check "create files themselves," the PNG texture files will not be deleted, since they may be shared by other exports.
Content is shown on the left exported with "all textures to three large images" and on the right with "individual textures." Mipmapping works properly with individual textures.
Texture Output
If you "Export all textures to three large images", by default there are three types of files that can be output to PNG files, as needed. "RGB" is a colors-only file, "RGBA" is colors and transparency, "A" is just the transparency values. For 3D printing, only the RGB file is exported. For rendering export, if any blocks needing transparency are found in your model, then the "RGBA" and "A" files are also exported. Most rendering systems need only one or two of these file types, not all three. You can turn off output of any of these file types by unchecking the corresponding box.
The "texture output" export option can save you much time if you are exporting again and again while using a large custom terrainExt file (see the next paragraph for what that is). You can export your model once with textures on, then modify your export and, by exporting to the same file name, you don't need to export the textures again. For the "individual textures" option, you need to uncheck all boxes to turn off texture creation and export - any one box checked means all textures will be output.
The other major option for texture export is "Export individual textures", just below the "full color texture patterns" option on the export dialog. As noted in the previous section, this exports a texture for every block face used in the mesh produced. The "texture export" checkboxes below can also be used to suppress textures when using it. All three checkboxes must be unchecked to stop texture export for this option. Also, since the "export individual" method truly exports only those textures needed, if you change the boundaries of your export, you may expose new blocks but won't export their textures if you turn off texture output (in other words, suppressing texture export is then not a good idea). That said, used properly, turning off texture output can save you time each time you export a model.
Custom Terrain
The one file you may want to change is the terrainExt.png file that comes with Mineways. To select a different terrainExt.png file, use the "Choose Terrain File" under the File menu. You can also simply drag and drop a terrainExt*.PNG file on to Mineways. In either case, at the very top of the Mineways program you'll see what terrain file is active, right after the name of the world you've opened. Mineways supports a number of premade terrainExt.png files for you to try. Visit the Textures page for previews and download links for terrain files not included in the Mineways distribution.
If you have a terrain png file you would always like to use by default, copy it into the directory where mineways.exe is located and call it terrainExt.png, replacing the one that is there. For example, if you always want to use terrainExt_Smoolistic.png, delete (or, better, rename) terrainExt.png, then copy terrainExt_Smoolistic.png to terrainExt.png. If you know how to use the command line, you can also use a command line option to specify the terrain file to use on startup, e.g., "mineways.exe -t terrainExt_Smoolistic.png". Better still, you could make a batch file called, say, "my_mineways.bat" that contains the single line "mineways.exe -t terrainExt_Smoolistic.png" and double-click that to start up using your preferred terrain file. Yet another way is to use a Mineways script to change the terrain file. This is handy for exporting the same model multiple times, each time with a different terrain file applied.
For a more thorough explanation of textures and how they're used in Mineways, read the Textures page. To make terrainExt.png files yourself, see Creating Your Own Terrain Files.
3D Printing: The effective 3D print resolution of textures appears to be around maybe 10x10 for the default output block size of 2 mm/block. Fine details are unlikely to be visible, though sometimes I'm surprised to see them.
Click on an image for higher resolution versions.
 This model was made using Glimmar's Steampunk terrainExt.png and printed at 2 mm/block. It appears that the glass cube grillwork texture has some synchronization problem with the printer, causing the pattern to sometimes print out incorrectly.
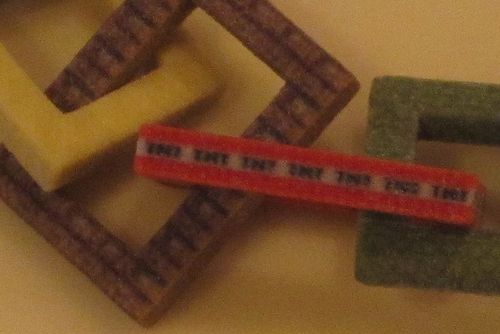
This model is printed at 3 mm/block and shows the original 16x16 TNT texture; however, at both ends the fidelity becomes poor.

This model, from Alexander Boden, is a 5 mm/block print which clearly shows details such as cobblestone and tree bark.
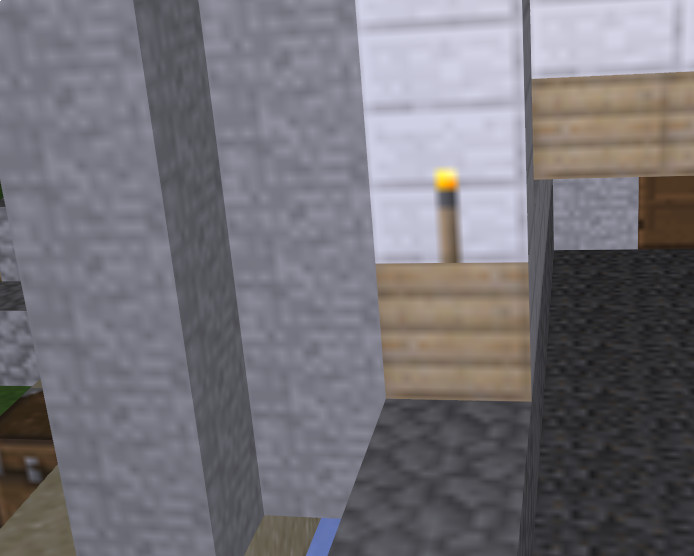
Blurry Textures
If your rendering software doesn't show the distinctive blocky style of Minecraft, you can fix this in two ways. The first is to set texture sampling in your renderer to be "closest" or "nearest neighbor." This is the best solution. See the instructions for the various renderers for more information. The other option is to use higher-resolution textures, which will simulate turning bilinear interpolation off.
On the left, the basic 256 x 544 terrainExt.png file is used; on the right, the input terrainExt.png image is resized (without filtering) to 1024 texels wide. You can download high-resolution versions of terrainExt.png: 1024 wide and 8192 wide. In Mineways do "File | Choose Terrain File" and select either; the higher-resolution version gives sharper results, at the cost of memory.

You can also interactively compare these sampling methods here vs. here.
These textures are for the default Minecraft appearance. To avoid blur for your own terrainExt.png file, resize it to be say 4x larger in both directions. You can use the TileMaker program included with Mineways (use the "-t tileSize" option), or any other image manipulation program (I'd use "nearest neighbor", if possible - IrfanView has this option when resizing a texture by doing "Size method: Resize"). Note: from experimentation, this higher resolution does not improve the clarity of 3D texture printing.
There is a case where you'll want your textures to be blurry: when they're far in the distance. Usually mipmapping is done by a renderer to make this happen. The Minecraft block textures are normally put in one large texture and each is given a border 1 pixel wide. This border avoids bilinear interpolation artifacts. However, mipmapping for extremely far blocks will not work well, since block textures are next to each other in this big texture. The solution is to either "Export individual textures" (where each block face is exported to its own texture), or disable mipmapping for rendering and live with the artifacts (other sampling techniques should work fine).
Wavefront OBJ File Export Options
If you find you want your model data to be arranged a bit differently for your rendering system, there are a bunch of options. These vary how Minecraft blocks are grouped and how materials are shared among different block types. Every rendering system imports OBJ files differently, so try different combinations and see what you prefer. Most of these options do not affect display. These options are mostly for determining how much control you have over modifying materials and moving blocks around.
Wavefront OBJ has two concepts when it comes to polygon faces: named objects and named groups. In Mineways there can be one or more objects in a scene, each object can have zero, one, or more groups inside of it. Normally there is just one object exported; the "Make groups objects" creates a separate object which then contains a corresponding group.
Mineways has (rough) "block families." For example, the Stone family has stone, granite, polished granite, diorite, and so on. Each block in this family has a separate "type." Materials can be output by one per family or one per type.
Any number of polygons can be in an object or group. There is also a set of materials (defined in the .mtl file). One and only one material is applied to each polygon.
- Export separate types: on by default, this option says each type of block - stone, logs, fences, and so on - are put in a separate group. Turning this option off means no groups are created, which can be useful for simplifying import into rendering packages but can make editing more difficult. This option does not affect how many materials are generated.
- Export individual blocks: This option is mutually exclusive with the previous option, "Export separate types." Normally Mineways exports only those faces that are visible. By checking this box, all of every block's faces are output, allowing you to animate such operations as mining or explosions. This considerably increases file size and render time, so use it only if you need it. You may also want to check the Make groups objects option, e.g., for Blender export, as each group will then be a separate object you can manipulate. For Blender you'll also want to make sure "Material per family" is checked. Note that the individual blocks option will change the appearance of some blocks, such as water and glass blocks, as all faces now have sides, which are visible. Normally Minecraft removes these interior sides (e.g., where two glass blocks share a face), but this option makes them visible. This option works for OBJ and USD export. With USD export, two additional USD files are produced, "*_BlockLibrary.usda" and "*_MaterialLibrary.usda".
- Material per family: on by default; blocks in a family (or type; see next option) have their own material. If turned off, a single material is used for all objects. When exporting individual blocks, this checkbox affects whether each block is in its own group (making it easier to edit: move, delete, etc.) or whether individual blocks are grouped by material.
- Split by block type: Blocks have a family and a type. When checked (the default), the individual types are used for grouping and materials. If you find you are editing too many materials, turn it off and materials will be exported per family. You can see many of the families on this page, e.g., Stone, Granite, Polished Granite..., through Polished Andesite are a family. New materials are limited to those where there's a physical difference in the material itself, not just geometric changes. For example, a cake being sliced will not give it a separate material and group. Crops are given separate materials for each growth level, and farmland for each wetness level. Redstone wire is given separate materials for its 16 levels of power, even though Mineways itself differentiates only between off and on states. Campfires, sea pickles, and respawn anchors will be given separate emission levels when this box is checked; else the maximum light level is assumed.
Confused yet? There are non-obvious interactions among the various settings. A table follows, describing the results when using this 2x3 set of blocks - two grass blocks, two stone, two diorite - as the exported volume. Recall that diorite is part of the stone family.
| Export separate types | Export individual blocks | Material per family | Split by block type | Effect on objects | Material library produced |
| SELECTED | unchecked | SELECTED | unchecked | Default for rendering: Polygons are grouped by block family. Result is one Grass_Block group using the Grass_Block material applied to 8 block faces (the visible faces of the two grass blocks) and one Stone group using the Stone material applied to 14 faces (the visible faces of the four stone-related blocks). | Each block family has a separate material. Result is two materials, Grass_Block and Stone. |
| SELECTED | unchecked | SELECTED | SELECTED | Polygons are grouped by block type. Result is one Grass_Block group using the Grass_Block material applied to the 8 visible block faces, one Stone group using the Stone material applied to the 6 visible faces, and one Diorite group using the Diorite material applied to its 8 visible block faces. | Each block type has a separate material. Result is three materials, Grass_Block, Stone, and Diorite. |
| SELECTED | unchecked | unchecked | unchecked | Polygons are grouped by block family. Result is one Grass_Block group with 8 visible block faces and one Stone group with 14 visible faces. | Single material. A default MC_material is created and applied to all polygons. |
| SELECTED | unchecked | unchecked | SELECTED | Polygons are grouped by block type. Result is one Grass_Block group with 8 visible block faces, one Stone group with 6 visible faces, and one Diorite group with 8 visible block faces. | Single material. A default MC_material is created and applied to all polygons. |
| unchecked | unchecked | (grayed out) | (grayed out) | Default for 3D printing: No groups are created at all. Result is 22 visible block faces. | Single material. A default MC_material is created and applied to all polygons. |
| unchecked | SELECTED | SELECTED | unchecked | Each individual block is in its own group. Result is 6 block faces in each of six groups (the six blocks): block_00001, block_00002, etc. The related material family, Grass_Block or Stone, is assigned to each block in turn. | Each block family has a separate material. Result is two materials, Grass_Block and Stone. |
| unchecked | SELECTED | SELECTED | SELECTED | Each individual block is in its own group. Result is 6 block faces in each of six (block) groups: block_00001, block_00002, etc. The related material type, Grass_Block, Stone, or Diorite, is assigned to each block in turn. | Each block type has a separate material. Result is three materials, Grass_Block, Stone, and Diorite. |
| unchecked | SELECTED | unchecked | unchecked | Individual blocks are output, but grouped by block family. Result is one Grass_Block group using the Grass_Block material applied to two blocks' 12 block faces and one Stone group using the Stone material applied to four blocks' 24 faces. | Each block family has a separate material. Result is two materials, Grass_Block and Stone. |
| unchecked | SELECTED | unchecked | SELECTED | Individual blocks are output, but grouped by block type. Result is one Grass_Block group using the Grass_Block material applied to two blocks' 12 block faces, one Stone group using the Stone material applied to two blocks' 12 faces, and one Diorite group using the Diorite material applied to two blocks' 12 block faces. | Each block type has a separate material. Result is three materials, Grass_Block, Stone, and Diorite. |
When exporting individual textures these settings have slightly different meanings, because separate materials are created depending on the texture needed, not the Minecraft block family or type. "Export individual blocks" then means that "Split by block type" has no effect, since materials are set as needed. Similarly, if neither "Export separate types" nor "Export individual blocks" is on, materials are output as needed, since there can be no "single material for all" with "individual textures." Long and short: try various options out and see what they do.
Make groups objects: By default, the OBJ file produced has just one object, consisting of everything exported. If you want to make each group into its own separate object, which can be useful if you are trying to export individual blocks and animate them in the scene, check this box. This is useful in Blender, for example.
Custom material
Checking this box causes a more elaborate illumination model to be output. By default it is checked, so that a more elaborate material model is used. Specifically, the parameters Ns, Ka, map_Ka, illum, and Tf are set. Also, a special mode is exported for use by G3D: "interpolateMode NEAREST_MAGNIFICATION_TRILINEAR_MIPMAP_MINIFICATION". This hints to G3D to make the textures look blocky, giving the classic Minecraft look. This line should not hurt OBJ readers, which should simply ignore it (or possibly flag a warning).
If you are using a physically based terrain set, the custom material will also include additional channels of information, such as textures for normal maps, shininess power, metallic, and emission textures. These attempt to follow this proposed specification, also documented here. An example:
- map_Kn textures_jgrtx/nether_portal_n.png - the RGB normals map (not a heightmap, so "bump" or "norm" is not used)
- map_Pm textures_jgrtx/nether_portal_m.png - the grayscale metallic texture
- map_Ke textures_jgrtx/nether_portal_e.png - the grayscale emissive intensity texture
- map_Ns textures_jgrtx/nether_portal_s.png - the grayscale specular power texture, 0-255
If you want to use the custom material description for OBJ export but do not want these additional textures to be output, simply delete or rename the images in the set that you want to remove. For example, with the terrainExt_JGRTX64*.png set of terrain files, removing terrainExt_JGRTX64_e.png means no grayscale intensity emissive textures will be output. You may also find that the corresponding color texture is a better choice for the emissive texture in particular, if supported - this is true for the G3D viewer. Currently Mineways has no switch to use these colored textures instead. However, you can edit the MTL file produced and simply search for "_e.png" and replace with ".png" to point to the colored textures instead.
Special note: in terrain files, the one ending in "_r.png" is a roughness texture. When exported for OBJ, this texture is inverted and the exported files are named "_s.png", for "specular". This is all a bit confusing, I know, but my advice is to export using terrainExt_JGRTX64.png, for example, and see what gets created for you, with "Custom material" set or not. If you want the "r" version, you can either manually invert the _s.png images (ugh), or just do a separate USDA export, which will produce the _r.png versions.
For USDA export, the Custom material setting mainly has the effects of making the texture's texels appear blocky, in Minecraft fashion, and present stripped down materials in Omniverse Create. This is almost always a good idea, even with high resolution textures. If you turn this option off, you can get texture wrapping problems, where the bottom of a fire cutout, for example, will get interpolated along the top edge of the fire, giving a narrow line of fire at the top of the cutout.
Make Z the up direction instead of Y: some graphics applications consider the Y direction to be "up", some Z. If your model imports sideways into your application, check (or uncheck) this box.
Create Composite Overlay Faces
For 3D printing there cannot be "floating" cutout textures such as vines, ladders, rails, torches, and so on. These block types are overlaid atop the underlying block and a new "composite" texture is saved and used. This process must be done for 3D printing. For rendering it is an option. The advantage of leaving this option off is that the result more closely matches Minecraft itself, and that each object has its own material. It also means that all render files exported could use single set of PNG textures, since no composite textures are created. The main drawback of having this option off is that you may encounter z-fighting problems, stray shadows, or other artifacts in your renderings.
This option was on by default for rendering up to version 5.00 of Mineways (in truth, it could not be turned off); as of 5.01 this option is off by default.
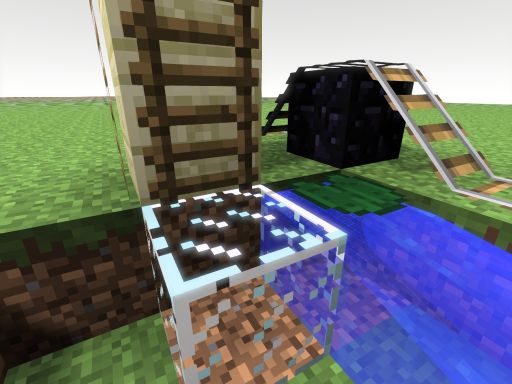 Create composite option off (the default). The ladders, rails, and lily pad float a bit above the surface.
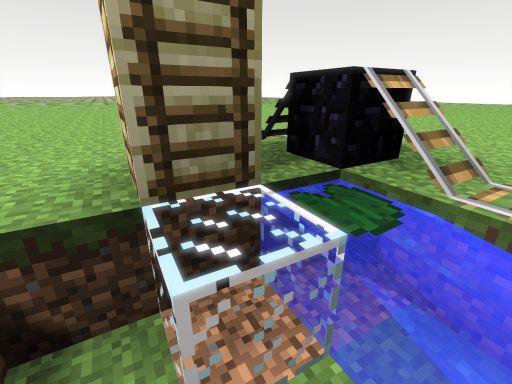 Create composite option on. Note how the ladders, rails, and lily pad are attached to the surface.
Center Model Around the Origin
When checked, the center of the bottom of the model is put at the origin, location (0,0,0). This helps for import into some renderers, and can improve the floating-point resolution of the data. If you want to instead have the same coordinate values as in your world, uncheck this box (you might also want to set the "Make each block" size to whatever you like). Unchecking this option is useful if you do multiple exports from the same world for rendering and want them to use the same coordinate space. Multiple exports are a way to get around the export size limits for the 32-bit version of Mineways, which is what runs on the Mac.
Use biome in center of export area: Instead of the default colors (seen on the Plains biome), use the grass, tree, and water colors computed by the biome in the export. Currently the biome at the center of the export is used for the whole export. It would be nice to export multiple biomes someday, but this is a complex export, as it can require many different color variants of grass and tree blocks. Show biomes (F8) to display the biomes in the map itself.
Create block faces at the borders: this option is only available for rendering, to reduce polygon count. When on, the edges of the export the model are sealed off with whatever blocks were at the borders. For 3D printing this is necessary, as the model must be a solid object. For rendering these side and bottom polygons often are not needed, as the camera is usually positioned to never view these areas of the model. Turning this option off for rendering also allows better "tiling", where you export a world piece by piece and read all the pieces in (see center model, above), as it pays more attention to neighboring blocks just outside the borders. Note: the various 3D print "fill air bubbles" methods will turn off this method (it's a bug).
In the scene below, the camera is dollied out to see the borders. The model with borders off, on the right, has about 15% less polygons in it.
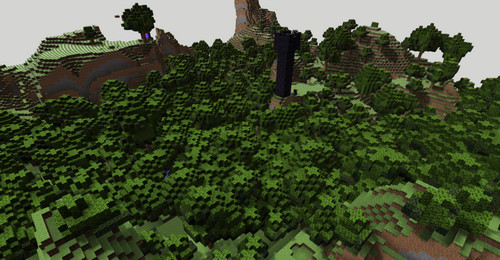
Tree Leaves Solid
This option is only available for rendering, to reduce polygon count. Tree leaves are "cutout" textures, which means that by default each leaf block is exported, along with the trunks. In forested scenes this can make for a lot of extra polygons. By checking this box, leaves are made solid with a black background, which then allows many less polygons to be generated. For example, in the scene below, rendered with G3D, the transparent leaf model has 986k triangles, the solid leaf model just 369k triangles.
![]()
The rest of the options mostly have to do with 3D printing, which follows.
Exporting to 3D print
As background, view the Shapeways 3D color printing process video. Layers of material are laid down and solidified at the appropriate spots. Unsolidified "sand" is vacuumed away. You pay by volume, not by complexity. What this means to you is: avoid making enclosed spaces with tiny entrances. Unfortunately, most buildings are just that: large rooms with small doors. Your job is to make sure your model has either no openings at all, in which case the Hollow option can clear out the inside, leaving just a shell. Alternately, make escape holes yourself using snow blocks, which you then melt after all processing of your model. I'll explain these options below.
There are other potential pitfalls with 3D printing, such as thin wall problems (more here), and too many polygons (rare for a Minecraft model), to name just two. Shapeways' tutorial pages and materials pages give you a lot to chew on, Sculpteo also has a help section. The Mineways program tries to guide you past the major pitfalls, but it's always possible to generate something that's essentially unprintable: too weak, holes too small to clear out the dust, or some other problem. Browsing the tutorials there should help you understand what is possible. Options follow.
Rotate model clockwise: Can be useful for choosing a default view angle for other programs reading in the model produced. For example, the view of the model is rendered by Shapeways from the south-south-east. So if your model faces west, you might rotate it 270 degrees to have it face south and so display better on your models page.
3D printing related options: There are four major ways to scale your model.
- Make the model #N cm high: you can specify how high you would like a model to be. This is also useful for rendering output, where the default is set to be reasonable for import into Blender.
- Minimize size based on wall thickness: if you want to make "draft" 3D print models that are as small as safely possible, check this option. That said, if you know your model has thick walls, you could make your model smaller still by using the next option.
- Make each block #N mm high: by default, the safe wall size (for a non-supporting wall) is shown here. You can make this value smaller if you are convinced that your model is thick enough to print. Mineways will issue a warning nonetheless. This option is also useful for rendering output. Note for pixel-art makers: if you export pixel art, the thickness of pixel art model is usually just one block wide. Shapeways won't print a model in colored sandstone that is less than 2 mm thick, so use the "Make each block" option and set it to 2.5 mm high.
- Aim for a cost of #N: you can ask, though the wall size needed may be too small to safely print. If you get this warning on export, you'll have to decide whether the walls appear thick enough to print. This feature is imperfect: it computes a rough cost before hollowing, so that it has a sense of how small it has to make the blocks to reach the goal. Hollowing uses this size to keep the walls thick enough to print. So, sometimes the walls are thicker than needed when the model is finally exported.
Physical material: choosing a material here from among some of the Shapeways material options sets the default wall thickness and constrains the "Aim for a cost" option. It also ensures that the price is computed for that material and output in the top of the model file (or associated *.txt file, for STL output). Key tip: if you look at the export file Mineways creates for you (the .OBJ, .WRL, or for STL the .TXT file) in a text editor, at the top you'll find all sorts of useful information about the model and how you generated it.
The "White & Flexible" material has a smaller minimum wall thickness compared to "Colored Sandstone" (0.7 mm vs. 2.0 mm), so much smaller (and cheaper) models can be created in it. White & flexible is plastic and durable, colored sandstone is heavier, fairly strong, but brittle. Shapeways has a tutorial on how to paint this white plastic material, which can be fun in itself. Note that the ceramics material has a maximum wall thickness of 15 mm, something Mineways does not check; this material is also the only one where you are charged by surface area instead of volume (which Mineways does compute).
The "Custom Printer" material is used for STL export. By default, it is set to show the approximate cost of a print for 1.75 mm PLA priced at $24 for a 1 kilogram spool. The cost numbers are modifiable by using a script. See the scripting commands for "Custom printer" for how to set new cost values.
Model's units: when a model is saved, the values stored in the file are not in any particular units, like meters or inches. However, 3D printers need this scale for printing the model. Millimeters are assumed, as this is what Shapeways uses by default. For other services and printers, other units are assumed. Here's a brief rundown:
- Sculpteo - choose the "Wavefront OBJ, absolute and true" file type; by default, "Z is up" is on and the units are centimeters. Textured models are fully supported, including the truly worthwhile "Export lesser blocks" feature, though read the warnings to make sure you know what problems may occur.
- i.materialise - for this 3D print service, millimeters are the default units. For STL export, choose the "Binary Materialise Magics" STL file type; by default "Z is up" is off and the units are millimeters. Textured models are not currently supported, but colored models are, by exporting color to STL and choosing the multicolor material in their 3D print lab. If you want to import VRML for some reason, "Z is up" should be on and you'll have to change the export scale to millimeters.
- Ponoko - this 3D print service uses centimeters, millimeters, and inches. "Z is up" should be on, to show properly in Ponoko's thumbnail view. If your model is flagged as having a problem with normals, export again and check the "Weld all shared edges" checkbox. You can use the "Export solid material colors" or "no materials" options; textures are not supported. The preview itself will not show the colors, but I have been assured the model will print with color.
- RepRap - this home 3D printer appears to need models in centimeters. I'm not sure if this is more of a requirement of the related software.
By default, the model is heavily processed to clear up a number of potential 3D printing problems:
Fill air bubbles: any hollow area is filled with solid material (specifically, glass, which can sometimes be seen when doing base hollowing, below). This option can also potentially reduce the polygon count when exporting for rendering. There are two sub-options:
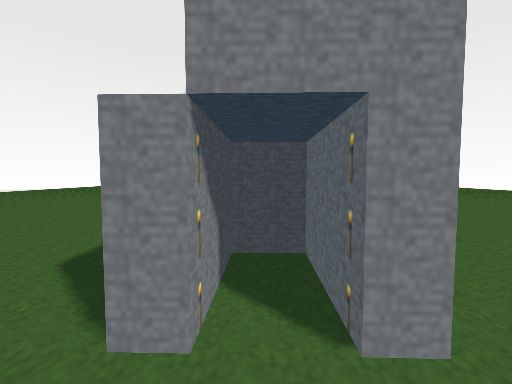
- Seal off entrances: If a building has 1-block wide windows and doors that are not filled in, this setting will attempt to fill these in with recessed glass blocks. This option also uses snow blocks and "entrance" blocks - doors, ladders, trapdoors, torches, fence gates, daylight sensors - to help seal off rooms, even if the doors and ladders themselves are culled. See the examples below. Sealing a room has a few advantages: the interiors of rooms that cannot be seen are filled in. This lets the hollowing option do its job better, both saving material on a print and making the print stronger.
- Fill in isolated tunnels: a volume being exported can have tunnels underground running through it, and can run into the sides of the volume itself. These tunnels cost time and money to print; if the tunnel is isolated (no access to the surface) then this option will seal these off and fill them in. Hollowing can then remove more material.
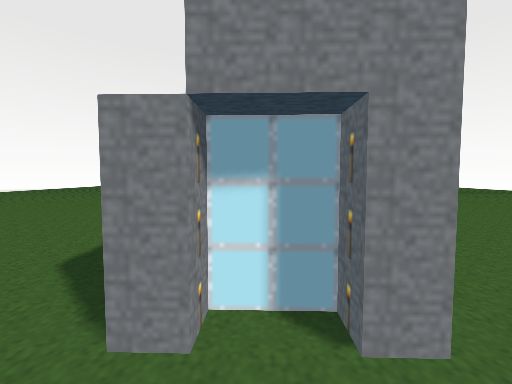
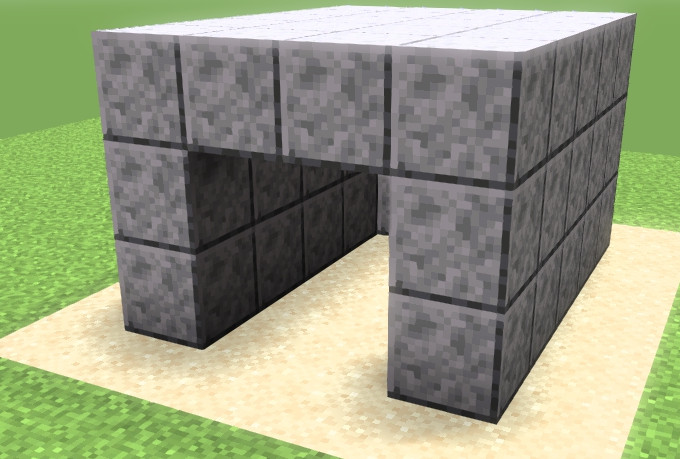
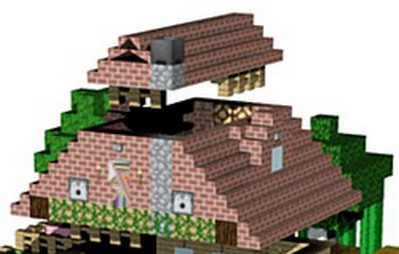
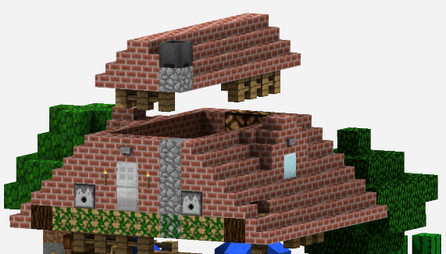
Example: in the first image, the inside of the building is not filled in. In the second, the "Seal off entrances" export box is checked. Since the model has window and door gaps that are only a block wide, these will be detected and the interior will be filled in with glass to cover these openings, as shown on the right.
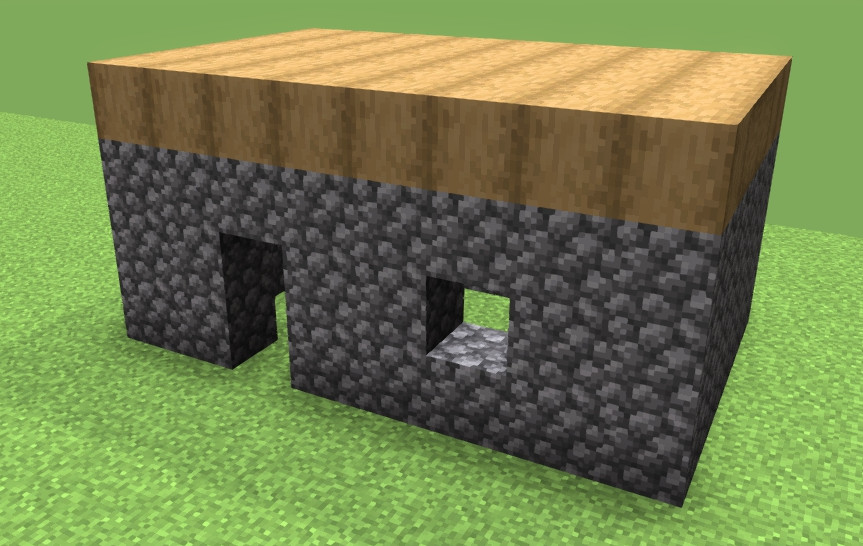

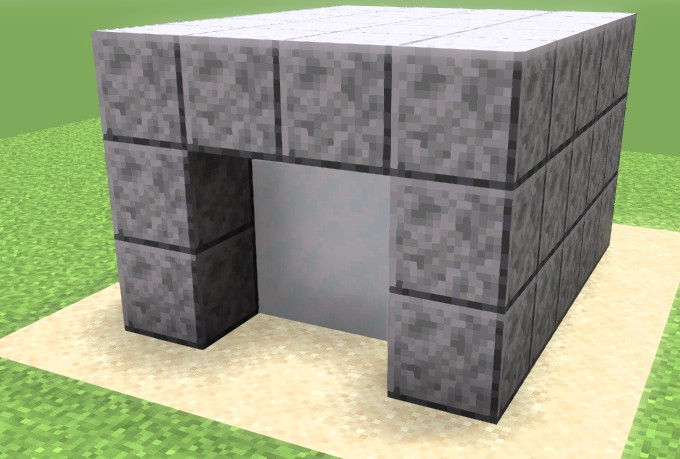
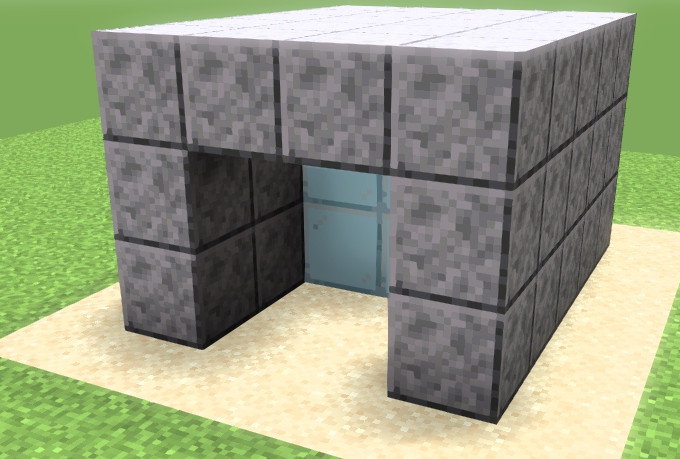
Wide door example: in the first image, the inside of this simple building is visible. In the second, the "Seal off entrances" export box is checked. The torches are then considered as blocking the entrance; since the entrance is fully sealed off, the room is filled with glass. This example is trivial, but by placing torches you can seal rooms off so that they fill up with glass, then get hollowed by the "hollow" option, described further on, thus saving on printing areas difficult or impossible to see from outside.
Another wide door example: Another way to seal off large doors or windows is to add snow blocks. Here a two-block-wide door will not automatically be sealed off by the "seal off entrances" option. By adding snow blocks and then also enabling the melt option (and turning off the hollow option), the building interior will be sealed off and then the snow blocks will be removed before output.
Connect parts sharing an edge: certain non-manifold edges (where two blocks are diagonal and share an edge) are eliminated by a welding process in which more blocks are added. This welding process normally occurs only when it joins pieces that otherwise would be separated and fall apart.
- Connect corner tips: if two blocks touch at just their tips and the blocks are found to be in separate parts, they are then welded together by adding two new blocks.
- Weld all shared edges: Shapeways normally allows two blocks' edges to touch, despite information to the contrary. If this behavior is unacceptable (Shapeways or some other application rejects the model), checking this box will work to remove all shared edges.
Example:
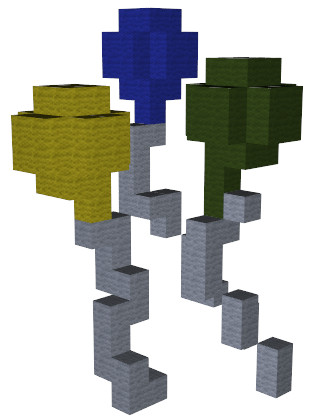
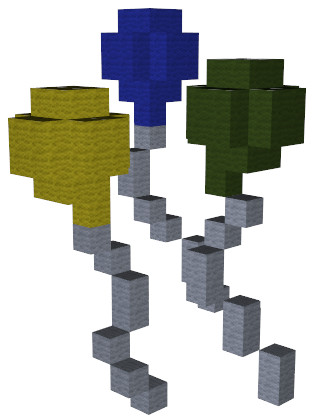 With all connect parts options off the strings of the balloons do not connect. These will probably print as separate bits.
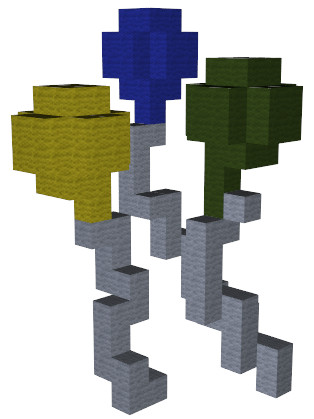
Blocks sharing an edge are connected. Some parts of the strings touch only at corner tips, so are still not connected. Note that for these examples the "delete floating objects" option was turned off, as otherwise the disconnected string bits would have been removed.
Corner tips are connected, and now each balloon will print correctly.
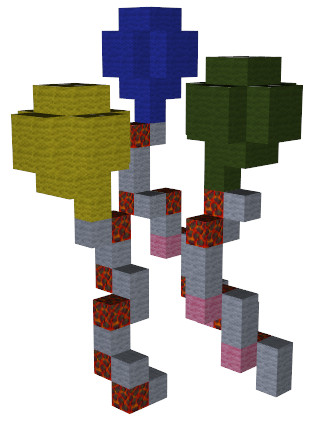
Debug mode, showing edge connecting blocks as lava and tip connecting blocks as pink wool.
Delete floating objects: if objects hang in space, these are eliminated if they're small (less than 16 blocks in size) or are entirely tree logs and leaves. This step eliminates parts of trees hanging along the edge because of where the selection box is located. If you get a warning about there being more than one part in a model exported, crank the block number up to 1000 or more to get rid of larger chunks (once you know what those chunks are - see the debug display parts mode below). If you're sure you want just the one connected group in the scene, set this value to 999999 and only the largest object in the scene will be saved.
This option can help tidy up a model for rendering or Sketchfab, too, by deleting tree foliage poking into an exported volume. In these export modes, any adjacent blocks are joined up (for 3D printing, only blocks that fill the cell are joined together). This difference means that, for example, a roof supported by fence posts won't be considered floating when rendering, but will when using detailed 3D printing (as the fence supports would likely be too thin to hold the roof).
Example:
 Exporting without deletion of floating objects results in a hunk of foliage hanging in space.
The "debug showing groups" option shows the disconnected group (the black columns are support columns created when hollowing).

Turning on deletion of floating objects, the floating foliage is deleted. Note the clump of leaves from a chopped-off tree stuck to the house is not deleted: get out the shears in Minecraft, if you want to chop it clear.
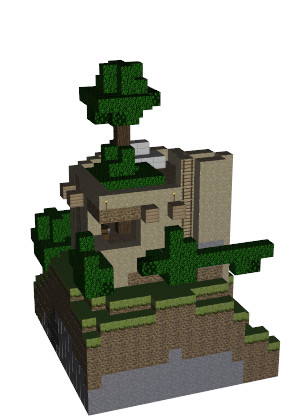
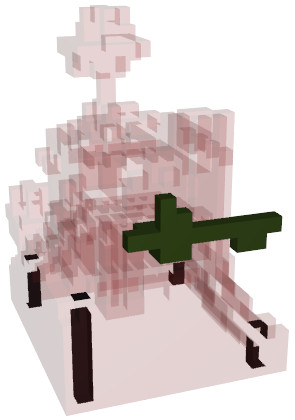
Hollow out bottom of model: models are typically resting on an uneven ground layer, and building interiors are typically filled in. Hollowing clears out blocks inside the model, making it less expensive and faster to print. The "super hollow" option is more aggressive, searching hollow areas found to see if more can be carved out.
This option, used in conjunction with seal off entrances, can make detailed models stronger. If the interior of a model is entirely filled in by the "fill air bubbles" process, it can then be hollowed out and the walls left thick. For example, say you want to print your cathedral model with 1 mm wide blocks. The printer you want to use needs walls at least 2 mm thick. Instead of manually adding blocks to the interior of your entire model, by using the seal off the entrances option you fill the interiors in with solid blocks. When you hollow, you set the hollow width to 2 mm, or even 3 mm, and now the exterior walls will be made a few blocks thick, automatically.
Technical note: superhollow can sometimes create little separate objects at the bottom layer unconnected to the rest of the model, pieces of tunnel not cleaned out. You'll need to also turn on the "fill in isolated tunnels" box to have these removed ("delete floating objects" should do this, but currently does not).
Example:
 Hollowing is off and tunnels are not sealed.
Tunnels are sealed (the glass blocks). While this briefly increases the block count, hollowing will cut it considerably.
Basic hollowing is performed; the cutaway shows how far it penetrates into the teapot. Block count is reduced from 26.8k blocks to 14.7k blocks.
Superhollowing is performed, reducing the count further, to 8.3k blocks. The escape hole between teapot and ground looks to be large enough to clear the sand (and indeed it was, see this photo)
Melt snow blocks: The seal off entrances option automatically looks for one-block-wide entrances and windows and seals them off. If you have wider entrances, off-axis windows (such as in a dome), holes in the roof, or other features, instead of adding torches or ladders to help seal these off, you can use snow blocks to do so. The melt option then removes these snow blocks from your model just before output. See the seal off entrances option description for an example of its use.
Export lesser, detailed blocks: when 3D printing, this option is off by default; for rendering it is on. When not checked, smaller objects, such as signs, fences, and torches are removed - only nearly-block-sized or important blocks are exported. This option is on by default when exporting full color textures for rendering; turn it off to remove the "billboard" objects and other smaller geometry objects. Remember you can also turn off output of any block type by setting its alpha to zero in your own custom color scheme. I've given you the ability to shoot yourself in the foot for 3D printing; I leave it to you to turn off any block types you think are likely to break off. As such, if you use this option you should probably turn off the "Connect parts sharing an edge" and "Delete floating objects" options further down, as these are likely to not work well - only full blocks are tracked when using these features. When exporting lesser blocks it's better to add and delete blocks by hand and not have the program clean up the data. If you do want to check for floating objects, I recommend exporting full blocks first (which will perform the check properly if the option is checked), then export lesser blocks with the option off.
Checking this box for 3D printing is risky, but will allow you to export slabs, stairs, and many other smaller elements as true geometry. The table gives specifics about what is printable, under the "Lesser" column. The model produced with this option on can have some geometry that's tough for some 3D print slicers to process. The risk is that the service bureau or printer software cannot properly interpret your files. If you are printing a single-color model, use the free cloud version of netfabb to preprocess your model. Shapeways also uses netfabb to process your uploaded models, so you should have no problems with the mesh itself using their service. You may still have problems with features being too thin to reliably print. If you truly want to print some geometry that Mineways won't output for 3D printing, e.g., you want to make a large banner model, you can always export via rendering and perform cleanup yourself (such as removing billboards).
If you use another service bureau such as Sculpteo, look over your uploaded model for any missing block or texturing errors (well, as of 2021, Sculpteo does not support textured, colored output). Secret Sculpteo trick: you can see a large view of your model by using the URL http://www.sculpteo.com/en/embed/design/<xxx>, where you put the 8 character identifier for your model in place of <xxx>. For example, for this model the 8 characters in the URL are "hfM9BZw2", so use http://www.sculpteo.com/en/embed/design/hfM9BZw2 to see it large. Try these two links and compare.
 Shapeways merges most of the "lesser blocks" geometry properly but fails with some textures.
Sculpteo does the texture merge properly, but is missing a stair step on the right part of the roof.
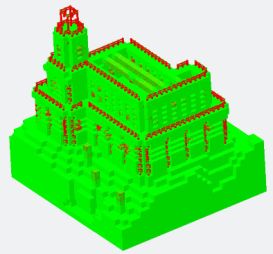
Sculpteo's solidity check feature showing how fences along the top of this palace model are likely to break off.
Currently some thin objects, such as sign posts and single fence posts, are exported. These are likely to break off, especially at small block sizes. You might want to "shore up" thin features by placing blocks below them (such as for roofs made of stair steps) and next to them (such as for doors). Alternately, turn off export altogether by setting the alpha for the block type to 0 in a color scheme.
Below are three prints done with fences, stair and slab roofs, and other small blocks. On the left, 1 mm/block, the fences and thin pillars have sheared right off. 2 mm/block, in the middle, survived intact for the most part - not surprisingly, a free-standing door at the rear broke off. With 3 mm/block, on the right, a part of the fence broke off when the superglue was applied. More photos can be found here. (Image courtesy of Alex Boden)

Fatten lesser blocks: If you do decide to export using the "lesser" option, by default some of the more delicate blocks are made fatter so that they are less likely to break off during printing. No guarantees! The blocks fattened are: fences, fence gates, doors, free-standing sign posts (which I suspect will still snap off), pressure plates (since they sometimes get used for table tops), bells, and a number of others - see the table.
There are also two debug print options available, both shown in examples above. The "Debug: show floating parts" option does just that: the largest object is made semitransparent and smaller groups each given a unique color, so that you can see what pieces of the model are not connected. Either remove these smaller parts by kicking up the "delete floating objects" limit, or go into Minecraft itself and add blocks to attach them together. That said, separate parts are fine in a file if you know what you are doing: you could be making a chain of separate links, or could have a number of individual pieces (such as letters) you want to create in a single print run.
The "show weld blocks" option shows what blocks are added by the various "connect parts" options. If you don't like where the welds are put, you can go into your Minecraft world and edit the model yourself. Key tip: you can run Mineways and play Minecraft at the same time. So, you can edit your world in Minecraft, then reload the world into Mineways by pressing the "r" key. The selected area won't be cleared when you do so, so you can edit, reload, export, and view the model (in a separate viewer); lather, rinse, repeat. This is an efficient way to improve and view any model you're working on.
ChannelMixer and TileMaker
You can make your own sets of textures to use when exporting models with Mineways. This process is fairly straightforward, but is a more advanced topic. See the Textures page for how textures work in Mineways and how to use these tools.
Rendering Tips
There are lots of cool add-on shaders for Minecraft. But, for truly stunning stills and animations you'll want a standalone package. This section covers the basics on importing Mineways files into various renderers: Blender, Cinema 4D, Omniverse Create, 3DS MAX, Maya, and Houdini. If you want better geometry for some blocks, you might also consider using jmc2obj (though personally I have problems getting it to work properly).
While I have your ear (eye?), you should also check out OptiFine and Sonic Ether's Unbelievable Shaders (SEUS forum) for in-game play or viewing. They have lots of cool rendering options. What makes these systems shine (literally) is using a high-quality texture pack that support specular textures, bump maps, etc. (which Mineways does not - sorry - though you should be able to jigger TileMaker to make such sets of textures for you). Some nice texture packs: UMSOEA and Sildur's Shaders.
Also worth a shout-out, the Minecraft RTX beta. If you have an RTX card, this system accelerates ray tracing effects on the Bedrock Edition (sorry, no Java Edition version). However, conversion of a Java Edition world is fairly straightforward; they give a long guide, but really, just follow the MCC Tool Chest Conversion steps - it's all I needed (note that MCC Tool Chest has, sadly, disappeared, but can be found archived here). If you're really feeling frisky, you can design a texture pack (though be warned, the format will change).
Previewing:
To quickly check results before printing or importing into a rendering program, consider using an interactive previewer. The G3D viewer is great for OBJ files, with shadows and screenshot capture built in. Open 3D Model Viewer mostly works, though has transparency issues when you export individual textures. Microsoft's 3D Viewer also can work, though it does not treat semitransparent surfaces well. MeshLab is a usable previewer for models in any format Mineways produces, though handles transparency and cutouts incorrectly.
Below are steps for using various popular rendering software packages. There are always more; for example, this article talks in depth about using RenderMan for rendering.
Blender
![]() These instructions assume Blender version 2.93 or newer.
These instructions assume Blender version 2.93 or newer.
Don't like reading? Watch this one-minute video - things have changed a little since its release. For example, you don't need to select "Split by block type" at 0:44, as this is now the default.
Note: Blender 3.0 will have USD import, which should help make it easy to use physically-based materials (reflectance, non/metallic), normal maps, and other more elaborate textures found in some texture packs. If you're using this alpha software, give Mineways' USD export system a try with it and let me know how it goes (I haven't tried it yet).
To move your Minecraft world's data into Blender, the first two steps are the same for all versions of Blender, since they involve only Mineways:
1) Open your World in Mineways, then, select the area for exporting (hold right mouse button and drag the rectangle).
2) Choose "File | Export Model for Rendering" and save the file as a Wavefront Object (.obj) to a folder of your choice. Let's call it myobject.obj or whatever you like. You could simply click "OK" in the dialog with the export settings. However, choosing the "Export individual textures" on the left can give better filtering results, especially for areas in the distance with large scenes, as mipmapping will be more effective. The main consequence of checking this box is that many more individual textures are generated, vs. three large images. Individual textures are great if you want to swap in different textures, but does result in more files and directories to keep track of.
If you are exporting individual blocks for animation, make sure the "Material per family" box below this option is checked. You will also want to check the "Make groups objects" option further down for proper use in Blender.
To start, I would avoid clicking any other options (despite what any YouTube videos might say) until you know what you are doing.
You'll also want to consider using MCprep in conjunction with Mineways to improve your materials, geometry, etc. Here's my short video on how to install and use it. They also have a MCprep Blender Discord server with people that are quick to respond to Minecraft + Blender questions. Alternative Minecraft exporters for Blender include jmc2obj, a general-purpose and full-featured exporter (which I can't figure out any more), and Mineblend, which is dated, but is tailored specifically for Minecraft to Blender import.
3) Open Blender 2.93 (or newer) and click anywhere on the screen to make the splash screen disappear. Then press the "Delete" key to remove the default cube model.
4) Import the model: select "File | Import | Wavefront (.obj)" from the menu. Put the directory name of your Mineways export file (the .obj file) on the first line and hit "Enter". You can then double-click the .obj file name itself in the listing below. Alternately, you can type the file name itself on the line below the directory name and then click the blue "Import OBJ" button to the far right. Once imported, hit the "Home" key to reposition the camera to be well outside the model.
5) Display in Look Dev mode: in the upper right of the viewport are a series of icons. Rightmost are four sphere icons. Click on the second from the right (though the rightmost is also nice):
![]()
You should now see a textured view of your model.
6) Adjust camera: Use the mouse wheel to dolly the camera in or out. As noted before, the "Home" key can also dolly the camera out to view the whole scene. Middle mouse down and drag lets you rotate the camera. Middle mouse with the Shift key lets you pan the camera. Middle mouse with Control is another way to zoom, but why do that? Middle mouse with Alt changes to different views in a funky way - just use middle mouse to recover.
Once you like the view, click Control-Alt-"Numpad 0" to set the render camera to your view (or at least the center of it). If you move your view of the world, you can go back to this saved view by hitting "Numpad 0" again, or Control-Alt-"Numpad 0" to set the render camera again.
7) Rendering: You are now ready to do a first render of your model. Just press "F12" or select "Render | Render Image" from the menu and have a look. It probably looked pretty dark, because the default light is some local light instead of something like the sun.
Also, the distant part of the model might not appear, as the Clip End distance is too small. Adjust this by selecting the camera object in the Scene Collection in the upper right of the screen, select the camera icon, then click on the "End" value box and type in a new value or simply drag your mouse:
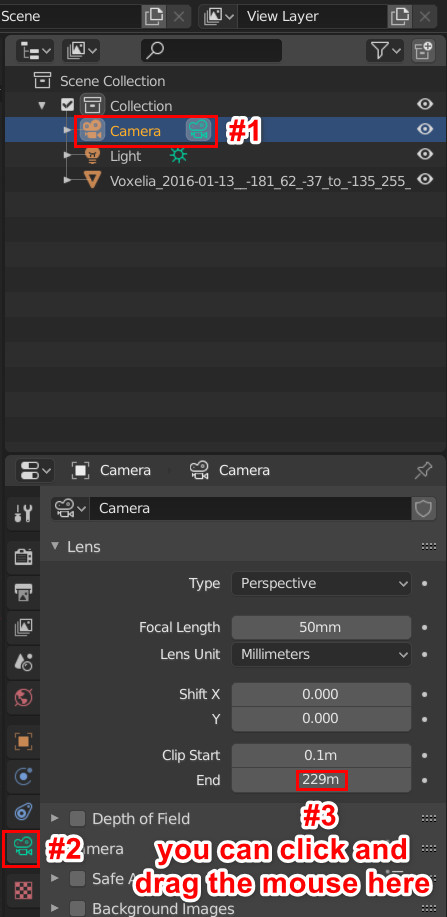
8) Lighting: Select that light in the Scene Collection in the upper right of the screen, then click the lightbulb icon near the bottom of the set of icons below. Click on the Sun setting, then I'd also crank the Strength down to 8.0 or so, as shown:
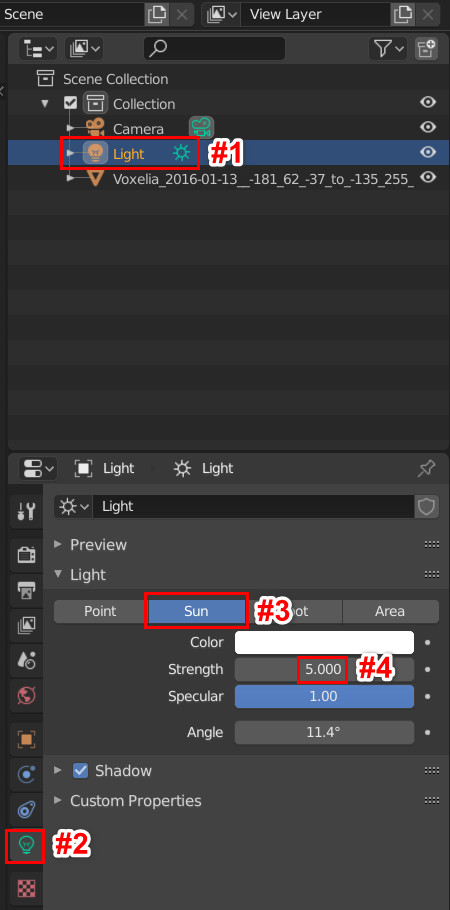
To adjust this now-a-sun light, go to the "render preview" mode by clicking the rightmost of the four sphere icons in the upper right of the viewport (see step 5 - it's the sphere next over). Now press Shift-"t" and move your mouse around in the viewport. Hey, the sun's moving. When you left-click with the mouse, you lock down the direction of the sun. It's a bit non-intuitive, and you may need to rotate the view, Shift-T, rotate again, etc. to get the angle you want. Try F12 again to render the scene.
9) Material Conversion: Transparency can be a bit strange with imported OBJ models in Blender, as its importer makes some (IMO) poor decisions currently. Cutout objects have poor blending modes assigned, and anything with transparency will not cast shadows properly. Low resolution textures are fuzzy, not blocky like in Minecraft. The fastest way to fix these problems (by far) is to use the Prep Materials button in the free MCprep addon. Here's my short video on how to install and use it.
If you want to do this conversion manually, it's a tedious process of selecting each object type in the model. Open your world and there's a list of objects. Choose a semitransparent or cutout object you want to make display properly, pick Context.Material from the vertical icons (next to last one). Under Settings in the properties page below, change its Blend Mode and Shadow Mode both to Alpha Hashed:
![]()
(You might realize that, up top, you can select multiple objects by using Shift-click. You then might think you could then change them all to the proper blend mode. You would be wrong - only the last one group selected is changed. If someone has a way of selecting and changing multiple objects at once, let me know!)
At this point, try F12 again to render. You'll probably notice that the textures are not blocky like in Minecraft, unless you've used MCPrep. To change each material manually to have a blocky look, select it and, under the Surface parameter window below, click the small "right arrow" icon to the left of "Base Color", about five lines down. Two more lines down it will say "Linear"; change this to "Closest". Scroll down considerably further to "Alpha" and click on the small right arrow again and also set to "Closest". Here's the Base Color sequence:
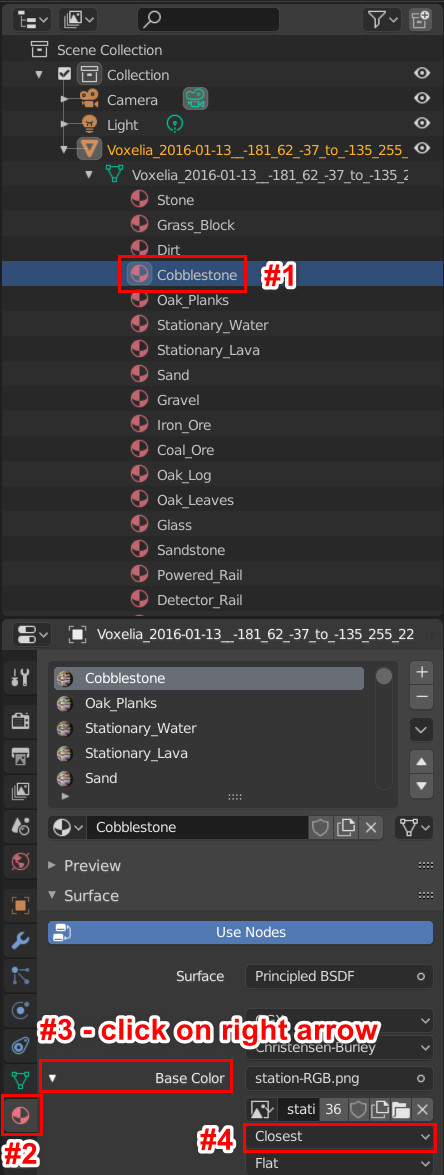
That said, setting the sampling to "Closest" can give noisy renders. You may want to consider using the high-resolution "1024" or "8192" textures when exporting from Mineways, as these give a blocky appearance and also allow mipmapping to be used for filtering when blocks are distant.
10) Render Size: You can also set several parameters of the Renderer by selecting the Camera in the Scene Collection in the upper right, then clicking on the Context.Output icon in the vertical list of icons - it's the third one down, it looks like a printer spitting out an image. In the section "Dimensions", you can set the Resolution of the image, add a border, and so on. To export Full HD, you can set the Resolution to X:1920 and Y:1080, and set 100% in the bar below these settings.
11) Optional: Split into Objects: Blender 2.92 imports a Mineways OBJ file as a single object. If you did not use the "Make groups objects" option but want to split the object in Blender, do the following. First, switch to Edit Mode. Then hit the "p" key and with your mouse select the option "By Material." The objects will now be separated in this way. Note that this may not be what you want - likely you'll need to use the "Export individual blocks" option in Mineways to get "solid" blocks you can animate.
12) Upload pictures of your creation to the Mineways Flickr group! (Optional, but I hope you do - I like seeing what people make.)
I'll again note that you should probably be using MCprep to convert your materials. Here's my short video on how to install and use it. They also have a MCprep Blender Discord server for asking questions.
Omniverse Create
![]()
Here is how to import a model into the free Omniverse Create program. First, download the Omniverse Launcher (Beta), install and run it, then from the launcher install and launch Omniverse Create.
See the tutorial video. It runs through a lot of the common operations for Omniverse Create: moving the camera, modifying the lighting and materials, etc. There's a lot of documentation on Omniverse and Create, but the video will get you started. I also show Omniverse in action here. What follows are the steps in the video.
Step 1: Select your world and region for export in Mineways, then from the menu choose File | Export Rendering.
Step 1a: I highly recommend doing "File -> Choose Terrain File" and selecting the terrainExt_JG-RTX64.png file that comes with Mineways. This will give you more interesting and physically realistic materials for some blocks.
Step 2: Save as the file type 'USDA'. This is the Universal Scene Description ASCII file format. USD is a format developed by Pixar that is used in film studios and other applications.
After choosing the file name, you are faced with many export options. Most are grayed out in the upper left part of this dialog, with one important exception: "Custom material." By default this box is checked. Doing so gives the distinctive blocky look for Minecraft textures. However, if you are using higher resolution textures, 64x64 or larger, I recommend unchecking this box. You will then use Omniverse default materials, which blend smoothly between texture texels. Also, these default materials will display much more quickly; the custom materials need to be compiled when viewed in Omniverse Create for the first time.
As far as other export options go, I recommend not touching them. USDA export is a brand new feature, so support for individual block export and other modes is unlike to work, nay, likely to crash Mineways.
I should note that Pixar USD files can be read in by other applications, for example the free Houdini Apprentice and Cinema 4D.
Step 3: Load the model into Omniverse Create. Easiest is to copy and paste the directory where the USDA model is located into the Content directory bar, towards the lower left, here highlighted in red:
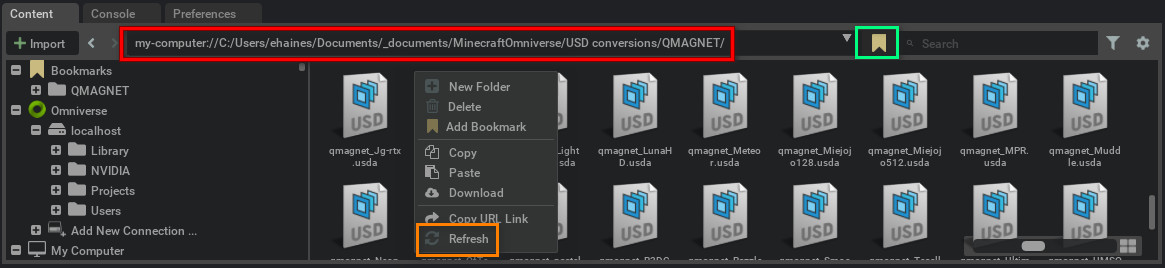
Hit "Enter" and below this line you should see the USDA file, some MDL (material) files, and a texture directory. Double-click the USDA file to load it. The scene may take awhile to resolve and look good, as two things are happening: textures are loading, and material shaders are being compiled (if "Custom material" was checked - see Step 2). This compilation can take awhile, but after the first time you do it for a directory it should be faster.
Pro tip: if you click on the bookmark icon, highlighted in green (and already clicked) in the image above, you will add a bookmark to the list of files at the lower left. Clicking that bookmark entry takes you to this directory.
Note: one glitch in the beta is that the directory shown in Create does not refresh when new files are added to it, or deleted. If you save and don't see your file, right-click in the window to the lower right and select "Refresh" (highlighted in orange).
Step 4: Move your camera around. Easiest is to right-click-and-hold in the viewport. Mouse rotates the view, WASD moves you, QE move up and down, and holding Shift during any of these key presses doubles your speed (and Control halves it). If you get lost, the F key will frame your model, i.e., pull you all the way back so you can see the whole thing. One gotcha is camera speed: you can adjust this by clicking on the gear icon in the upper left of the viewport and adjusting the first slider, Camera Speed. To go faster than 10, you can Control-Click on the slider and type a number.
Step 5: Adjust the lighting. Look in the upper right. Select the Stage tab, if not selected. You'll see the sun and a dome light. You can toggle these on and off by clicking the eye icon to the right of each. You can move the position of the sun by selecting it, then clicking and dragging in the box highlighted to rotate its angle. You can also adjust the sun and dome light's intensity in the Light dialog area below. Also, note that if you toggle the "lighting" view in Mineways (the "L" key), so that the map is shown in a nighttime mode, nighttime lighting will be exported to USDA instead.
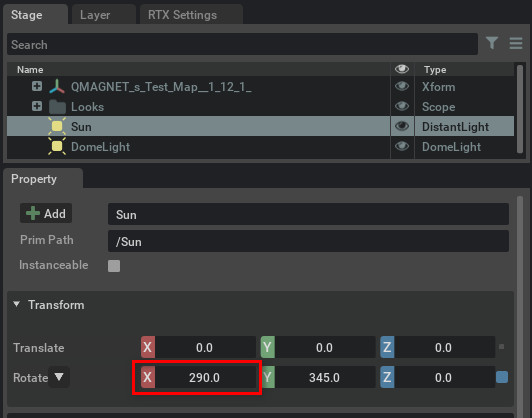
Step 6: Take a screenshot. First, you'll need to adjust one property. On the menu choose Edit | Preferences. At the bottom left see the Preferences dialog. Click on Capture Screenshot, and then on the right check "Capture only the 3D viewport":

Take note of the "Path to save screenshots", just above - I copy and paste this and go to it in my file explorer. Now, each time you press F10, a screenshot is generated and put in this directory.
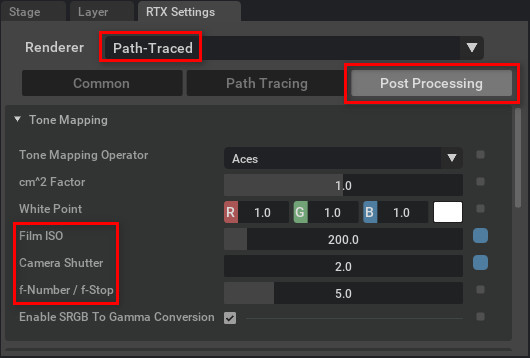
I have noticed this feature can sometimes be a bit flakey, with F10 not consistently working after adjusting this. Restarting Create seems to help.
Step 7: Adjust the camera exposure. By default, the camera exposure is set for a daylit, outdoor scene. If you go inside, it'll likely be dark. In the menu, choose Rendering | Render Settings, if not already checked. In the upper right should appear "RTX Settings". By default, Mineways uses the Path tracer, so select "Path-Traced" for the Renderer, then "Post Processing", below that to the right. Open the Tone Mapping menu. You can then fiddle with the Film ISO, Camera Shutter, and f-Number/f-Stop to adjust the exposure. If you're feeling bold, you can also try the Auto Exposure feature in the menu below Tone Mapping.
Step 8: Edit a material. Click on an object in the scene, or in the content hierarchy in the Stage list in the upper right (pro tip: you can type. Below a picture of a sphere should appear. Click the sphere and you will see below a long list of material settings. Have at it! Note that you can also simply replace textures in the "textures" directory created by Mineways and then read the scene in again.
Bonus feature: I've included a water_normal.png normals map (from the open source MDL material set) in the Mineways distribution. Resource pack authors basically never include a normal map for water, because the renderer usually generates this. You can include this in your "block-and-chest" directory when making a terrain file set using TileMaker or assign it manually in Create or other applications.
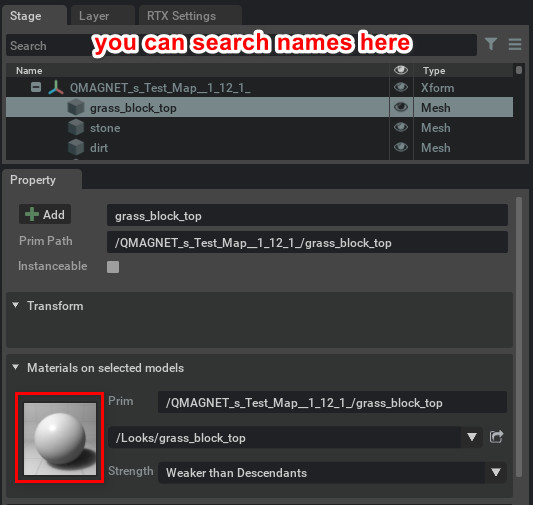
Step 9: Save your work. You can simple choose "File | Save", but for faster loading in the future, you could do "File | Save As...", check that "USD" (no "A") is selected in the lower right of the save dialog, and click "Save". The binary USD format is about 30% more compact and faster to load.
For more about physical materials and how to add them into Mineways, see the texture tutorial page.
This is as far as I'm going, as explaining materials, animation, and many other features is definitely beyond the scope. But, notice that last sentence has links to documentation for these topics. Some people know way more than I do about Omniverse.
Since you got this far, I'll note one option you can choose at Mineways export: the "Custom material" checkbox on the export dialog. By default it is checked. This exports a custom Minecraft.mdl material that gives textures the classic blocky look. However, if you are using a high resolution texture you likely won't care about this look. Unchecking the box means to use the default materials, no MDL files written out. A minor thing, but you may prefer it.
Here's JG RTX in action (and more resource pack previews - these are not included in Mineways):
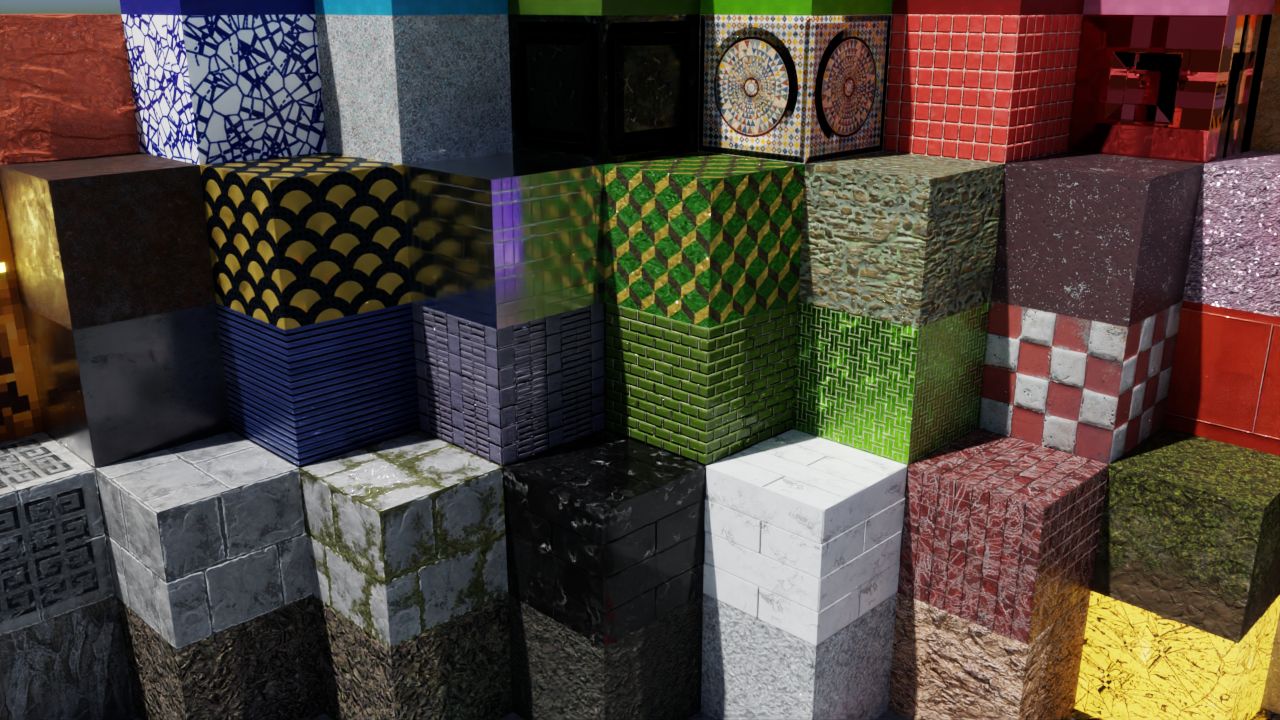
Cinema 4D
![]()
Here is how to import a model and set the textures for Cinema 4D S22 or newer; the instructions are similar for older versions, though. The steps are mostly from this excellent (though a little dated) video from this forum post, which includes a number of other useful Cinema 4D animation tutorials and resource links. Here's one more useful post.
That said, you may want to use jmc2obj, another exporter. I won't be insulted - use what works best for you!
Step 1: In Mineways, select your world and region for export in Mineways, then from the menu choose File | Export Rendering.
Step 2: Save as the file type 'OBJ'. Use Absolute OBJ, not Relative, as older versions of Cinema 4D do not read relative OBJs well. Alternately, Version R25 of C4D does a nice job of reading USD files, which means that you can use physically based rendering resource packs such as JG-RTX (that comes with Mineways) which add attributes such as normal maps, specular textures, and more.
Step 3: Adjust the export options as you wish. Nothing is required here; by default, blocks will come in at a size of 1/10th meter each. You can adjust this by changing "Make each block 100 mm high"; for example, 1000 mm is 1 meter. You may also wish to use the "Export individual textures" option, as this allows mipmapping and similar filtering in Cinema 4D to work better. Also, for physically base rendering terrain sets such as JG-RTX (which comes with Mineways), individual texture export means you also get normals maps and other attributes automatically exported, which Cinema 4D can make use of (well, by default just the normal maps, but you can attach the others manually).
Step 4: Once the model is exported, open Cinema4D and drag the .obj file generated into the main window. Make sure the "Presets" at the top of the OBJ Import dialog is set to Default. (If you don't, your grass blocks will import upside-down.) Hit "OK".
Here is what the defaults are, just in case:
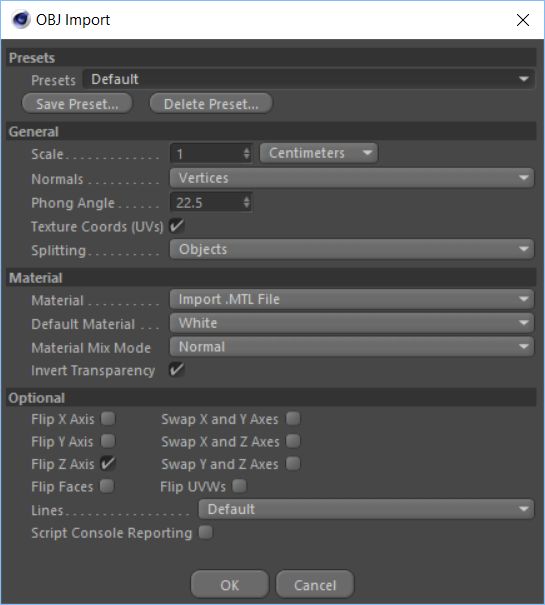
To move around the scene, hold down Alt and use the three mouse buttons and scroll wheel.
Step 5: At this point you can render by clicking Ctrl-R. It won't be the most exciting render, as there are no lights (if you used USD, the sun light will be too bright - turn its Intensity down from 3000% to 100%). Try "Create -> Light -> Light" and move the light up a bit to illuminate your scene. Select the light and in the material editor in the lower right, select "Shadow" and then, a few lines down, change "Shadow" from "None" to "Raytraced (Hard)." Now Ctrl-R will give shadows to your scene.
Step 6: Select all the materials in the material manager, the row of spheres at the lower left (or alongside the right edge of the viewport). Do this by clicking one sphere and then hitting Control-A. All spheres should now be selected. If the material manager is not visible, open it with Window -> Material Manager, or the shortcut Shift+F2.
Step 7: If you want to make textures look blocky, like they do in Minecraft, first click on the "Color" box next to the "Basic" box at the top of the material editor. In this area you will see a section below labeled "Color." In this section you will see "Color," "Brightness," "Texture," and just below that and to the right, "Sampling," which will say "<<Multi." In the menu list for this option choose "None." When you are done selecting, it will still say "<<Multi", but don't worry, you have changed it. See the figure below.
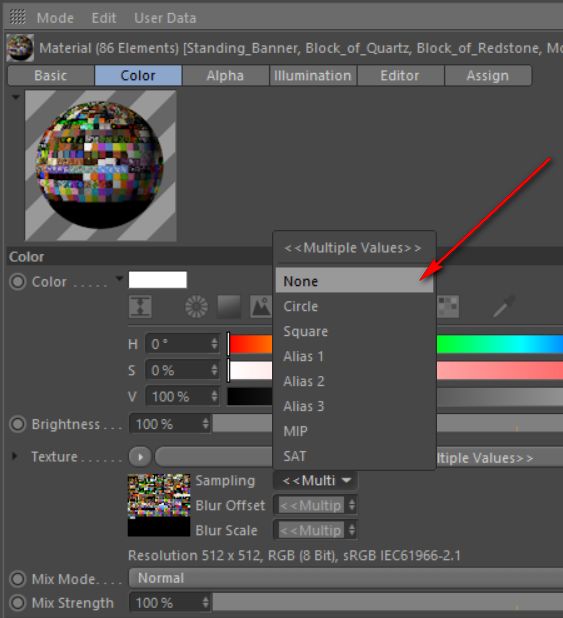
That said, setting the sampling to "None" can give noisy renders. You may want to consider using the high-resolution "1024" or "8192" textures when exporting from Mineways, as these give a blocky appearance and also allow mipmapping to be used for filtering when blocks are distant.
That's about it! I'll mention that you can also import Mineways' VRML files into C4D. This will work, but all blocks will share the same material, limiting what you can do to them.
Houdini
![]()
Houdini Apprentice can be downloaded for free for non-commercial use. Houdini Apprentice pays attention to the UsdPreview material Mineways produces. Their support for USDA continues to improve, so get the newest version when you can. One nice thing about Houdini is that it can read USDA files from Mineways, allowing more elaborate material descriptions, such as using normal maps. Make sure to have the newest version (at least version 19), as their USD import has improved enormously recently.
I made a short tutorial video for how to import Mineways USDA models with physically-based rendering textures attached to them. Summary: select Build -> Solaris, right-click in the lower right "/stage" dialog, type "file," and then click in the dialog to place this element. Above this dialog is now "Sublayer file1" - scroll down to find "Sublayer File" and in "File" give the USDA file you want to import. Once imported, scroll out with Alt and mouse-wheel down. Turn off the sun and dome light in the lower left dialog, "Scene Graph Tree." Add your own lights from the icons in the upper left of the app. Hold down "Alt" and use the mouse for camera moves. In the upper right of the viewport select the Karma renderer from "persp" to use the path tracer.
One thing I did forget to mention in the video narration: at time 1:14, where I add a File node, what I did was right-click in that lower-right area and typed "file" to get that node, then clicked in the area to make the node appear.
3DS MAX
![]()
Note: 3DS MAX is free for students and teachers.
These instructions are for 3DS MAX 2012. You might also try jmc2obj instead, as it does a better job producing some geometry. The steps here should also work for cleaning up jmc2obj OBJ models.
For newbies (like me): in a Viewport, middle-mouse button changes the view: mouse-wheel to zoom, button to pan, Alt key down to rotate, Control key down to fast-pan. Shift+Q to render. Steps are as follows:
Step 1: Select your world and region for export in Mineways, then from the menu choose File | Export Rendering.
Step 2: Save as the file type 'OBJ'. You likely want to keep the "Custom material" option on, as this gives a slightly different water color by changing the diffuse color to white.
Step 3: Adjust the export options as you wish. Nothing is required here; by default, blocks will come in at a size of 1/10th meter each. You can adjust this by changing "Make each block 100 mm high"; for example, 1000 mm is 1 meter, MAX's unit size.
Step 4: Use the upper left MAX symbol menu and select Import. Find the .obj file and select it. In the OBJ Import Options, under Normals select Faceted to get Minecraft's blocky look. Alternately, if you want to smooth water surfaces a bit, select "Auto" and leave the setting at 30 degrees. Click "Import" at the bottom.
Step 5: Go to Render Setup in the Rendering menu (or just hit "F10"). Select the Renderer tab and uncheck the "Filter Maps" checkbox under Antialiasing. This makes cutout objects look correct, as well as making the Minecraft textures have their distinctive blocky appearance.
Step 6 (optional): At this point rendering should work fine. In interactive preview mode you will see some transparency problems in the Viewport. To fix these, bring up the material editor by pressing "M" and expand the view. Scroll down in the Material/Map Browser on the left and find "+ Scene Materials". Click on the "+" to show the scene's materials. Double-click on whatever material looks bad, e.g., Stationary_Water, Glass, Leaves, Torch, Tall_Grass, Sugar_Cane, Rose, Dandelion, or other cutout object. Now click on the "checkerboard-with-light" icon along the top, which does "Show Shaded Material in Viewport". This material should now look better. Do this for each material that looks bad. Press "M" again when finished, to dismiss the material browser. If someone knows a faster way to change all materials, let me know. Note that these fixes do not affect the final render itself.
Maya
![]()
Note: Maya is free for students and teachers.
First, there is now a material converter for RenderMan. Notes from the author: "I've created a simple Python script for Maya to convert all the imported materials from the standard 'Phong' shader to Renderman's 'PxrSurface' shaders. It'll also re-use the same file reference node and clean up the duplicates and the old shaders. Bonus is that it will also turn off filtering on all the textures."
If you want to rendering within Maya, I will not give a comprehensive tutorial here; it's up to you to know the basics. The main tasks facing you when importing from Mineways is adjusting the Transparency material attribute, which Maya does not set up at all on import. The steps:
- Import an OBJ from Mineways.
- Select each transparent or cutout object in turn, right-click and drag to choose the "Material Attributes" menu.
- On the right, under Common Material Attributes, click the small checkered box to the far right of the Transparency attribute. This will let you assign a texture to the alpha channel.
- In the "Create Render Node" dialog that appears, choose "Maya | 2D Textures" on the left, then click "File" on the right. You will now see a "File Attributes" parameter dialog.
- Click on the file folder icon to the far right of "Image Name" and select the grayscale image for the alpha channel, e.g., MyModel-Alpha.png. While you're here, you can change the "Filter Type" above from Quadratic to Off; this makes the alpha channel have the blocky Minecraft look.
- The cutout object will typically disappear; you need to reverse the sense of the channel. There's probably some easier way, but scrolling down to the "Color Balance" section and setting Alpha Gain to -1 and Alpha Offset to 1 works.
- To make the colored pixels blocky, again right-click on the model and select "Material Attributes...", then click the small box with an arrow to the far right of the "Color" attribute, the first thing listed under "Common Material Attributes." Change the "Filter Type" from Quadratic to Off.
There may (and probably is) a more efficient way to make these adjustments - let me know.
For instructions for older versions of Maya, check out this video from this playlist, it shows how to set transparency and texture sampling. That said, you may want to use jmc2obj, which even comes with a MEL script to perform cleanup during import (that said, I don't know if this script still works).
A problem with jmc2obj is that each material must be adjusted by hand. One option in Mineways that can speed import conversion is to uncheck the "Material per family" checkbox in the OBJ file export options. Doing so means you have to fix up only one material, though at the expense of not having a separate material per block family (that said, you can always add new materials later). That said, this option tends to mess up Maya's display, as every object will be considered semitransparent and all will be sorted from back to front by depth in the interactive viewport, causing objects to flicker in front of each other. The scene will render just fine, however.
Publish to Sketchfab
![]()
Sketchfab is a free service that lets you upload your models and share them with others; try an example here or look at the end of these instructions. Mineways exports to it in a straightforward fashion, there are just a few steps to get your model up and running. It's always been possible to upload models to Sketchfab, see these illustrated instructions. With the 4.16 version of Mineways you can now publish directly from Mineways to Sketchfab. Note: you can always export a rendering as usual to an OBJ file and upload the ZIP of the files output to Sketchfab. This will give a somewhat different rendering style, sharp and less shadowed.
1) Sign up for an account on Sketchfab.
2) Open your World in Mineways, then, select the area for exporting (hold right mouse button and drag the rectangle), and choose "File | Publish to Sketchfab" from the menu.
3) The Sketchfab dialog will come up. Click on the button "Get your token." This will open a web page.
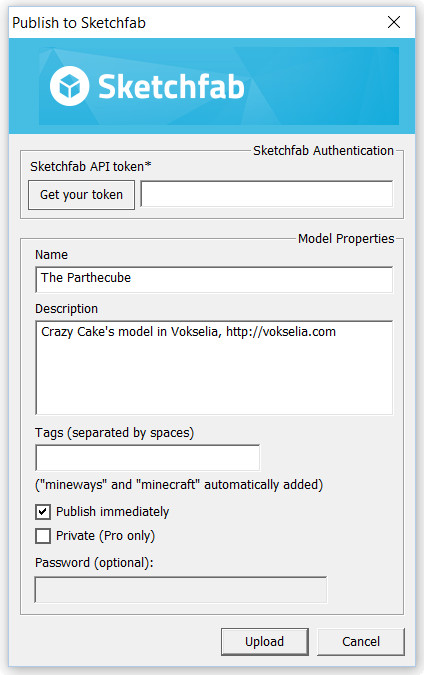
One line says "API Token," as shown below. Copy the API token, a long string of letters and numbers (a black box covers mine here), and paste it into the Sketchfab dialog. Fill in the other fields as you wish, then click "Upload" at the bottom.

4) When done, a new dialog comes up saying, "Your model has been uploaded. Click OK to view it on Sketchfab." - do that!
5) On the model's web page, adjust and save the view. You can orbit, pan, and zoom (mouse wheel). In the lower right corner is an eye icon, where you can switch to a "First Person" mode - I find it a bit zippy by default, so use the mouse wheel to dial down the speed. Also, if you double-click with the middle-mouse button on your object, you set the pivot point that the camera orbits around. Pick a nice view and then click "SAVE VIEW" in the upper left-hand corner.
6) In the lower right of the window click "SETTINGS" and choose "3D settings". I recommend clicking on the light-bulb icon in the upper left, then turn on the lights (just below); this will give shadows. There are lots of options here - explore and have fun! You can change the surrounding environment, make various materials look different, and other options. Annotations are nice for setting up views and touring your model.
7) In the upper right click "SAVE SETTINGS".. Then click "EXIT" and you're done.
If for some reason you can't get the "Publish to Sketchfab" feature to work for you, or you want to use anything but the default export options, there's another way to upload to Sketchfab that's only a little more work. Follow these instructions or go through the step-by-step below.
1) Open your World in Mineways, then, select the area for exporting (hold right mouse button and drag the rectangle), and choose "File | Export Model for Rendering" from the menu.
2) "File | Export Model for Rendering" and save the file as a Wavefront Object (.obj) to a folder of your choice. Let's call it myobject.obj or whatever you like. In the dialog with the export settings click on the option in the upper left click on "Create a ZIP file containing all export model files". Click "OK".
3) Sign up for an account on Sketchfab if you haven't already, then upload the zip file you created by clicking on the "UPLOAD" button in the upper right. A dialog pops up; click on "CHOOSE FILE" and upload the .obj.zip file you created. Click "CONTINUE".
4) Fill out the form as you wish. It's nice to add "minecraft" and "mineways" tags, so others can find your model. It's also nice to "Allow download", if you like.
At this point the steps are much the same as above, starting at step #5. The main difference is that your uploaded model is not published by default; for the last step you'll want to click "SAVE AND PUBLISH," then "EXIT."
One other thing you may wish to do is material cleanup. On the Sketchfab Materials tab (the center one) is the "Faces Rendering" option at the bottom. You may notice some "z-fighting" for objects such as sunflowers, where the two textures on each side of the flower fight each other. Choose a material at the top and select "Single sided" for that material. This will make the object look better.
An irregularity: if you download your uploaded model from Sketchfab, it may not display correctly. The short version is that you probably have to comment out the "map_d" field in the .mtl file for the model. Some viewers incorrectly grab the red channel instead of the alpha channel from the four-channel map that Sketchfab uses for compactness.
Physically based rendering support: Sketchfab does recognize addition material types, see their page for details. Note that when you use individual textures and "custom material" for OBJ export, you get these extra files, if available (or derived, such as the emission textures). However, the naming doesn't quite match for normal and emission textures currently; it does match for specular ("_s") and metalness ("_m").
Here's an example of Sketchfab in action, a model I uploaded. Click on the window and you can interact with it. More models here and here.
3D Print Services
If you want to make a 3D print of a model, the easiest way is to use a 3D print service such as Shapeways or Sculpteo. The main differences are cost, quality, and speed of delivery. Shapeways is almost always less expensive, Sculpteo offers faster delivery and better supports the "Export lesser blocks" option, which lets you print out slabs, steps, fences, and other smaller bits in your model. 3D Hubs also has some users with full-color printers, so may be both competitive and fast. There are other 3D print services for consumers, such as i.materialise and Ponoko, but currently these two do not offer fully-textured 3D printing, just solid color blocks. There are many services offering single-color (i.e., single material, such as plastic) prints, such as any of the above or those on this list. Finally, here's a little collection of articles on 3D printing Minecraft.
Shapeways
![]()
After creating an account (and creating a shop), go to the upload page. Or, if you go through the Shapeways site in other ways, choose "Get a quote." Choose a file for upload - you must pick the .ZIP file for your model that you created with Mineways, using 3D print export, e.g., "mymodel.wrl.zip". You also don't need to change the Unit of Measure: "millimeters" is the default and is what Mineways always outputs. Push the upload button.
Once you've uploaded, you can preview the model in the window to make sure it looks correct. You can also order from this page by choosing the material. For a full color print you want to pick "Sandstone", the last material on the list. For options, choose "Full Color" and then, your choice, "Glossy" or "Natural." If the material is not selectable, there may be a problem with your model. Select "Tools" near the top, next to the name of your file. You can now select the material you want and the page will show you exactly what test is failing, such as wall thickness or bounding box (model size).
Note there's a fixed cost per order. Be careful, however: you normally cannot cancel your order once placed. After you've made an order, the waiting begins, sometimes 2-3 weeks.
If you later want to make your product for sale or otherwise modify it, go to My 3D Models. Click on the three dots to the right of a model a choose the option "Edit Product."
See my humble shop as an example of how I set up various models.
Sculpteo
![]()
Go to the Sculpteo site and register for an account.
WARNING: Currently (as of 2021) Sculpteo no longer supports textured, colored output for objects. I'm leaving these instructions in place, though they're unlikely to do you much good.
In Mineways, you normally want to export to Wavefront OBJ when exporting to print, using the "Sculpteo" file type. Sculpteo also accepts VRML2 files, but the OBJ exporter sets some useful defaults for Sculpteo. One major advantage of Sculpteo is that they support the "Export lesser blocks" option, which allows you to export slabs, stairs, fences, doors, and other smaller objects. Please read the documentation for that option before using it. Also note that when you export, the price shown is the Shapeways price (more or less); Sculpteo prices tend to be about a third higher overall.
Once you have your export file ready, on the home page click on the Upload a 3D file button in the upper right (you can also go to your account and find the "Upload a new design" link).
On the upload page choose a file - you must pick the .ZIP file for your model. Adjust the design name, description, keywords, and categories as you wish (personally, I fill these in later, when I'm sure the model is a keeper). Note you can also add French translations; I use Google Translate. Agree to the terms of use at the bottom and click "OK". Wait a bit.
You should then get a page showing your model has been uploaded. You can interact with it in the viewport using left-mouse, right-mouse, middle-mouse, and scroll wheel. Pro tip: note that rotating by going up and down near the edge of the window gives a different rotation than going up and down in the middle. This can help you adjust the "up" direction.
You now have a number of options. The "Click to see repair work on your model" shows where objects were merged - usually not that useful. "See the price" brings you to the main page for the model. From here you can do a wide range of operations, and they're mostly self-explanatory. You can choose the material (colored by default), change the overall scale (and see the new price), or perform a solidity check. This last option is useful for seeing if some part of your model is likely to snap off during printing.
Note the links above these options. "Settings" lets you add photos, change your description and sharing options, and set the initial scale for the object. "Customize" gives some worthwhile options, such as engraving text, adding images and symbols, and smoothing the design. This last option can give a different sort of look to smaller models, though there is a risk of some bits of the model becoming detached when printed.
Smoothing: done using Sculpteo's "smooth the design" customization option.
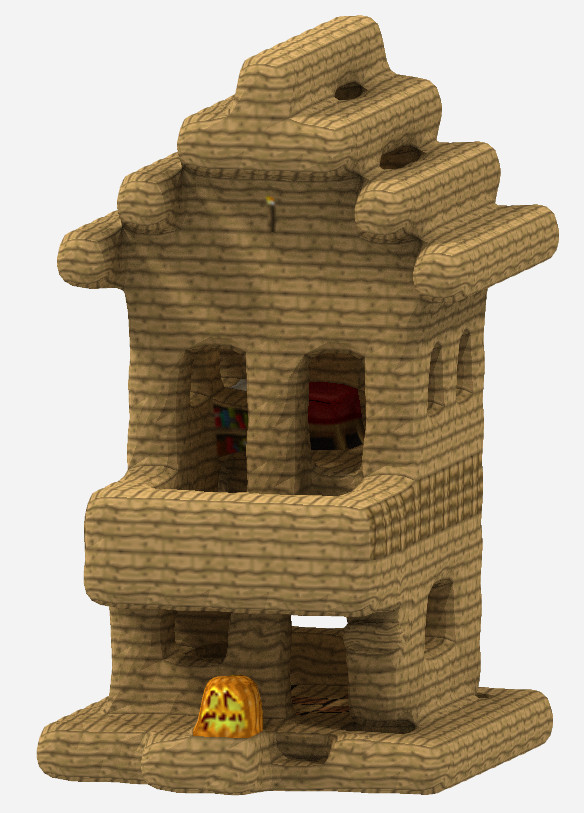
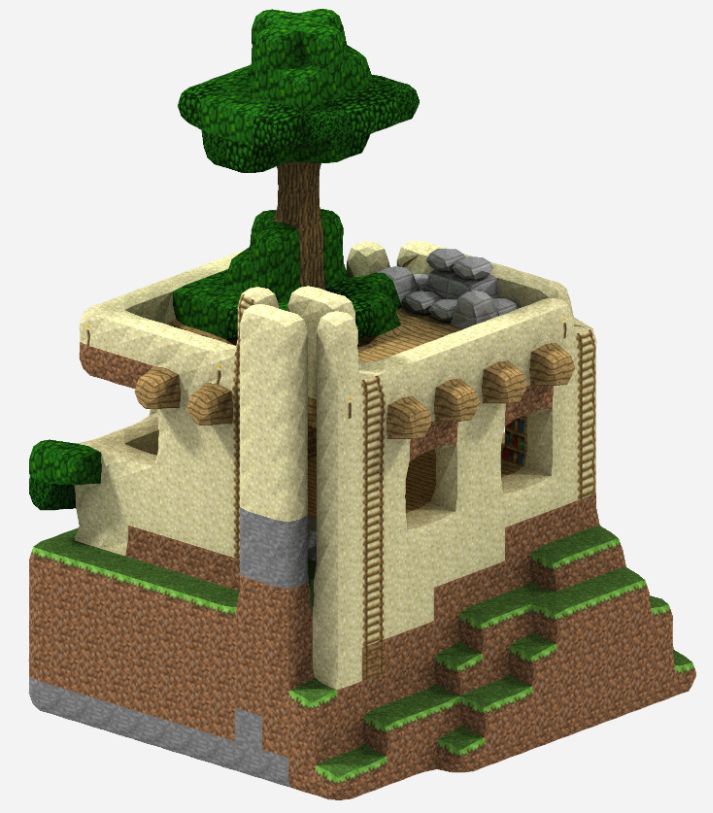
Scripting
By using "Import Settings" you can make Mineways do all sorts of things quickly. You can also temporarily modify blocks when exporting. It's easier to use than you might think, read about it here.
Related Resources
Here are some related (free) tools that are handy, collected in one spot:
- MeshLab for viewing exported models for 3D printing.
- The G3D viewer is excellent for previewing 3D OBJ files for rendering (sorry, not VRML or STL), as its support for cutouts is superior to the MeshLab viewer. It also includes real-time shadows and reflection-mapped water, as well as built-in screen and movie capture (only the viewer32.exe version has video capture). Models also load faster. Downside: on weaker GPUs it can be slow, and it doesn't work when exporting individual textures. Some examples here.
- MeshLab helps you convert, simplify, and smooth meshes, among a huge number of other operations. It's not the best for displaying textures.
- MCEdit Unified lets you make large-scale changes on your world; documentation here. For example, you could trim away objects near your model to make a cleaner export. You can also read in model schematic files you've downloaded. To use a schematic with Mineways, import the schematic into an empty world and save the world, then use Mineways on that world.
- WorldEdit is another mod that lets you make large edits to your world. It can load and save .schematic files, allowing you to export a model from Mineways and move it to a separate world. It also allows a huge number of modeling operations, including procedurally-generated models. It differs from MCEdit in that it is a plug-in to Minecraft, while MCEdit is standalone.
- VoxelSniper is another Bukkit addon for servers, providing a wide range of editing abilities.
- Mine-imator is a self-contained Minecraft video animation system. It can read in and view schematic files, among much else.
- Spritecraft converts an image to a schematic file, allowing you to easily create pixel art.
- Binvox goes the other direction, letting you turn a model file into a voxelized representation, suitable for building or export to a schematic file. I have a quick-start Binvox package for Windows: binvox, viewvox, GLUT DLL, two sample 3D models, and batch files to run the programs. Documentation here. For more info, see the forum thread and related forum thread. I used it to make the teapot, guardian, and hopper, among other models.
- Qubicle costs money, but has some nice functions. It is a set of voxel-based utilities, including an editor and a voxelizer that computes a good color for the voxel from the material.
- CraftMaster has developed a program for voxelization specifically aimed at Minecraft, and that exports directly to Sketchfab.
- TinkerCAD is an online CAD program. You can now export to Minecraft from it - try the "Download for Minecraft" feature, now with materials. You can also search for Minecraft-related objects. See this video for how to use it and export.
- Biome Painter lets you modify the biomes of your world. If you get it, make sure to use the "Help" menu "Check for updates" feature.
- More Minecraft tools here.
Stuff to Print and Render
Want something to try Mineways on? There are a number of sites with cool downloadable models and worlds, including:
- Planet Minecraft projects - all sorts of great stuff to print, sorted by popularity.
- Minecraft World Map has a large number of worlds and includes a nice Google Maps preview feature.
- Open Street Map has a Minecraft-related page of resources. Many people have made all sorts of maps, including one of the entire earth.
You could get a copy of our world, Vokselia. I've also got a Shapeways shop, where you can view photos of different 3D prints and download the model files themselves. You could also buy any of these (though you should just make your own!).
For something amazing, check this out (more here)- meta! Double-meta, I exported this model using Mineways, check it out.
Other Packages
Mineways is not the first to offer a Minecraft model exporter, nor necessarily the best for export for rendering. Minepedia has a page about exporters. Here's more information on the ones I know about and related services.
- Jmc2obj is a Java-based (so multi-platform) exporter for rendering. It is actively developed, but I find I can no longer quite get the textures to attach properly to the surfaces. You do need to export textures first, typically giving you a single texture to work from, which is then applied to the model. If you get it going (let me know the secret), it has some nice features, nicer than Mineways in some ways.
- MCprep is a Blender python script that can improve model quality of Mineways and jmc2obj exports. Here's my short video on how to install and use it for that. But, it does much more than that, including letting you add mobs, swap in custom 3D meshes for objects, change character skins, etc.
- Chunky is an amazing self-contained path-traced renderer: choose your chunks, load them, set the view and let 'er rip. Definitely try out the various options.
- OptiFine, Sonic Ether's Unbelievable Shaders, and related resource packs are definitely worth checking out. Find information here.
- Mine-imator lets you directly import from Minecraft and animate. It's pretty impressive! However, it doesn't export to 3D model files, so I guess I need to keep working on Mineways.
- MagicaVoxel read Minecraft schematics and gives a nice rendering of them. It's best for large models, as it converts everything to colored blocks, no details. There is also code to convert to its .vox format.
- Blokify is a free Minecraft-style modeler for the iPad. I found placing individual blocks a bit dicey, but that's because they've built in ways to fill in lines of blocks in a single go. You can email yourself the resulting STL file (though it didn't work for me). The blocks used are geometrically textured, so 3D print out with more than just simple flat surfaces.
- Voxel is an iPad app that lets you design in voxels and send your model directly to Sculpteo for printing.
- Minecraft Schematic Store - buy and sell Minecraft schematics (note that Mineways has an Export Schematic option).
- MineToys offers 3D prints of your character. More on how MineToys works here.
Older Stuff
Mostly defunct, but FYI and because I like to keep track.
- The Minecraft Animation Wiki is mostly about animations made by others, but has a few pages of direct interest to creators, such as who uses what programs for Minecraft animation.
- Printcraft is a cool idea: you go onto this server, build something with friends, then push the Print button and an STL file of your build is sent to you. No muss, no fuss. Meant for home and school 3D printers for the most part, since the STL comes without any colors.
- SourceCraft creates maps for Valve's Source engine, for games such as Team Fortress 2 and Garry's Mod, via Minecraft.
- dynmap has an option to export blocks, even custom blocks, to the OBJ format. I haven't tried it; let me know how you find it.
- Mineblend - an add-on that extracts data from a world directly into Blender. Defunct, no updates since 2015, but mentioned because I'm a completist.
- MINECRAFT.print() - these guys were first to print Minecraft models, all glory to them! You run some python scripts from a command line to take a volume and turn it into an STL file. There's a hollowing function (their Companion Cube is not solid, thank heavens). Cody pointed out this nice little color export someone did using their scripts. All that said, the python script is years out of date and won't work on Minecraft version 1.2 on (Anvil format).
- Cura, the software for the Ultimaker 3D printer, has a Minecraft import option, step-by-step instructions here. Again, ancient, but I like to keep track.
- Minecraft structure planner - written in Ruby, this is a basic exporter of STL files from schematics. It's the first program I know to export color models from Minecraft for 3D printing.
- Minecraft world exporter (old thread) - Mineways works only with worlds you have locally on your computer. If you can't download the multiplayer world you're in, use this mod to suck in whatever chunks you see.
- Eihort was an easy-to-use standalone program that lets you see and explore much more of your world at once.
- mc2obj (documentation and source here) - mentioned mostly for historical purposes, it has been superseded by jmc2obj, mentioned earlier. This utility pulls in the specified Minecraft world data and makes an OBJ file. It includes true geometry vs. Mineways' whole block orientation.
- mcobj - again mentioned for historical purposes, the first-known exporter. There is a Blender tutorial and a gallery of results. It has command-line and dialog versions. Source available. It didn't apply textures.
- Thingiverse - this site contains a bunch of Minecraft-related models if you are looking for things to print. I think this one is brilliant.
- Minecraft Reality sadly doesn't seem to be around any longer, but the demos of Minecraft objects inserted into the real world are cool to look at. It beat the (now-defunct) Minecraft Earth to the punch by seven years.
Minecraft Bedrock Support
Mineways works on only Minecraft Java (aka Classic) Edition worlds. Minecraft for Windows 10, also known as the Bedrock Edition, uses an entirely different database format for its worlds, called LevelDB. If your level.dat files are located in a directory with the path ..."\AppData\Local\Packages\Microsoft.Minecraft"... in it, or have weird directory names like "ZAD1Xfl9AAA=", that's a Bedrock Edition save. This section describes how to convert a Minecraft Bedrock world to a Minecraft Java Edition one so that Mineways can read it.
The options I know of are:
- MCC ToolChest PE - a little quirky, but free. Sadly, it seems to have disappeared in June 2021; we link to the archived site where you can still download it (should work for Minecraft 1.16 and earlier).
- Universal Minecraft Converter - evidently more reliable than the MCC ToolChest, but is a (rather pricey) subscription service.
What follows are instructions for the free MCC ToolChest PE. Download it, install, and run. If you get an error about some missing DLL, you may also need to install the VS 2015 C++ Runtime. Once running, do the following in MCC ToolChest - PE:
- Select "File | Open" and choose the Bedrock world you want to convert. It should read in, and you'll see "level.dat", "players", etc. listed on the left. If you don't see the world you want to convert, you'll need to (somehow) get it to your PC and find its path via "File | Open" and "Select Folder."
- Select "Tools | Convert -> To Java." A large dialog box appears.
- For the "Minecraft Java world folder" at the top put a path where you want to create the converted world. If you leave it the default "\" you'll get a mysterious error. As an example, I use "C:\Users\erich\AppData\Roaming\.minecraft\saves\bedrock_test\" - my user name is "erich" and the world directory name I want for the converted world is "bedrock_test." By putting the path "...\AppData\Roaming\.minecraft\saves\..." I am putting the converted world in the default directory for Minecraft Java worlds, which means it will then show up in Mineways' list of worlds automatically.
- Halfway down on the left of the dialog look for "Convert into." Change this from "Empty Dimension" to "Empty World."
- Click "Convert" at the bottom of the dialog. Cross fingers.
If there were no errors, great, and you should see your converted world in your saves directory, and Mineways can then convert it. In Mineways you should look for the directory name of the world on the right-hand side of the "File | Open World" list of worlds.
If you did get some error, try the "Help" button, it might actually help. I found not setting "Convert into" properly or not giving a good directory path can give errors.
If you need more help, this older site might help.
Note that this tool can also convert from Java to Bedrock, if that's of interest. This video goes through most of the steps for that process. There's also this detailed guide, which filters out bad data.
There are other, lesser converters out there. MCEdit has worked in the past, but it comes and goes. Another possibility is to find some way to convert your model to the Schematic file format, which Mineways also reads. For consoles, there is also this poorly-rated one that looks unlikely to work.
Structure Block Export
You can also export 3D data from (only) the Bedrock Edition directly to a 3D model file format, the glTF binary format. Give yourself a structure block in Minecraft by typing the command "/give @s structure_block". Place this block near the area you want to export, then right-click it. A dialog comes up in which you can specify the size of the export (never larger than 32x32x32, even if you set it higher), the offset, and the file name to export to, along with some other options. This file can then be viewed by the built-in Paint 3D program and be converted and loaded by many other programs in the glTF ecosystem.
Keyboard Shortcut Keys
The quick reference of handy shortcuts is here, with the full list here. Most operations in Mineways can be done with the mouse: left button drag and mouse wheel for viewing, middle mouse click for setting the depth to whatever is at that location, right mouse selects a region to export. If you don't have a right mouse button, hold Control down and use the left mouse button. Instead of using the height sliders at the top, using the mousewheel with the Control key down changes the depth, with Shift down changes the max. height (this second mode can be slow, since the map is regenerated). More on mouse controls in the Selection section.
Block Types Supported
There are two main modes of export: for rendering and for 3D printing. These mainly differ in that some blocks, such as flowers, are not things that can be printed as is. For 3D printing, the "Export lesser blocks" option has a major effect on what gets exported. Note that this option is on by default for rendering; turning it off will turn a number of blocks into "full blocks" instead of true geometry, for a more abstract look (but, no one ever turns it off). Finally, for the "lesser blocks" option there's a "fatten" suboption, which makes fences, fence gates, doors, free-standing sign posts, and pressure plates thicker, so they're more likely to print without snapping off.
If you want to test particular blocks to see what they look like, use the "[Block Test World]" and the block IDs to select and export whatever block types in whatever mode you want. For 1.16 or earlier, you can also create a Debug block world in Minecraft itself (short version: "Create New World", "More World Options...", hold Shift and keep clicking on "World Type:" until "Debug Mode" comes up) - note Mineways doesn't support everything. Alternately, you could find a texture test world you like, such as this one.
Here's what Mineways exports as of version 5.01:
Mineways does not support export of characters, creatures, sign text, paintings, or banner patterns, among other things.
All "full blocks" (stone, dirt, wood, on and on) export the same under all modes. The table below outlines the rest. "Flatten" means a billboard, such as a flower, or small object, such as a torch or lever, is flattened to be a decal on the block below, since such objects are too thin to be 3D printed.
Also see candle.
| Block Type and ID (for 1.12 and earlier) | Render Export | Print Export | Print w/"Lesser" | Notes |
| Saplings (#6) Tall Grass (#31) Dead Bush (#32) Flowers (#37, #38, #175) Mushrooms (#39, #40) Pumpkin and Melon Stems (#104, #105) | | | | Pumpkin and melon stems do not darken with maturity when exported from Mineways. When "Split by block type" is set, separate (identical - you may edit these) materials are output for each age of stem, 0 through 7, e.g., "Pumpkin_Stem_age_5" is nearly fully mature. |
| Water (#8) Stationary Water (#9) Lava (#10) Stationary Lava (#11) | | | | The bottommost texture copy found in Minecraft's water_still.png and lava_still.png are used for these blocks. The water_flow.png and lava_flow.png bottommost left tiles are used only for vertical walls. For walls behind glass blocks, water_overlay.png is used. Bubble columns are identified as a subtype of Stationary Water when output with "split by block type" but have no effect on rendering otherwise. |
| Bed (#26) | | | | |
| Rails (#27, #28, #66) | | | | |
| Cobweb (#30) | | | | |
| Piston Extension (#34) | | | | Detailed piston heads not fattened for 3D printing, may break. The "short" property for pistons is ignored, the model is always exported full length. |
| Slabs (#44, #126) | | | | |
| Torches (#50, #75, #76) | | | | |
| [Soul] Fire (#51) | | | | The bottommost texture copy found in Minecraft's fire_layer_0.png is used for this block. The various direction data values are ignored; the fire is always solid. |
| Stairs (#53, #67, #108, #109, #114, #128, #134, #135, #136, #163, #164) | | | | Note that Minecraft 1.4 connects stairs differently. If you have a pre-1.4 world, use Mineways 2.22 to export it. |
| Chests (#54, #95, #146) | | | | The chest textures in terrainExt.png are created by TileMaker using assets/minecraft/textures/entity/chest normal.png and normal_double.png. |
| Redstone Wire (#55) | | | | In Mineways wire is show either off or on, baked into the texture, with no gradations. When "Split by block type" is used, the redstone wire is separated into up to 16 (identical - you may edit these) materials, "Redstone_Wire_power_15" down to "_power_0" to show how bright the wire should appear. For 1.16, the ability to turn an isolated dot into a cross is not supported in Mineways current. |
| Wheat Seeds (#59) Sugar Cane (#83) Nether Wart (#115) Carrots (#141) Potatoes (#142) Beet Seeds (#207) | | | | The fully matured texture is used for printing, on all sides. |
| Farmland (#60) | | | | Wetness level is ignored. |
| Doors (#64, #71) | | | | Door hinges on edges are not consistent with Minecraft (which are also inconsistent with their frames). |
| Ladder (#65) Lily Pad (#111) | | | | Orientation of lily pad is not available in basic data, so orientation is always the same. |
| Wall Sign (#68) Pressure Plates (#70, #72) Buttons (#77, #143) Snow (#78) | | | | Wall signs are put next to wall for printing - no gap. |
| Lever (#69) | | | | |
| Cactus (#81) | | | | |
| Fences (#85, #113) Fence Gate (#81) Cobblestone Wall (#139) | | | | |
| Portal (#90) | | Uses the last texture copy in the Minecraft portal.png texture. | ||
| Cake (#92) | | | | |
| Redstone Repeaters (#93, #94) and Comparators (#149, #150) | | | | |
| Trapdoor (#96) | | | | |
| Iron Bars (#101) | | | | |
| Glass Pane (#102) | | | | |
| Vines (#106) | | | | Since vines cannot hang in air for printing, blocks are added. |
| Enchanting Table (#116) | | | | |
| Brewing Stand (#117) | | | | Delicate, and billboards won't print on a 3D printer. |
| Cauldron (#118) Dragon Egg (#122) | | | | When printed, area under cauldron is solid; top bit not added to completed portal frame. |
| End Portal (#119) End Gateway (#209) | | Uses the custom texture MW_END_PORTAL.png for the void | ||
| End Portal Frame (#120) | | | | |
| Cocoa Pod (#127) | | | | Stem is removed for "lesser" printing. |
| Ender Chest (#130) | | | | The ender chest textures in terrainExt.png are created by TileMaker using assets/minecraft/textures/entity/chest/ender.png. |
| Tripwire Hook (#131) | | | | Note that tripwire itself is currently not added. |
| Tripwire (#132) | | Hey, it's supposed to be hidden... | ||
| Beacon (#138) | | | | Faked by putting "beacon.png" texture at 11,14 in terrainExt.png. |
| Flower Pot (#140) | | | | In Minecraft flower pot flowers are dimmer than the originals. Mineways does not dim these. |
| Head (#144) | | | | Mineways reads block entity data to get the rotation and type of head, but currently does not use the head type to put something other than a pumpkin. There is an add-on for Blender that fixes this limitation. |
| Hopper (#154) | | | | |
| Barrier (#166) | | To make the barrier appear, create a color scheme and change the barrier's alpha to 255. | ||
| Standing Banners (#176) | | | | |
| Wall Banners (#177) | | | | |
| End Rod (#198) | | | | |
| Chorus Plant (#198) | | | | In the game itself the shape used varies based on location, in some unknown way. |
| Grass Path (#208) | | | | Renamed to "Dirt Path" in MC 1.17, so Mineways 9.00 and newer versions use this name. |
| Structure Void (#217) | | To make the tiny structure void block appear, create a color scheme and change the alpha to 255, and "Show all objects" (F7) to see it on the map. Structure void uses red wool for its tiny output block. | ||
| Observer (#218) | | The lit observer texture is found in terrainExt.png, but is not tested for and displayed. | ||
| Shulker Boxes (#219-234) | | Shulker box sides and bottoms are created by using the color of the upper left pixel (2,2) of the top of the shulker box compared to the white shulker box top, multiplied by MW_SHULKER_SIDE and MW_SHULKER_BOTTOM. | ||
| Coral, Coral Fan, Coral Wall Fan | | | | Flattened texture always applied to ground, even if wall fan. |
| Sea Pickle | | | | Textures not applied exactly right. "Split by block type" will give separate emission levels based on number of pickles. |
| Turtle Egg | | | | 1.14-style eggs; 1.13 mapped a 4x4 texture to a 3x3-size egg. Textures not applied exactly right. |
| Bamboo | | | | Using the bamboo mosaic texture when 3D printing is a little odd, but better than nothing. |
| Stonecutter | | | | |
| Lectern | | | | |
| Lantern | | | | |
| [Soul] Campfire | | | | "Split by block type" will give separate emission levels for when the campfire is lit or extinguished. |
| Scaffolding | | | | Side texture for 3D printing is a little bit wrong, being thick on the top. |
| Respawn Anchor | | | | "Split by block type" will give separate emission levels for how many charges are left, 0-4. |
| Candles | | | | No fire is exported on the wick for lit candles. "Split by block type" will give separate emission levels based on number of lit candles. |
| Light | | Meant for map makers | ||
Version History
You can also see release notes at the Github repository.
Find the latest Mac port on the downloads/quick start page.
The textures and rules used in Minecraft for how blocks appear and connect have changed over time, such as how stairs and chests are formed. If you want the closest fidelity, for a given version of Minecraft use the following version of Mineways. That said, older versions may have bugs fixed in newer versions. So, for texture consistency, you could also go the route of using the Minecraft textures of your world's version and make a special terrainExt file for Mineways, as explained on the textures page.
- Minecraft 1.17: Mineways version 9.00 or newer
- Minecraft 1.16: Mineways version 8.08
- Minecraft 1.15: Mineways version 7.12
- Minecraft 1.14: Mineways version 7.07
- Minecraft 1.13: Mineways version 6.08
- Minecraft 1.12 and earlier: Mineways version 5.10
From newest to oldest. The very newest is work in progress, with "*" meaning "to do" and "**" meaning "stretch goal."
- Version 9.06, */*/*
- USDA: Scale the emissive texture up properly (by about 1000) for the UsdPreviewSurface representation. YMMV - emission from surfaces is not well-defined for UsdPreviewSurface.
- USDA: Better default sun and dome light Euler angle ordering. X rotation is now altitude, Y is azimuth, Z does nothing.
- TileMaker version 3.11: use ..\terrainExt.png if terrainBase.png is not found in directory.
- *Update textures.html with new TileMaker behavior.
- Version 9.05, 11/2/2021 - exe, source.
- USDA: Export the backfaces of sunflowers.
- USDA: Export all cutouts and semitransparent textured objects as "doubleSided".
- Fix off-by-one error for world list, where the last world was listed but unselectable.
- Version 9.04, 10/26/2021 - exe, source.
- Major change: export the OBJ material attribute "map_d", so that textures will import with cutouts automatically. This helps Blender and Cinema 4D, among others. The custom G3D viewer has also been updated (and has a new name "viewer.exe" instead of "viewer64.exe"), fixing a bug it had with using a separate map_d when individual textures were exported from Mineways (it would extract the red channel instead of the alpha channel from the RGBA texture).
- Power user feature: drag and drop a model file (*.OBJ, *.USDA, *.WRL, or for STL, the related *.TXT file) on to Mineways and you will go to the settings used for that model (similar to Import Settings). Same with *.MWSCRIPT scripting files. Drop a terrainExt*.png and it will set this terrain file. Drop a .dat world file and it will open this world. Drop a .schematic file and it will open that model.
- OBJ: make "split by block type" the new default setting for OBJ export, to help improve assigned roughness (specular power) for all materials. Really, this option should probably go away at this point, as "block families" are not easily determined, since type numbers are no longer used.
- Tiny adjustment to sunflower back and front, so these no longer z-fight.
- OBJ and USD: fix and adjust the default roughness (and metalness, if used) for many materials to be more reasonable, basing off the created material name.
- USD: do not set sRGB for the emitter color space for UsdPreviewSurface.
- USD: a few materials were not properly marked as semitransparent. Ice and frosted ice, nether portal, and honey fixed.
- Sketchfab and USD: Check if glass and a few other textures are cutouts or semitransparent when they're output, so that map_d can be set if needed for Sketchfab and the opacityThreshold can be set appropriately for USD. Since its status can be determined, glass is now a cutout by default (as it is in original Minecraft).
- Do not allow the "individual textures" directory to be a path, only allow a simple folder name.
- Better error reporting for TileMaker (now version 3.10) when terrainBase.png is not in the current directory. (Thanks to Common for reporting the weak error reporting.)
- Make copper ore and deepslate copper ore more noticeably different than stone and deepslate on the map. (Thanks to MadeInSteak for the suggestion.)
- Rename "Export full color texture patterns" to "Export all textures to three images", to better describe it. Similarly, "Export separate textures" is now "Export individual textures", and "Export richer color textures" to "Export noise textures with color." Documentation, export code, and scripting updated.
- Change export directory name for individual blocks to "tex".
- Update documentation for Blender and C4D, now that map_d is exported properly.
- Remove ancient BlenderScripts directory - use MCprep instead.
- Updated JG-RTX terrain files with the very latest (they're constantly being updated). Notes: removed lava_flow_e.png as it's dim.
- Version 9.03, 10/10/2021 - exe, source.
- Fixed crash condition when "Delete floating objects" is checked for rendering export. Blocks along the "air block" buffer around the edges of the volume were being misidentified as containing something. Fixed because this video recommended checking "Delete floating objects."
- Updated JG-RTX terrain files with the very latest (they're constantly being updated).
- Version 9.02, 10/1/2021 - exe, source.
- Fixed dumb regression bug (as opposed to my usually highly intelligent bugs) turning glass and water opaque for USD export.
- Fix zipping up files to be more robust, properly grabbing all files and deleting subdirectories for USD if files themselves are not to be saved.
- Updated TileMaker to properly identify grayscale heightmaps, version 3.09.
- Updated JG-RTX terrain files with the very latest (they're constantly being updated).
- Version 9.01, 9/24/2021 - exe, source.
- Update: 9/29/2021 updated TileMaker to properly identify grayscale heightmaps, version 3.09. No new release; simply updated in the 9.01 zip file.
- Important bug fix: properly interpret flowing_water, flowing_lava, empty, and ominous_banner - not sure that last one is needed (thanks to theOther_Kloud for reporting this problem).
- Memory leak fixes: "empty" (no Sections) chunks were not cached, and clearing the cache during export did not properly free the new block structures.
- Read 1.18 beta worlds, as the data format has changed.
- Added ability to remap the left, middle, and right mouse buttons' functionality: use "Set mouse order" using scripting. The new remap_mouse_buttons.mwscript gives a fuller description.
- New command: View->Information (shortcut key: i). Shows major version of the world and other bits of information. The major version is also now shown at the top in the title.
- Make hotkeys work even if caps lock is on.
- When exporting using the biome, show in the statistics popup which biome was chosen, and note the same at the top of the OBJ, VRML, or USD file.
- Shrink grass by 15/16ths, and put it from 0.0 to 3.0 texels down (thanks to Raihan for reporting this problem).
- Since glass now has a tinted type, when filling areas with glass for 3D print export, set the data value properly to 0 to avoid problems.
- Improve USD opacityThreshold settings for cutouts, now that Houdini has fixed its renderer.
- Output lights first for USD export. This makes them easier to find and modify.
- Fix zip export for USD files, and allow single-texture 3D print output for 3D printed USD.
- Fixed azaleas in pots to display properly and have the right material name.
- Fix incorrect identification of double-height flowers when the top is cut off by the height slider.
- Better labels for various file selection dialogs; tiny spacing cleanups on export dialog box.
- Internal cleanups, handling empty chunks more carefully and cleanly.
- Show different colors for azalea, flowering or not.
- Note in the Color Scheme editor that entries 396 and 400 are unused.
- Version 1.07 of ChannelMixer and 3.06 of TileMaker: Interpret fletcher_table_side1 as fletching_table_front, fletcher_table_side2 as fletching_table_side.
- Texture packs updated to JG-RTX 0.19.1 and BD Craft 1.17. Sadly, Coterie and Doku look to be abandoned, with no 1.17 content, so may be dropped in the future.
- Fix documentation for 3D printing instructions about filling in doors and windows (thanks to Cadage for asking about this feature). Other minor documentation improvements.
- Version 9.00, 7/3/2021 - exe, source.
- Minecraft 1.17 support. This version of Mineways will read in older worlds, but uses the latest naming conventions, e.g., "Dirt Path" instead of "Grass Path," "Block of Lapis Lazuli" instead of "Lapiz Lazuli Block." Lectern top is lowered for 1.17. New textures used, of course.
- Chunk maximum "filled" height is now tracked on load. This speeds up model export, as well as providing faster map updates when the display mode is changed.
- The "Give more export memory!" feature has been further enhanced. When turned on, chunks that are loaded are reduced in storage size, eliminating the blank air storage at the top of each. This storage reduction can result in considerably slower map load times (about 3 times as long). But, overall memory use dropped from 2.8 GB to 1.8 GB for a giant full-screen view of a world.
- The increase in height for the 1.17 betas from 21w06a to 21w14a is supported, but back to normal height for 21w15a on.
- Fix tall seagrass so that it extends one pixel higher (thanks to Raihan for reporting this problem).
- Have TileMaker (v.3.05) not flag any tiles manufactured internally by Mineways as missing.
- Fixed bug in TileMaker where if a _normal and _heightmap PNG both existed, no warning was produced and the heightmap was not properly ignored.
- ChannelMixer (v.1.06) now quietly ignores files that are not used by Mineways, e.g., debug.png, instead of reporting them as unused. This should make it easier to identify which textures are in a resource pack that have non-standard naming.
- UsdPreviewSurface had "asset inputs:wrapS", fixed to "token inputs:wrapS".
- UsdPreviewSurface now negates the inputs:scale and inputs:bias values to be -2.0f and 1.0f, respectively, to get normal mapping to work properly.
- Fix "Glass" to be transparent and not a cutout.
- Change "Export tiles to textures" to "Export separate textures", which I think is clearer.
- Tiny space optimization: cut back on the "standard" set of normals output, as possible.
- Other little fixes to names for blocks, cleanups for 3D colored prints, etc.
- Remove terrainExt_ModernHD.png terrain, as this pack has not been updated since 1.13. Updated Coterie Craft to 1.16, but at 16x resolution, down from 32x.
- Version 8.08, 6/17/2021 - exe, source.
- Re-fix the biome system - I fixed a biome bug in 8.06, but then left in some debug code that forced everything to be a swamp. D'oh. Thanks to Evgenii for reporting this major bug.
- Add "Focus View" option, under the View menu. Lets you center the view at a given location.
- Fix issue #82, add base color to banners exported from worlds from Minecraft 1.12 and earlier.
- Change doors to all possibly have cutouts. While vanilla Minecraft doors do not, some resource packs add cutouts. Really, I should test all textures for alpha cutouts, but that can be costly and it's simpler to just note doors can have semi-transparency.
- Change UsdPreviewSurface to output the opacity threshold and use the diffuse texture alpha only if the texture has semitransparency or is a cutout.
- Version 8.07, 5/5/2021 - exe, source.
- Fix obscure interaction between OBJ and USDA individual block export by making the two values entirely separate.
- Clean up [Block Test World] map a bit, getting rid of duplicates such as Dead Bush (33:0 and 34:0) and Double Quartz Slab (43:7 and 43:15), adding types of Wood.
- Unify UDSA export files: put all export files other than the primary USDA file in a subdirectory. This is much tidier, though it means the custom materials need to be recompiled for every model, not per directory, and the texture library directory doesn't get shared (for good or ill). Also removed unneeded parameters from the Minecraft.mdl file.
- Fix USDA instancing: don't shift instances from origin, move all scaling to scale transformation, get rid of non-graphical data values (such as the age of the fire), check for piston as a full block, note double slabs are waterloggable but don't actually output water for their locations, and much other trivia too painful to describe.
- Added a video for using Mineways with the free Houdini Apprentice program.
- Version 8.06, 4/14/2021 - exe, source.
- For USD export, allow export of individual blocks, created as instances. The "Export individual blocks" option creates separate block and material USD files. Not every block type will export nicely, due to limitations in Mineways' data structures, but it gets pretty close. The excitement here is that it means simulations or other manipulations are now possible for USD scenes.
- Map grid, "m" hotkey: overlays a grid showing the Anvil (r*.mca) file bounds and the individual chunks. Also, map file and chunk numbers are now always shown in the status display in the lower left. One of those "I should have added this a decade ago" features, as it also helps me debug. (thanks to lajawi for the suggestion.)
- Note if block is waterlogged in status display (but only if it isn't always waterlogged, i.e., inherent).
- Add waterlogged status to some [Block Test World] blocks; also fix this world in a number of places.
- Updated color schemes to include all block types, using my internal block type numbering scheme for blocks from 1.13 on. If you get flaky problems with old color schemes, at worst you can always run REGEDIT and delete the ColorSchemes directory at "Computer\HKEY_CURRENT_USER\Software\<your name here>\Mineways".
- Fix walls: increase height by one, and become solid (and remove the post if not at a junction) if there is an object above the post. Note that the new 1.16 wall rules are not complete, but closer than they were. It will take major rework of the data values system (e.g., go to 16 bits) to capture the full state of a wall block. (Thanks to Joefy200 for reporting this bug.)
- Fix fences: glass blocks now properly connect to fences. Also encoded fences, iron bars, clear glass pane, pumpkin and melon stems, and chorus plants to properly read in and use attributes stored in 1.13 and newer maps.
- Fix biome coloration code: mesa and roofed forest colors fixed. (Thanks to Joefy200 for reporting this bug.)
- Kick the built-in Block Test World up two blocks in height, so that the visible y height is not negative.
- Cleaned up VRML export, so that it properly shows in the export dialog using a single mosaic tile during export. Fixed VRML and STL export so that radio buttons that should not be selectable, aren't.
- UsdPreview fixes for Houdini: opacityThreshold set to 0.001, set proper wrap mode for s and t texture wrapping.
- Changed "map_metallic" to "map_Pm", proposed here and noted here. Output both "norm" and "map_Kn" for normal maps and both "map_ns" and "map_Ns" for shininess maps when exporting PBR textures to OBJ materials, due to this issue.
- ChannelMixer/TileMaker: support TGA input. Improve logic for testing for cutouts, clean up error and warning messages.
- For UsdPreview material, set wrapping vs. clamping of tiles, to avoid "fire wrap" problem (where the bottom of a fire gets interpolated to the top edge of the tile). I believe I made this fix in 8.05 but forgot to record it.
- Fixed sapling name display, properly masking off the age_bit.
- Added a "Nightmare List" to the docs, basically proposed features that seem like too much work for too little return.
- Version 8.05, 3/16/2021 - exe, source.
- Fix a regression: waterlogged glass panes now properly connect with one another again. (Thanks to Parkouristik93 for reporting this error.)
- Fix textures on waterlogged glass panes.
- Fix waterlogged chain to be properly oriented.
- Fix lanterns to be waterloggable.
- Version 8.04, 3/12/2021 - exe, source.
- Better fix for Minecraft 1.17 beta export - now shows height properly. Note: due to the height increase, this version and future versions of Mineways will use about 50% more memory for all maps. If you find you get an out-of-memory error during export, selecting the "Give more export memory!" item in the Help menu before export will free up all cached offscreen chunks, at the expense of map update performance.
- For OBJ export, a mild specular highlight (Ns) and relative Ks is now exported, if "Custom material" is chosen (which is now the default). This works nicely with G3D, which applies a reflectance map. If "Custom Material" is not selected, a minimal MTL is exported. See Custom Material for more information.
- USDA Glass and water look better now, due to turning on the opacity texture for MDL and turning the opacityThreshold to 0 for UsdPreview. Also, the emission texture is now exported; previously, it was not, due to a misplaced line of code.
- Improve export of grayscale textures from Mineways. Now there are better rules to decide if a tile is grayscale (and should be tinted by the color assigned to the block or by using the biome) or if it is already fully colored, as done by some resource pack creators.
- Use "invisible" neighbors to affect the output. That is, given an export area, there are neighboring blocks that are not output but that can affect whether a fence is created, what the height of the water should be, etc. These invisible neighbors were used only when "Create block faces at the borders" was off, but they should be used all the time, so that water doesn't "droop" around the region edges. Note for making tiles you'll still probably want to turn off borders at edges.
- Fix water height calculations to be affected by "invisible" neighbors.
- Double-chests that are chopped in half now are "capped" vs. being incomplete, when "Create block faces at the borders" is on (latches are still exported for only the left side of a double chest). Note: this fix may affect other objects - let me know of any bugs.
- TileMaker: Crazy involved code to examine the grass_side_overlay/grass_side/grass_side_carried textures and try to use the right ones.
- ChannelMixer and TileMaker: Detect heightfields better, and support "_heightmap.png" extension directly.
- Updated JG-RTX to 0.14.2-alpha.
- Version 8.03, 2/15/2021 - exe, source.
- Temporary patch for 1.17 beta crash, issue #75. For snapshot 20w49a and newer, 64 is added to the world's height, so that the now-deeper underworld is handled. This means Mineways Y coordinates for these worlds is displayed incorrectly, until I come up with a full patch. As important, "only" 256 levels, Y=-64 to Y=191, for beta worlds will be displayed. Anything higher is ignored.
- Added "Transparent water" toggle to the View menu, hotkey "t". This removes water from the map view, only. Water blocks will still be exported normally. If you truly want to remove water from export, use a color scheme and set the alphas of water and stationary water, #8 and #9, to 0.
- Properly set the stonecutter block with a flag noting it has cutout content, the saw.
- Fixed output of normal map textures for the UsdPreview material, properly scaling and biasing them.
- Added the ability to change the normal map strength for custom USDA materials. Lower resolution normal maps are often formed poorly by their creators, resulting in the bumps getting blended away. Increasing the strength, essentially the slope, of normal maps can help improve these a bit. This is also useful for heightfield textures, where a scale factor is not specified.
- ChannelMixer now also detects BMP files and warns of them. ChannelMixer now warns of valid files found but ignored due to the "-k" flag being set, and gives a summary of the types of files found.
- Updated JG-RTX to 0.12.0-alpha, the rustic release.
- Version 8.02, 1/29/2021 - exe, source.
- Display some statistics when done exporting for rendering. This has the bonus of making a "ding" sound when an export completes.
- Added a beta of USDPreview materials, which means that programs that read USD files (such as the free Houdini Apprentice) can use Mineways USD export files. (Thanks, Ben Skinner!)
- Added LunaHD sampler and Smoolistic PBR texture packs. See previews.
- Somewhat better progress bar update when reading in large PBR terrain file sets.
- Fixed stair orientation for stairs in version 1.13 on (issue #68). (Thanks to ChlorideCull for reporting it.)
- Fixed "Change blocks" scripting command bug (issue #69). (Thanks to ChlorideCull for reporting it and pointing to the code change that caused it.)
- Extended the "Change blocks" scripting command to partially support 1.13+ block names, and updated the scripting documentation.
- Make the array for swatch UVs larger, to avoid crashing when exporting large 3D prints.
- ChannelMixer now attempts to test if texture files are in the newer LabPBR format where the specular alpha channel holds emission data. ChannelMixer also now detects JPEG images that have not been converted to PNG and warns about them. Incremented to version 1.01.
- TileMaker now checks if a block's tile is not properly square. Incremented to version 3.01.
- The lodepng PNG reading package was updated to a new version (which has better memory handling and bug fixes) and regrooved for wide character filenames.
- Internal: change mallocs to callocs for slightly better and more readable code.
- Version 8.01, 12/17/2020 - exe, source.
- A small flaw in one custom material file was causing Omniverse Create's renderer to spend about 50% more time ray tracing than needed. Fixed.
- Added "Choose Terrain File" selector to File menu. All color "terrainExt*.png" files found in the same directory as mineways.exe at startup are listed.
- Added a low-res version of LunaHD as an optional terrain file set for rendering.
- Added more menu items for specific help, and for the terrain file download area.
- Reorganized the terrain file documentation and generally cleaned up and updated it.
- JG-RTX updated, and brick replaced with a less obvious repeat pattern.
- 8.01a release: to avoid release fatigue, I've taken the unusual step of making an "01a" release. Changes: terrain file directory detection fix, small updates to docs, use PNG image crush on JG RTX to reduce download size.
- Version 8.00, 12/15/2020 - exe, source.
- Support for USD into Omniverse Create. USD is a new file format used by the film industry. Omniverse Create is a free product out in beta that lets you see your scene path-traced at interactive rates. See this documentation for how to use Create with Mineways.
- Physically based material support. USD supports exporting more elaborate material models. Mineways integrates with this, exporting USDA files and physically based textures from resource packs. To help the process of taking an arbitrary resource pack and converting it to the textures Mineways needs, a new easy-to-use (really!) command-line utility is available: ChannelMixer.
- TileMaker regrooved. TileMaker takes block face textures and makes "terrain files" that Mineways uses to texture models. This utility program has gone through an overhaul, now supporting making physically based terrain files for Mineways, for use by Omniverse Create and possibly OBJ files. See the new documentation page for a tutorial and details.
- JG RTX: This resource pack is included with Mineways, in both 64x64 and 256x256 versions. That's why the download got so large... Download the original for higher resolution versions of some textures.
- Fix chain export bug by supporting horizontal chains. (Thanks to Chris for reporting this bug.)
- The shortcut control-A now selects the entire visible screen when exporting from a world map. For schematics opened in Mineways, control-A continues to select the entire schematic, regardless of the visible screen.
- For custom terrain files, don't multiply by the biome color if the texture itself is not grayscale. Applies to grasses, ferns, leaves, water, stems, vines, redstone wire, and lily pad.
- Other small cleanups and better use of memory.
- Version 7.20, 11/30/2020 - exe, source.
- If a terrain file other than the default "TerrainExt.png" is selected, show that name in the title bar at the top.
- Fix chest to use proper latch, not the Ender chest latch.
- When a campfire was put on a hay bale to make a signal fire, Mineways would export a soul campfire - fixed.
- Fix end portal so that it is the proper height and just a two-sided layer, not a full block.
- Campfires were incorrectly lit, due to a flag not being cleared from button settings - fixed (Thanks to Kyra007 for reporting this bug).
- Blocks of redstone were incorrectly acting as emitters - fixed.
- Nether portals for pre-1.13 worlds were not getting exported properly if they ran north-south.
- Snow was getting converted to stone cutters when MCPE converted from Bedrock to Java and then Mineways read this faulty conversion in. Guard code has been added to avoid this error, but MCPE itself needs to be fixed in order for all snow thicknesses to be correct (Thanks to Tate B. Hickman for reporting this bug).
- You can now specify the terrain file(s) to use on startup on the command line; use "-t terrainExtYourfile.png".
- The elevation shading and lighting setting is now saved, and restored using "Import Settings."
- Fix export progression system so that progress shown during export is a bit more proportional to the time actually used.
- If TileMaker's normals terrain file is present, Export normal map textures within the OBJ export, for the "Export tiles" option.
- Numerous small cleanups and fixes.
- Note: there is now an add-on for Blender that fixes the "generic head" problem.
- Version 7.19, 8/27/2020 - exe, source.
- Fix problem of schematic export not exporting, and other gzip-related file close problems. This fix introduced in 7.15 caused the problem.
- Fix tile associations so that, when exporting separate textures, more materials will be properly flagged as emitters. Currently the pumpkin/jack o' lantern and the redstone block ore materials still are not separated into non-emitters and emitters.
- To ease substitution of separate textures, any synthesized textures (where the grayscale texture is tinted by Mineways, such as for leaves and water, or composited textures, i.e., grass_block_side) are now identified by a suffix of "_y.png" to differentiate them from their original textures.
- Fix output material name for grass_block_side to not include the word "overlay".
- Properly do a full composite for grass side overlay tiles that have alphas between 0 and 255.
- In TileMaker, update some alternate tile names to match Bedrock or other newer names.
- Updated with new tiles from Sphax PureBDCraft and Doku Light 1.16.
- Checked 1.16.2 terrain files. Happily, these are unchanged from 1.16.1.
- Version 7.18, 7/4/2020 - exe, source.
- Improve TileMaker, now version 2.15:
- Test all input images to make sure their height is a reasonable multiple of their width. If not, give an error and ignore.
- Test input chest images to ensure they are using powers of two. If not, give an error and ignore.
- Add option '-z pathname' that lets the user point directly at the directory location where the texture pack has been unzipped. Documentation and example added.
- Show all errors at the end of the console output, so the user can easily see them.
- Update to the 1.16.1 final terrain tiles; only the "water_overlay.png" changed.
- If the Terrain File and export settings lead to a single texture that is 16,384 x 16,384 pixels or larger, warn the user that this size can cause problems for other programs and give suggestions for better ways to export the data.
- Add a few more (possibly useless) digits to the vertex texture coordinate output for OBJs, just to make sure we're doing the best we can when high resolution Terrain File textures are used.
- Sphax PureBDCraft and other included texture packs updated a little with cleanups.
- Improve TileMaker, now version 2.15:
- Version 7.17, 6/27/2020 - exe, source.
- Coral was getting converted to jigsaw pieces when underwater, because I missed masking off a "waterlogged" bit. I've also masked out other blocks' unneeded bits now when checking the subtype, just in case.
- Version 7.16, 6/20/2020 - exe, source.
- Fix gaps due to path and farmland blocks not truly filling the full block. (Thanks to roket333 for reporting this problem)
- Fixed tiled texture output so that individual block export and other options work better.
- Lower the lily pad by 0.5 in pixelspace to match Minecraft.
- The export property "Material per object" is now called "Material per family".
- Improve documentation for Wavefront OBJ export options by adding an example, etc.
- Version 7.15, 5/30/2020 - exe, source.
- Fix problem of reading empty (not yet created) chunks that have no Biomes array in them yet. (thanks to Artiom Boyko for reporting this)
- Improved warning messages for when there are no worlds in the Minecraft save directory.
- Fix conflict between zlib and MSVC for closing files; use fclose instead of gzclose on gzipped files.
- Version 7.14, 5/20/2020 - exe, source.
- Fixed problem of empty areas showing random terrain.
- Fix Bee Nest color on map.
- Added scripting option "Selection location: all" - which does not select everything in a world, but is a useful shorthand for selecting everything in a typical schematic file.
- Fixed STL export so that all statistical data is properly added to the text file.
- Fixed the problem of an imported STL .txt file causing the appearance of two texture export states.
- If bad data is encountered, close the file with the problem (the code was always closing the model file).
- Cleaned up dead links and other problems with the documentation.
- Version 7.13, 5/9/2020 - exe, source.
- 1.16 beta 20w19a: added the 82 new block types, their behaviors, and the 4 new biomes. Newer betas can and will not work properly in various ways. Warnings added for when unknown block types are detected.
- If a block type is unknown, replace it with air instead of bedrock, to make mismatches less intrusive. Warn that an unknown block was encountered, once per world.
- Fix warning in TileMaker when tiles using the accepted name and the alternate name are both present.
- Do not allow "Export individual blocks" when "Export tiles" is selected. I hope to make these two options work together in the future.
- Untangle the quartz texture naming, so that now quartz block and smooth quartz use the correct tiles.
- Fixed honey block so that the outer layer is all honey_block_bottom tiles. (thanks to vktec for reporting this bug)
- Fixed bug where going from "Export tiles" to "Export full color texture" would change the scale of the model from 1 meter to 2 millimeters.
- Made the following blocks light emitting, and scaled all emitter emission levels properly: burning furnace, blast furnace, smoker, conduit, magma block, sea pickle, brewing stand, brown mushroom, dragon egg, end gateway, end rod, end portal, and end frame. Because of the non-physical nature of Minecraft emission levels, I chose to raise the "raw" emission value of emit/15 by the 1.5 power, since dimmer lights are considerably (not linearly) dimmer in Minecraft.
- Fixed illumination on campfire flame and lantern chain material, along with the material on other blocks.
- Snowy grass and podzol now show as white on the map.
- Use proper colors for signs on map (when "Show all objects" is chosen).
- Corrected redstone connectivity on sides of blocks, with TNT, redstone blocks, and sea lanterns now not blocking the flow if these block edges touch. Really, this is a tough one to explain... search the ObjFileManip.cpp code for BLOCK_SEA_LANTERN if you care.
- Hashing errors with flowerpots and heads cleaned up. Sorry, no head textures added.
- Reduce download size by using pngcrush. (thanks to Morgan McGuire for the tip)
- Numerous other boring little fixes - see the numerous commits for more.
- Version 7.12, 3/28/2020 - exe, source.
- Added export option "Make groups objects" for OBJ export. This option makes every group formed into a separate object of the same name. It can help ease editing when exporting individual blocks, for example. (Thanks to zero for reporting this problem.)
- Added file scripting/annotate_map.py, which annotates output maps with where each region file is located, along with other related scripts. Such maps can help you decide to delete remote regions from your world, for example. Read the top of the file for how to install Python and ImageMagick and then run this program. (Thanks to Rob P for testing these scripts out.)
- Fixed script interpreter for "Zoom:" - input was incorrectly limited to between 1 and 15, not 1 to 40.
- Added scripting/_README.txt to explain the sample scripting files. This is the least known, and most powerful, part of Mineways.
- Version 7.11, 3/5/2020 - exe, source.
- Added "Export Map" option to the "File" menu, and added "Export Map: my_map.png" command to the scripting system. Exports the selected area to a PNG. See the file "scripting/make_map_tiles.mwscript" as an example of how to export a set of maps, and "scripting/make_slice_maps.mwscript" for making cutaway animations. (Thanks to Rob P and Ross for pushing for this feature.)
- Fixed bug with the scripting command "Select maximum height" in which the user interface did not show the change requested.
- Added better error reporting for when ancient McRegion worlds or Bedrock world files try to be opened. (Thanks to supercat 95 for reporting this problem.)
- Version 7.10, 2/2/2020 - exe, source.
Call this one the "Minutia Release," as the debug block world in Minecraft helped me find a large number of fixes and cleanups:- Tilemaker updated to version 2.12: The new 1.15 layout and images for chests is now supported (why Mojang changed it, I don't know). If a "normal_left.png" image is found in blocks/chests, all chests are assumed to be in 1.15 format, else 1.14 or earlier is used.
- Bug fixed where water on top of inverted stairs or top-half slabs made the top face of these blocks disappear.
- Bug fixed in which beehive and bee nest honey_level values were getting transferred to other blocks.
- Free-standing bells were rotated 90 degrees from where they were. Free-standing bell supports now also have bottoms. The new "powered" data value in 1.15 is now handled.
- Buttons placed on the top or bottom of a block now properly use the east-west vs. north-south property for orientation (issue report).
- Activator rails inactive/active states were reversed - fixed.
- Observer blocks' powered state is now shown properly for 1.13 on (it worked under old 1.12 Minecraft format).
- Shulker boxes now have orientations, and the default (no color given) shulker box is now purple (it should be a pale purple, but that's a lot more work and on the TODO list).
- Torches now have bottoms.
- Grass, dirt, coarse dirt, podzol, mycellium, grass path, sand, red sand, netherrack, and bedrock (180 degrees only) have their top and bottom faces randomly rotated, similar to how Minecraft does it, to break up repetition in large expanses of the block.
- Better randomization functions added for plant placement, bamboo texturing, and chorus plant sections.
- The default red bed tiles are updated to 1.15 versions. Still no colored beds, nor beds with solid legs.
- Chests, scaffolding, and campfires (including burning ones - go figure) can now be waterlogged, as in Minecraft.
- Waterlogged stained glass now retains its proper color.
- Redstone repeaters and comparators now have shortened torches, for when they are on transparent blocks (the torch handles used to be visible under these circumstances).
- Redstone repeaters now show the "locked" mode.
- If farmland moisture level is not fully wet (0x7), output dry farmland.
- Make average wet farmland map color brighter on the map.
- Mycellium blocks are now snowy on their sides when there is snow on top of them.
- If individual snowy grass, podzol, or mycellium blocks are exported, they will have snow on their tops.
- Improve error message and behavior for when someone attempts to read in a Minecraft Bedrock world.
- Version 7.09, 12/7/2019 - exe, source.
- Interpret 1.15 biomes correctly. Technical details: The 1024 integer array is 64 levels of 4x4x4 voxels. In Mineways only the 4x4 biome values for levels 64-67 (level 16) are used, the rest are ignored for now.
- Bug fix: redstone wires should not run down the sides of upper-half slabs that have redstone on top of them and connecting to redstone a level below them. (Thanks to Quinlan W again for reporting this bug).
- Update to now build under VS 2019.
- Version 7.08, 11/29/2019 - exe, source.
- Added 1.15-pre3 bee nest, beehive, honey block, and honeycomb block.
- Added 1.15 biome reader, so we don't crash. NOTE: I haven't figured out how the 1024 integer biome storage works yet.
- Made nether portal have true geometry instead of a whole block.
- Bug fix: redstone wires should not run down the sides of upside-down stair blocks that have redstone on top of them and connecting redstone a level below them (Thanks to Quinlan W for reporting this bug).
- Bug fix: when using MCC ToolChest PE, the order of stair Properties is reversed, which revealed a subtle bug in Mineways when translating upside-down stairs' data values; now fixed.
- Version 7.07, 11/23/2019 - exe, source.
- Bug fix: when stairs are put next to each other and "Export individual blocks" were chosen, the sides of the top part of the stair step were not exported - fixed (Thanks to "Speaker" for reporting this bug).
- Version 7.06, 9/18/2019 - exe, source.
- Wood (vs. Log) blocks for versions 1.13 on were getting turned into planks. The deforestation has been fixed; they're now properly wood blocks again. (Thanks to Avatar2003 for reporting this bug.)
- Update import instructions for Maya.
- Version 7.05, 9/13/2019 - exe, source.
- The G3D viewer has been updated to properly handle tile texture output. This viewer works well with Mineways OBJ files and is highly recommended. Download this custom build here.
- Tilemaker is updated to version 2.10:
- Update the number of tiles that can be read considerably, since the number of input tiles can be higher than the number actually used. This avoids a crash condition for some resource packs.
- If both the normal name and the alternate name are found for a tile, warn the user and save only the first tile found.
- Doku Light and Doku High terrainExt PNGs now properly formed and included.
- Added import instructions for Blender 2.80.
- Changed tiled texture output and G3D full material options for Wavefront OBJ to not include an explicit "map_d" material. Most programs understand a diffuse RGBA texture to mean "use the alpha channel as a mask." Blender is an exception, and the instructions include how to use the Shader Editor to attach the alpha.
- Fixed bug where a stray mouse move was generating out of bounds biome numbers, causing a random crash during import of previous OBJ export (can't say I fully understand this one, but I now protect against it).
- Properly extend "set cutout pixels to background" to include the one-pixel "bleed" border, so that interpolation along cutout edges hitting the border is better.
- The "Delete floating objects" option now works a bit better for rendering. If a block touches any other block's face (not just "full-sized" blocks, as with 3D printing), it is made part of a group and so is more likely to be properly preserved.
- Made export dialog a bit more bulletproof when switching between texture output types (it's still possible to kill the program with weird enough combinations).
- Cauldron feet are no longer cutouts in 1.14, but actual geometry, so geometry is now created.
- Old-style (1.12 and earlier) potted acacia saplings and potted dark oak saplings are now exported correctly.
- Properly place mob heads from 1.13 and 1.14 that are meant to go on the floor actually on the floor, instead of the wall. (Proxy carved pumpkins are still used for the heads, though.)
- Fix built-in Block Test World to set valid test data values for all wall signs.
- For "Split by block type," the block names are no longer output as "Block__Subblock" but rather "Subblock". This makes the block types less wordy and more sensible when exporting. Many names have been added. Some names have changed, to the newer names or for consistency:
- "Stained Clay" changed to "Colored Terracotta" (and sub-blocks are by color, e.g., "White Terracotta").
- "Hardened Clay" changed to "Terracotta".
- "Purpur Double Slab" changed to "Double Purpur Slab".
- "Andesite Double Slab" changed to "Double Andesite Slab".
- "Tube Coral Block" to "Coral Block", "Tube Coral" to "Coral", "Tube Coral Fan" to "Coral Fan", and "Tube Coral Wall Fan" to "Coral Wall Fan".
- Version 7.04, 8/10/2019 - exe, source.
- Fixed bug where "split by block type" was reporting sub-block names in the OBJ file, but still using numbers in the MTL file.
- Some "manufactured" tiles were not bled along their edges properly, as bleeding occurred too early; also, semi-transparent alphas were ignored. All tiles are now bled to their edges, to make mipmapping work properly.
- Hide blocks 253 and 254, which are special internal IDs, in the [Block Test World] in release builds.
- Version 7.03, 7/7/2019 - exe, source.
- Fixed bug where the program crashed when missing blocks were visible when exporting. This had to do with the stack reserve size not being large enough. Along the way I noticed empty chunks were not loading properly, leading to them getting loaded repeatedly. This is fixed, so such areas should be accessed more efficiently now, meaning a bit faster drawing when the view changes.
- Added "-m" to the command line options, which minimizes the Mineways window on startup. This is useful for running Mineways fully automated with scripts.
- Moved lily pad up a small bit (similar to redstone dust) to avoid z-fighting in the obscure case of a waterlogged slab.
- Changed "Cut" and "Smooth Sandstone Slab" to be a correct map color of beige, not red. Similarly fixed (polished) granite and smooth quartz slab map colors. Fixed "Emerald Ore" to not be red. Changed "Smooth Red Sandstone" to have the same map color as "Red Sandstone". Fixed "Sea Pickle" and "Turtle Egg" colors. Dimmed "Bell" color so it doesn't look like a light source. Added colors for some additional slab types: polished andesite, (polished) diorite, end stone brick, and (pure) stone.
- Name fixes, for those who care: Fixed "Tall Grass" blocks to be named "Grass" and "Double Tallgrass" to be "Tall Grass". Fixed "Leaves" to be "Oak Leaves". Fixed (the new) "Sandstone" to properly be named "Smooth Sandstone". Ditto with "Red Sandstone" to "Smooth Red Sandstone". Changed "Snow (layer)" to "Snow" and "Snow" to "Snow Block". Changed "Monster Egg" to "Infested Stone". Brown and red "Mushroom (block)" to "Mushroom Block". Changed "Wooden Slab" to "Oak Slab" since there are sub-type names for all the different types. Changed "Weighted Pressure Plate (Heavy)" to "Heavy Weighted Pressure Plate", and same with "Light". Changed "Large Flowers" to "Sunflower". Changed "Red Nether Brick" to "Red Nether Bricks".
- Added block sub-type names for "Wet Sponge", "Chiseled Sandstone", "Cut Sandstone" (ditto with the Red varieties), "Block of Quartz", and the "Mossy/Cracked/Chiseled Stone Bricks" (ditto with the Infested varieties, plus "Infested Cobblestone").
- Cleaned up documentation a bit, fixing an error on the reference page and improving the text throughout.
- Version 7.02, 6/20/2019 - exe, source.
- Added feature: separate tiles are written to a subdirectory, default name "textures". If no subdirectory is given, the tiles are written to the same directory as the OBJ and MTL file, as before.
- Convert MWO_ chest tiles without cutouts to RGB only, no alpha, as alpha throws off some viewers.
- Fix tab order on export dialog.
- Version 7.01, 6/15/2019 - exe, source.
- "Export tiles for textures" option (now called "separate textures") added for Wavefront OBJ export. Now each tile can be exported to a separate texture image, making image substitution simpler and permitting mipmapping to work better. Updated Blender and Cinema 4D instructions.
- Added individual names to output of objects, e.g., instead of "Poppy__1" you will now see "Poppy__Blue_Orchid." Someday I'll take the time to make all these names unique.
- Added Red Sand, Log, and Bubble Column identifier names for mapping and output.
- The "F1" key now opens up the online Mineways reference page in your browser.
- Fixed lectern export: top was being exported twice (added test code to assert if the problem is encountered in the future).
- Fixed lantern and other export for Sketchfab, which was filtering out content unnecessarily.
- Added material names for types of stone and wooden double slabs, to match the single slab names.
- On export, texture coordinates are now labeled with their corresponding Minecraft block texture name.
- Bug fix: For Wavefront OBJ solid color export, export Tr = d - 1.
- Documentation revised, with all shortcuts moved to the Mineways reference page.
- Version 7.00, 6/8/2019 - exe, source.
- 1.14.2 support; turtle eggs updated from 1.13's odd texturing to instead match in size, as done in 1.14.
- Finally fully fixed bug where repeating an export would output a relative-coordinate OBJ file instead of the user-chosen format.
- Texture output RGB/A/RGBA now supported in scripting.
- Fix wall signs to be oriented properly.
- Fixed bug in which new blocks were occasionally not exported if near the fringes of the export volume.
- Models read in through "import settings" load faster, by avoiding a redraw caused by the color scheme being set unnecessarily.
- When selecting, if water is detected, Mineways now chooses the lowest non-water block for the lower height.
- The lower height is now renamed to simply "Depth," and "Max height" simply "Height."
- Interpret the "single" chest property introduced in 1.13, so chests next to each other that are singles are shown as such instead of being joined into a double chest.
- Fixed flower sizes and positions for flower pots.
- Set and use waterlogging property for more blocks (slabs, stairs, trapdoors).
- Flowers, grass, and other natural objects are now given a consistent "wobble" in their location in the block, like Minecraft does (but not using the same algorithm as Minecraft, as I do not know their method).
- Chorus plant blocks have added consistent randomness to their shapes.
- Properly connect fences, gates, and walls to one another.
- Properly orient piston head textures.
- Added automatic proper initialization of "sort by block type" system masks for blocks.
- Show on the status line that the model is being imported when read in with "Import Settings."
- If the internal tile texture is used, instead of an explicit TerrainExt.png, no warning is now issued when reading back such exported files with "Import Settings."
- Renamed "Split materials into subtypes" export option to the slightly-less-confusing "Split by block type," and expanded the documentation on this and related options.
- Tilemaker updated with new lodepng library.
- Numerous other fixes throughout.
- Version 6.08, 5/3/2019 - exe, source.
For power users, especially if you use large texture tiles: added "Texture output" checkboxes to dialog that suppresses the output textures being generated. // Fixed the long-standing bug that OBJ exports for older versions of Cinema 4D would import with the textures applied radially. The problem was that Sketchfab set the OBJ export for rendering to be relative, not absolute, coordinates. For some reason, older versions of Cinema 4D would fail to read these; version R18.057 does not. Fixed by separating Sketchfab export values from the normal rendering export values. // Improved user experience by having autocorrection of the bottom height be off by default for schematics or whenever the user has set the lower depth to 0. Updated LodePNG and modified it to use wide character strings, to fix a crash when terrainExt.png files with extremely large block textures, e.g., 512x512, were read in. Change default for exporting models for Sculpteo to be millimeters, as their default has changed to this from centimeters. Make TileMaker a bit more robust, giving an error if a non-power-of-two or other erroneous tile is found, but skipping the tile instead of aborting. (Thanks to Kevin Niestrat for showing how TileMaker mysteriously failed, to SolarPH for helping solve the Cinema 4D problem and for pointing out the flaw with autocorrection and schematics, and another user for reporting the large-tile problem.) - Version 6.07, 3/8/2019 - exe, source.
Modify reader to handle (pre) 1.14 file format change, namely, that there are now up to 18 horizontal sections and these can have -1 or 16 (out of bounds normally) for the Y value. Now Mineways can properly read pre-1.14 worlds with towers up to the maximum height without crashing. Turn off warning that a directory in the world saves directory is not a world, since some users intermingle world and non-world directories. (Thanks to Justis for reporting the "bad world directory" problem, and Brian Jia for the 1.14 crash repro files.) - Version 6.06, 2/17/2019 - exe, source.
Coal ore in 1.13 was getting exported as iron ore, due to a "5" that should have been a "6". Bone blocks imported from 1.13 were not getting an axis direction, due to a missing AXIS_PROP flag. The new schematic format introduced by FAWE crashed Mineways. No support for this new (and quite different than the previous) schematic format, but such files will generate a warning when read. A warning is now generated if 1.13 data is present when exporting a schematic (to the standard, old schematic file format). Properly tiled top of double chests so that level one mipmap looks better (i.e., for distant chests). Made many cppcheck cleanups to code; pass by value changed to pass by reference in world read and map display functions, which should be a bit faster. (Thanks to Maker26 and Hubert Theodore for reporting some of these problems.) - Version 6.05, 1/27/2019 - exe, source.
New control: Holding the control key while using the mouse wheel changes the lower height; holding the shift key while using the mouse wheel changes the max. height (this latter mode can be slow and laggy, since the map is regenerated on each click). TileMaker 2.08: work with 8x8 tiles properly, give more information about how to continue when a tile is not a power of two, and avoid crashing when given extremely large tiles. (Thanks to Bear Bear, Raoul, and Felix Brekelmans for reporting these problems and suggesting new features.) - Version 6.04, 10/10/2018 - exe, source.
Critical fix for 1.13 content: potted cactus and dragon head models were not treated properly, causing bad data interpretation. Fix [Block Test World] to show 1.13 content properly, along with other data fixes in it. Make sea pickle model sealed on the top and add the "tendrils" when in water. Update documentation about how to run under Mac and Linux. Updated custom texture packs and included bed part names in Tilemaker, which has a new minor release, 2.07. 32-bit versions removed entirely. - Version 6.03, 9/24/2018 - exe, source.
Worked around critical export bug: strange memory corruption from GetSaveFileName() that makes 3D print export not work correctly. "Fixed" by saving value before and restoring it after these calls. Ugh. Brightened grass and leaf color export to more closely match Minecraft; old code multiplied the tile's average green by its grayscale texture, when the brightest green should have been used. If too bright for you, use a color scheme to make the leaf color darker. Fixed furnace, dispenser, dropper, and observer tiles so that their tops perfectly match Minecraft's orientation. - Version 6.02, 9/14/2018 - exe, source.
Fixed critical tiny model bug: models with torches were scaled down to a tiny size. Added Sketchfab scripting (thanks, Aur&3acute;lien!), moved to zlib 1.2.11 (sadly, doing so does not fix the 32 bit version's crash on startup in this library). - Version 6.01, 8/6/2018 - exe, source.
Fixed dead bush bug; grass was getting converted to dead bushes, due to a data value error in nbt.cpp (thanks to Ebrahim Hamama for reporting this). - Version 6.00, 8/1/2018 - exe, source.
Moved to Visual Studio 2017, Windows SDK 10.0.17134.12. Added 1.13 translation - note that schematic export from 1.13 is iffy, since schematic does not support the new blocks. Added brown and red mushroom blocks "all cap" and "all stem" modes. Podzol with snow on it now properly turns snowy on its sides. Properly show bin direction for activated hoppers. Placed the active comparator output torch down two pixels to proper position. Fixed missing polygon bug of cobblestone walls connecting to fences. Connected fences together, even if of different types (this fixes one error, introduces another; nether fences should not join with wood, for example). Proper icons for the "structure block" block type is now shown. Fixed bad placement of mob head facing west (but, no, I have not added heads, it's still the pumpkin). Biome names updated, and a few temperatures updated. On the TODO list: The Windows 32 version crashes on startup; need to fix that so the Mac version can be made. The custom terrain packs are not updated in this version. The "[Block Test World]" is not updated with 1.13 content, nor are Color Schemes. On export, Waterlogging is not fully supported, and 3D prints should translate waterlogged plants to be water. Chests next to each other, not allowed in 1.12.2, will cause odd, faulty exports. Bed colors are ignored. Biomes 40-50 rainfall values are not known. Sea pickles do not have their tendril when in water. Flattened coral fans don't appear to composite correctly. Turtle eggs and sea pickles don't have the exact patterns seen, nor are the right sizes and textures. Conduit does not have the exact textures used. The nether portal should not fill the block. Basic scripting works, but block editing is not tested (and 1.13 blocks need to be documented). These problems are all fixable, but each will take some time and effort. - Version 5.10, 8/10/2017 - exe, Mac 32-bit only, source.
- Limited world list to 50 entries, as there seems to be a problem checking files if there are too many worlds in the "saves" directory.
- Provide more detailed and explicit instructions and information about errors when opening files.
- Use the backslash everywhere in the path for opening files, just in case that's a problem on some systems.
- Properly truncated world's name for Sketchfab title.
- Version 5.09, 6/9/2017 - exe, source.
- Added observer and shulker box texture support, along with 1.12 beta glazed terracotta, concrete, and concrete powder textures.
- Version 5.08, 6/5/2017 - exe, source.
- Subtract a bug, add another: fix gaps when an elevated slab is next to a normal step. (Thanks to Vervez for reporting this bug.)
- Version 5.07, 6/4/2017 - exe, source.
- Properly cull unneeded geometry for inverted stairs. (Thanks to Vervez for reporting this bug.)
- Properly make stairs and other complex blocks have tops and bottoms output if at border when "create block faces at the borders" is on.
- Version 5.06, 1/19/2017 - exe, source.
- Fix the test for player location so that purely server-side worlds can be loaded. (Thanks to Shannon Vaughn for help in finding this bug.)
- Give a better warning if an Education Edition world is detected, explaining how to proceed.
- Version 5.05, 11/2/2016 - exe, source.
- Fix the command line options: these were getting entirely ignored due to some dumb code I added in a previous release.
- Serious bug-proofing: avoid hanging if a bad level.dat file is encountered. Instead, ignore the world and warn the user. (Thanks to AttackPlayz for helping me track this down.)
- Fix highlight selection so that empty block locations (holes to infinity) are highlighted when selected, in keeping with 5.04's new highlighting display.
- Now that the G3D viewer doesn't need it, don't double the Ke material attribute values in OBJ output when the G3D material is used.
- Make transparent materials in OBJ output with a tiny bit of Ks reflectivity by default, which looks nicer in G3D.
- Version 5.04, 10/7/2016 - exe, Mac 32-bit only, source.
- Stand-ins are in place for the Minecraft 1.11 beta observer and shulker boxes. The new textures for these are not yet integrated into Mineways, as I don't like to integrate blocks and their texture names until the release is official. For now you'll get something approximating these new blocks.
- Material subtypes can be output: for example, Stone has seven types. Normally only one material, "Stone", is output, but you can have "Stone", "Stone__1", "Stone__5" for each type used, by its data value.
- Command line option added: you can specify the folder where your Minecraft world save folders are stored, if you want to use another directory location. The format is -s directory. (Thanks to this redditor for this suggestion.)
- The selection box now shows against empty or missing blocks. (Thanks again to this redditor for this suggestion.)
- Flower pots are fully supported for rendering, as block entities are now read in. Reading in block entities was involved...
- Mob heads are properly scaled and positioned, but are still rendered as pumpkins. Adding the real heads is on the TODO list, but involves using unwrapped textures; the dragon head in particular is elaborate. Note that with Material subtypes feature the different heads will be identified by their material.
- Efficiency/bug fix: 3D print OBJ models were exporting with separate materials and groups. These are unnecessary, as is the alpha channel texture output. However, if exported using a single material, the alpha textures were getting used. Fixed.
- Import of models exported from the Nether and The End using Import Settings now switch to these world types on import. Only models exported from this or later versions will contain the "View Nether" and "View The End" header information needed for this to work.
- Automatic height adjustment when using Hide obscured (usually on in the Nether) now takes this feature into account, to give a better bottom starting height.
- Monster eggs now output mossy, cracked, and chiseled stone brick versions, a 1.7.2 change I finally noticed.
- End portal frames now show the eye of ender if present, and are rotated (though not 100% compliant, as I don't want to mess with adding a bunch of rotation flags).
- Pumpkins and Jack O' Lanterns now show the faceless varieties (data value 4).
- Centering the model around the origin now maintains coordinates. That is, if you use color schemes to select various blocks for export and centering is on, each export will use the same centered coordinates. Prior to this fix, each export would be centered around whatever blocks were output, meaning that different exports of the same volume would not align. Some renderers such as RenderMan need all transparent faces. This improvement lets you export water or other transparent objects so that they generate all faces, not just those faces that border air, though you have to perform two exports to do so. I might add yet another checkbox for having transparent surfaces always generate faces...
- Bug fix: A block with vines hanging on all 4 sides and with the bottom covered could potentially crash Mineways. Array sizes increased.
- Bug fix: If lesser block export is turned off for rendering, composite overlay must also be off, as the whole "small object" subsystem is not used. This bug caused a crash. (Thanks to this redditor for reporting this bug.)
- Bug fix: Anvil top blocks were output twice, causing the top of the anvil to not show correctly.
- Bug fix: Acacia and jungle saplings were getting turned into oak and spruce saplings, due to masking out the two high data value bits.
- Bug fixes: The export options for OBJ were getting trashed when VRML or STL export was done first. Also, some options that were supposed to be unchangeable could be changed. I think I fixed this system now...
- Bug fix: Areas with X or Z coordinates outside of the -1,000,000 to 1,000,000 range would give an out of memory error, due to some lazy bounds testing I put in. Changed 999999 to INT_MAX, -999999 to INT_MIN throughout the code. (Thanks to David Ng for reporting this bug.)
- Version 5.03, 8/22/2016 - exe, Mac 32-bit only, source.
- Serious bug fix: stairs improperly causing full faces to disappear, due to the data value of the stairs being cleared when output. That's what I get for trying to tidy up.
- The "Open..." command now reads in a schematic as a map, for ease of exporting.
- For schematics, only, Control-A will select the whole schematic model.
- If you save or rename your schematic file to have the world "repeat" in it, e.g., rename "eiffel.schematic" to "eiffelRepeat.schematic", the schematic will load and be repeated across the map, with a minimum one block gap between each model. This can be useful if you want to create a single 3D print file that has multiple copies of the model.
- FWIW, I've added to Planet Minecraft a schematic of the Block Test World that comes built-in to Mineways.
- The seal off entrances checkbox now automatically attempts to fill in small window and door openings in houses and fill the interiors, without having to place torches.
- Bug fix: properly select the correct color scheme when adding or deleting color schemes.
- Bug fix: properly mark The End as on when chosen from the menu.
- CyclesMineways scripts updated.
- Version 5.02, 8/4/2016 - exe, Mac 32-bit only, source.
- Critical bug fix: properly find minimum height when selection is performed.
- Critical bug fix: schematic file export broken due to filtering out smaller blocks.
- Bug fix: Import Settings now will properly read in STL ".txt" information files, so work can be resumed.
- Bug fix: scripting export of schematic files now properly saves as a schematic.
- Bug fix: when a new world is loaded, properly display reset slider depths.
- Bug fix: ignore case when comparing most strings in scripting system.
- Improvement (I hope): "Custom printer" material added and used by STL export, set to PLA characteristics by default.
- Costs for volume & handling, currency, and minimum wall size can now be set by using script commands.
- Hardened clay (#159) changed to stained clay; tinted clay (#172) changed to hardened clay.
- Version 5.01, 7/5/2016 - exe, Mac 32-bit only, source.
See this model for a runthrough of the improvements made to rendering export.- Added 1.10 blocks.
- Full 1.9 support, leaving 1.8 truly behind: isolated iron bars and glass panes are now simple posts, redstone wire and overlay textures used, water overlay used.
- Added block face offset for rendering: instead of composite tiles, where a new texture is created for say a ladder on a wall, the ladder face is rendered offset by 1/16th. If you encounter z-fighting problems, turn "Create composite overlay faces" on.
- Torches simplified and improved: less polygons, work better with Sketchfab, Sphax, and other texture packages.
- Chests and ender chests now are properly created and fully recorded in TerrainExt.png.
- Redstone wires are now shown with their proper on or off state.
- Autocorrect for the level on initial selection now ignores semitransparent blocks by default, so including the bottom of lakes and coastlines. It also looks one block outside the border, so that cliffs are properly shown.
- Space bar now corrects the bottom height, ignoring transparent blocks, which is useful when adjusting the selection area. Holding shift with the space bar does the same, but pays attention to transparent blocks (better for 3D printing, where we don't care about the bottoms of lakes and oceans).
- Added "V" mode for script command "Select minimum height", see the docs.
- Water tile is now left as is, no longer modified by the alpha set in the color scheme.
- The enchanting table now is the proper size (no book, though).
- Pumpkin and melon stems fully rendered at maturity, and rotated to proper position. Color's still not exactly right for each... next version.
- Glass panes and iron bars properly sized and top and bottom edges rendered.
- Tripwire hooks (but not tripwires) added. Giant time suck, but now all blocks have a real rendering, not a stand-in decal.
- Flower pots emptied if version is 1.9 or higher (now that we can finally check the map version). I'll fix this fully someday. (thanks to JMY1000 for the report)
- Sunflower rotation angle fixed.
- Tiles stretched better for full block 3D printing export.
- Glowstone now does not chop redstone wire going over an edge.
- If a tile is not a power of two in width, TileMaker now flags an error and exits.
- Export full path to terrain file, for easier use when using Import Settings.
- Fixed chunk edge error when using "Create block faces at the borders".
- Reduced face loop storage size by about 30%.
- Removed default composite tiles, since the system generates these and there is now plenty of space for composites.
- Forced some pop-up messages to be topmost, since they're important and sometimes get lost.
- Added status information when script is run, showing file currently being exported.
- Plugged some small memory leaks.
- Removed tiles.h from TileMaker area, directly use the Mineways/Win version, to avoid file duplication.
- Documentation streamlined, putting more useful stuff first and consolidating troubleshooting.
- Moved Windows 32 version of Mineways to separate directory, included msvcr120.dll's for both versions.
- New icon! (thanks to JMY1000 for the idea)
- Version 5.00, 6/10/2016 - exe, source
- Moved to Windows 10 redistributables. If you get an error about MSVCR120.DLL being missing, you'll need to install the Microsoft Visual C++ 2013 Redistributable Package for your system. Select vcredist_x64.exe for your 64-bit system, vcredist_x86.exe if your system is 32 bits. To find out if your computer is running a 32-bit or 64-bit version of Windows, follow the instructions here, which come down to "hold down the Windows key and then click the Pause|Break key, then look for System type".
- Added scripting support. This is a huge deal if you're a serious user.
- Added quick reference page.
- Added a separate G3D viewer download, explained here, with special controls to maintain Minecraft's blocky look.
- Added material per type or per block as an option for individual block export.
- Fixed rendering output to be 1 meter per block. If you want it back the old way, change "Make each block" back to 100 mm from 1000. You can even use scripting at startup to do this automatically.
- Changed torch shear to rotate the torch instead, to match torches in 1.8 and newer.
- Made signs thinner to match Minecraft's.
- Changed hotkey to close app from Ctrl-W to Ctrl-Q (quit), to get it further away from other keys.
- Removed "B" hotkey - I don't even recall its intent.
- Fixed export scale radio button control (fix tab order).
- Fixed bug introduced in 4.17 where single-material export failed.
- Generalized "Import Settings" code to be more flexible and forgiving: it will now read in the world, terrain file, and color scheme from a previously-exported model file, as possible (4.18 files always set all three of these).
- Made names of blocks exactly match those at the Minecraft wiki, so they can be used in scripts.
- Fixed lesser blocks case of water on top of an upper slab, so that top of slab gets removed.
- Cleaned up step export for 3D printing, when using the "lesser blocks" mode. A few less faces are now exported when adjoining stair blocks match exactly, which may help some 3D printer slicers get it right.
- Lots of other little changes, hopefully for the better.
- Version 4.17, 4/24/2016 - exe, source - The world name and the world save folder name are both displayed for "Open World," since I was finding the world folder name was not sufficient. Moved Reload World menu item to be under File. Fixed export of rails, redstone, snow, and other "flat" decals onto partial blocks such as slabs. Two fixes with fluid export for detailed 3D printing; the mesh is now properly formed (I think). Removed all solid color texture output, freeing up a large area of the texture for "composite" tiles, such as redstone on logs, railway tiles, and more. The +/- keys (along with Page Up/Down and E/Q, as before) now zoom in and out. This is handy for small laptop keyboards, and because I forget that E and Q zoom. Color Scheme now has a "Hide Tree Blocks" to remove all log and leaf blocks, making terrain printing easier (trees tend to be delicate and break off). Sculpteo's prices have come down about 20% for colored prints, so the price estimate has been adjusted. // Deleted Windows8 executable; see the installation notes if you think you need it. You should just install the VC redistributables described there.
- Version 4.16, 3/13/2016 - exe, Mac 32-bit only, source - Sketchfab export option added. Added Modern HD texture file terrainExt_ModernHD.png (thanks for permission, Mikeyto1o) and removed unmaintained LB Photorealism texture file.
- Version 4.15, 3/7/2016 - exe, Mac 32-bit only, source - Minecraft 1.9 blocks added. 1.9-specific changes not added (these will come in 5.0): new "single" iron bars and glass panes, new redstone line patterns, and new still water texture next to glass. // "The Void" biome added (well, that's been in there for awhile). Fixed biome button turning off after an export. Fixed crash when "richer color textures" selected. Fixed haystack to display properly when horizontal. Fixed potato and carrot growth to properly match tiles. Added up and down buttons. Fixed pack ice to properly join to fences. Fixed fattened fences to always output their posts, and cobblestone walls to remove the post only when the fence forms a line. Pumpkin and jack o' lantern stems on whole blocks now properly oriented. Glass panes now properly don't connect to water, lava, and chests. // Improved world search for Mac users (from Aurélien Chatelain). "Show all" now shades transparent objects and mouse-over shows these objects. Increase block status window as application is resized to be wider. Fixed bug of File|Open... not working after using File|Open World. Properly update mouse-over status when changing view. Fixed bugs and inefficiencies related to switching to Nether and The End. Fix: if you switch from color STL to ASCII STL exporting, the material is now set to have no color and so will not give a warning. Escape key deselects area selected. F1 and ? pop up "About" dialog. // TileMaker now has two more options, -s and -S, that produce a solid (average) color terrainExt.png file. The "-S" option preserves the alpha cutouts. This texture allows greater control of solid color blocks, as you can set every face type as desired by changing its tile when using TileMaker, versus using the single color used for a particular block ID. // Latest Blender Cycles importer script included.
- Version 4.14, 1/9/2016 - exe, Mac 32-bit only, source - Made the "bleed" process for cutout objects (flowers, mushrooms, and more) always happen; it used to be done only when the G3D material was selected. Performing bleeding keeps the fringes of these objects their proper color. See this and this model to see the difference, and for further explanation. Added an option to make tree leaves solid for rendering, which vastly reduces polygon count for forests. Added an option to not export the bottom and side "box limit" polygons for rendering, to lower the polygon count and allow better export tiling. Changed the alpha map to have the alpha value in all four channels, so that Sketchfab properly displays the model by default. Increased thickness of "Block Test World" for better testing. Fixed bug in version number output to the various model files (there since version 2.24). Other minor fixes to vines and to the user interface.
- Version 4.13, 11/4/2015 - exe, Mac 32-bit only, source - Folded the terrainExt.png's data into the program itself. Now Mac users will never have to dig around to find this file. By default, if a terrainExt.png file exists in the same directory as the executable, it will be read in; if not found, the internal default terrainExt data will be used instead. This allows you to still customize the terrainExt.png file and have it get used by default. But, it also means that you can run Mineways entirely from the .exe itself, so on Windows could run it from a zip file, for example. // Fixed flower pot and cauldron export to avoid polygon overlaps and non-manifold surfaces.
- Version 4.12, 9/10/2015 - exe, source - Added cycles_mineways.py script to set materials for Blender's Cycles renderer (thanks to Jonathan Edelman for this script), and updated documentation. Improved water export for printing, so that surface is manifold. Lengthened the "unassigned terrainExt.png" error message yet again, to help people out.
- Version 4.11, 7/18/2015 - exe, Mac 32-bit only(flawed: missing terrainExt.png), source - Fixed serious bug in STL export, where "individual blocks" was always being flagged as on; this causes uploaded models to look "skeletal." Improve Mac error for unassigned terrainExt.png file, explaining what to do next.
- Version 4.10, 5/22/2015 - exe, source - Fixed initial view for some worlds, where spawn point was not being read in correctly (thanks to Bob Irving for reporting this). Fixed code to avoid infinite loop when modded world data is encountered (thanks to Julian Drawdy for reporting this).
- Version 4.09, 1/6/2015 - exe, source, Mac 32-bit only - Fixed stairs output to obey all Minecraft rules (thanks to James Ward for reporting this). Fixed carpets, snow, and other thin covers to export properly as lesser blocks for 3D printing (thanks to Justin F. for reporting this). Fixed output of cocoa plant pods. Made objects all watertight when exporting using the lesser blocks option. Made the individual blocks option work for all blocks. Hollowing is now off by default for STL export, as home printers usually don't want to use this operation. Changed OBJ material output to use a white color when a texture is output, since these two elements are multiplied together for GLC display. Improved error messages, especially for reading PNGs. Updated to Shapeways' new cost scheme for white plastic prints; mine is an approximation of their complex algorithm, but gets fairly close. Synced to latest Shapeways constraint data. Added popular block texture names as alternate tile names to TileMaker by using the '-a' option, and give better diagnostics about unrecognized tile names.
- Version 4.08, 10/22/2014 - exe, source, Mac 32-bit only - Major Mac version fix: worlds and terrainExt.png texture file is now found properly. Wall banners now display (with no pattern or color). Added normal per vertex for OBJ and fixed it for STL output, so that the GLC Player can display models better. Fixed vine and anvil normals. More object names are now displayed. Fixed color schemes so that old color schemes update properly to 1.8 format. Minor fixes to a few biome temperatures. Converted code's tabs to spaces for easier Github viewing.
- Version 4.07, 10/14/2014 - exe, source, Mac 32-bit only - the little big one.
- Added Windows 8 executable, mineways_windows8.exe. You may need to install the 64-bit version of the Visual Studio 2013 redistributables to be able to run it.
- Added biome mapping mode: View | Show Biomes (or F8).
- When biomes are displayed, elevation shading takes into account the altitude's influence on temperature for the biome. This effect is subtle, but it's there.
- Biome of the center of the area chosen for export can be used to modify the grass, trees, and water color (yes, I'm getting closer to exporting multiple biomes, but that's hard).
- Tilemaker 2.01: the grass_side_overlay.png texture is now used to properly form sides of grass blocks from scratch. If you make your own tile sets, you would be wise to rerun this new Tilemaker for best results.
- UI improvements: arrow cursor shown when resizing is available.
- Made mapping program output more (and better) colors, e.g., colored glass, carpet, and stained clay.
- Added more map description (at lower left of window) for cursor location for tree types, flowers, and other blocks:
- Block ID and data value shown for cursor location when View | Show All Objects (F7) is on.
- Biome type is shown when View | Show Biomes(F8) is on.
- Fixed semitransparent display: semitransparent objects now blend properly, and the cursor will report on only fully solid objects.
- Color of grass, tree leaves, and other green objects are now truer to their Minecraft counterparts.
- On the map, however, trees are shown in considerably different colors than used for export in order to make them visible vs. the ground, and easier to tell species apart. If you don't like these colors, turn on Biome display (F8) or make a color scheme for oak leaves (block 18) and acacia leaves (block 161) and set the color to say #6fac2d - a small color change of any sort will turn off this leaf display feature.
- Better (I hope) block adding algorithm. When two blocks' edges touch diagonally on a horizontal edge and need to be joined, favor adding a block below vs. a block above.
- Updated costs to match Shapeways' new prices for strong plastics. Shapeways' own site is misreporting machine volume needed, however, so there is currently a price mismatch.
- Changed export dialog so that if various values are changed, the corresponding scale option is selected. More export options are grayed out for certain output modes that they don't influence (e.g., biome color export works only when full textures are used).
- Made export dialog short and wide, so that it works better on 800x600 displays. Improved settings import instruction popup.
- Emitter color increased to work with new G3D viewer.
- Updated documentation, fixed stale links, added new prints to gallery.
- Bug fixes:
- Fix out-of-bounds data access for chest export in 3D printing.
- Mouse selection off left or top edge now no longer wraps around.
- "Debug floating parts" mode was crashing due to there now being more than 196 block types.
- "Import settings" now properly reads files created using the cost or wall thickness criteria.
- Progress meter fix, so progress now doesn't go backward.
- Old double chests (without a data value) fixed to properly join up. Interestingly, these old chests simply disappear, they can't be seen in 1.8, even though their data is still saved in the chunks.
- Internal cleanups: removed extra fake wool block types, removed duplicate block definition data structures, increased map block cache size 5x for the 64-bit version, general C++ification of code from C.
- Version 4.06, 9/25/2014 - exe, source - Fixed biome read bug; biome and section order seems to be a bit arbitrary for some reason. Thanks to Tony R. for reporting this bug. Sorry, biomes not implemented yet.
- Version 4.05, 9/20/2014 - exe, source - Fixed stair corner export bug; thanks to Chris Hutton for reporting it. Added name of world opened to title bar. Began biome work: biomes now read but are not yet interpreted. Fixed orientation of vines for south and east sides when rendering. Colors for grass, leaves, vines, stems, lily pads all adjusted to be closer to Minecraft's. Spruce and birch leaves now the proper hue of green for each.
- Version 4.04, 9/1/2014 - exe, source - Fixed obscure bug: sloped rails exported to a detailed 3D print export had bottoms of the blocks missing, causing models to not be watertight. Small cleanups on when texture coordinates are generated, which should make some export files a tiny bit smaller. Attempted yet again to find the Mac Minecraft world saves area.
- Version 4.03, 8/24/2014 - exe, source, Mac 32-bit only - Added more 1.8 beta blocks, including prismarine, sea lantern blocks, banners (minimal), red sandstone, wet sponges, coarse dirt, new wood fencegates, fences, and doors. Change block names to match Minecraft's names. Added experimental colored plastic material and updated material costs and properties for Shapeways. Fixed wheat export for wheat near villages (was appearing as Netherrack); thanks to Duncan Alimchandani for reporting this bug. Fixed anvil rotation, better door texture borders, and other obsessive bug fixing. Improved "missing TerrainExt.png" warning for Mac users. Changed PNG exporter to optimize PNG file export, giving smaller files (note that older versions of G3D may not read these files, so get the latest). Allow TileMaker to convert the color black for a texture to mean an alpha of 0.0. Updated texture packs as possible. New Mac version from Psp4804 that no longer requires X11 or xQuartz.
- Version 4.02, 6/22/2014 - exe, source, Mac 32-bit only - Added blender_mineways.py script to vastly simplify Blender import of Mineways models (thanks to Wyatt Jameson and Nicky for this script). // Fixed extremely slow memory freeing of face records by replacing face allocation with my own pool system; large exports now proceed much faster. // Finally fixed the "two selections" bug, where if you made a selection and panned so it was offscreen, it wouldn't get cleared and could scroll back onto the screen, looking as if there were two selections.
- Version 4.01, 6/20/2014 - exe, source - Fixed importer so that upper height is set properly. // Increased size of progress bar, so that progress is more visible for huge exports. (thanks to Adrian Cowherd for the suggestion.)
- Version 4.00, 6/18/2014 - exe, source - 64 bits, at last! Mineways and TileMaker are now 64-bit executables. Now large exports will not fail due to running out of memory. Use the *32.exe version if you can't run 64 bits for some reason. Programmer's notes: switched to all C++ and a single build directory and project. 64-bit Zlib static library from here, wonderful LodePNG (a replacement for libpng) from here. // Minor change: "Set terrain file" now starts in the directory where mineways.exe itself is located.
- Version 3.07, 5/29/2014 - exe, source, Mac - If you can't use the right mouse button, holding down "Control" will make the left mouse button act as the right mouse. // New 1.8 blocks added: Andesite, Diorite, Granite, Slime, Iron Trapdoor. // Piston head now properly created as geometry. // Trapdoors properly render at top of block. // Fences and walls properly join with transparent blocks. // Out of memory conditions now flagged as errors.
- Version 3.06, 1/27/2014 - exe, source - Added option under "Help" that minimizes the amount of memory used during export. Use this option if you're running out of memory on large exports. This is not on by default, as this option will make exports take a few seconds longer. // Share some common export settings (color, material, block size, and more) among some related file formats. This is useful for when you export to both Shapeways and Sculpteo, for example. // Free the input TerrainExt.png file as soon as we're done with it. // Added automatic cache resizing and recovery for large map display.
- Version 3.05, 1/1/2014 - source, Mac - Export "lesser" blocks more efficiently, removing many invisible polygons and so improving 3D print conversion. Added "Import Settings" feature, which lets you read in a previously-exported Mineways file and match its export settings. Various bug fixes: proper export of "connect all edges", proper export of solid-color renderings, fixed some error messages to properly display.
- Version 3.04, 12/10/2013 - exe, source - Allow export of partial blocks when saving without textures. // Set Ke and map_Ke for emitters' materials for OBJ, giving a better look when using the G3D viewer. // Properly output color swatches and other neglected modes. // Fix world name output for OBJ.
- Version 3.03, 11/17/2013 - exe, source - Avoid crash when old-style terrain.png is used; warnings system improved. // Updated new Shapeways ceramics costs, and improved estimation by including partial block export. // Updated terrainExt*.png files Coterie, Doku, and BD Craft.
- Version 3.02, 10/25/2013 - source, Mac - Move to 1.7.2, adding all its blocks (exceptions: flower pots with acacia and dark oak saplings not supported). No looking back, roses are replaced by poppies and April Fool's locked chests are replaced by stained glass blocks. // True geometry added for glass panes, iron bars, levers, and brewing stands. // Redstone wires potentially running up block sides now are properly cut or not cut by various block types placed above them. // Many little texture fixes and rationalization of the code. For example, some billboarded objects (e.g., brewing stands, iron bars) now have a tiny epsilon between their front and back faces, to avoid z-fighting in G3D - I'm not sure this helps others.
- Version 3.01, 10/17/2013 - exe, source - Serious color scheme crash bug fixed, due to array overrun. // The TileMaker is now available to help you make your own textures - see documentation. // Fire has been improved with more billboards, similar to Minecraft's style. // Torches are now sheared in Minecraft style instead of rotated. // The beacon's true geometry has been added for rendering.
- Version 3.00, 10/11/2013 - exe, source - 1.6 support: at last, I tackled the new way Minecraft stores textures. This release no longer uses terrain.png files. Due to rules and format changes, an older version may serve you better: for 1.2 to 1.3 Minecraft worlds, use Mineways 2.22; for Minecraft 1.1 or earlier, use Mineways 1.15 (I don't even have a copy of either any more.... Changes: began TileMaker project to make custom terrain textures from texture packs. // Added mapping (only) for 1.7 - geometry to follow soon. // Setting a color scheme's air color sets empty spaces on the map to this color (even if the air is still transparent). This can be handy for making a nice background color for railroad maps, for example. // When a new world is loaded, the view is switched to the Overworld level, to avoid confusion. // Torches now have tops when exported for rendering. // New Shapeways materials added and cleaned up. // Fattened wood fences for 3D printing are now exported as stone wall shapes, for stronger support. // Mossy fences are now mossy for "non-detailed" 3D printing. // Fixed chest lock placement, and creation on test world. // Nether brick and quartz slabs/double slabs added. // Detector and activator rails now have active states. // Lots of other fixes you'll never notice.
- Version 2.23, 9/3/2013 - source, Mac - Enable stairs to join under the 1.4 rules. Added "copy" for color schemes, and "OK" buttons. Added blocks up through 1.6.2, but mostly for mapping - the textures and some behaviors of the new blocks are not supported yet. Soon! Fixed "affects water level" property for some blocks. Fixed up direction stats format.
- Version 2.22, 1/21/2013 - source, Mac - Bug fix: sometimes unknown blocks caused a timing error, making the "bad block" message repeat many times. Fixed, I believe... (thanks to Michael Leone for reporting this bug)
- Version 2.21, 12/11/2012 - exe, source - Stupid bug fix: I managed to break rendering support a bit, causing export to use the printing code path (slower and unnecessary). Now it works again. Minor feature addition: Sculpteo exports now have a somewhat better price displayed, but since I don't know their formula, it's still approximate.
- Version 2.20, 11/30/2012 - exe, source - Major feature addition: schematic export. See the relevant documentation for more information. Added version number to output file's comment header, to help in debugging. Fixed physical material name in output file's comment header (was printing just one character instead of the string). Fixed error message warning of bad blocks: further code added to handle this problem (thanks to Josh Smith for pointing out the problem). There is now an "unknown block" type that will show up on the map and on export, which looks like bedrock. As usual, you can remove these blocks by using a color scheme. Fixed bedrock properties (was listed as having transparency).
- Version 2.19, 10/17/2012 - exe, source - Added anvil. Fixed terrain.png to avoid rendering errors. Fixed crash on solid color export for rendering, and proper export for 3D printing. Added fire tile for 3D printing. Added path information to .OBJ header. Fixed texturing and placement errors for doors, cauldrons, and cocoa. Fixed texture clamping for furnaces, bed, and cauldron. Added color expansion (bleeding a decal's texture colors outward into the transparent parts) to improve rendering quality on various renderers. G3D/SAP export also now performs further color expansion. Improved error messages for Mac version - I still don't know how to detect Mac paths using MFC and WINE; advice appreciated. Added beta's stair "trimming" rules (where stairs at right angles will trim away part of the upper step), but this feature will not be enabled until 1.4 is released.
- Version 2.18, 9/27/2012 - exe, source - Output block size in statistics popup. Warn user if unknown block type is encountered. Add a "head block" placeholder (pumpkin) for now; it turns out to be hard to add the new beta's head blocks. Bug fixes: fix the scale dialog (the radio boxes got separated from one another). Turn default options (connect blocks, delete floaters) back on when "lesser blocks" option is turned off. Attempt to find Minecraft worlds a bit better on the Mac (no promises...). Remove warning about floaters when "lesser blocks" is used.
- Version 2.17, 9/11/2012 - exe, source - bug fixes: for cobblestone walls, pillars were not appearing on straight walls when objects were placed above the walls (thanks again to Sterling Babcock for the bug report). Also, in version 2.16 I tried to fix a problem for the Mac where it crashes for some users, possibly due to a memory use improvement introduced in version 2.09. I've turned this memory improvement back on in this version as it doesn't seem to matter for the crash.
- Version 2.16, 9/8/2012 - source, Mac - bug fixes: fixed 3D printing color export for Sculpteo (OBJ) format viewed in SAP Viewer, fixed output of relative texture coordinates for OBJ export. Fixed color schemes so that old color schemes will auto-update when used with newer worlds. Provided guidance to Mac users looking for their world directory (still trying to figure out how to make this happen automatically). Added Xzip/unzip in anticipation of someday reading texture packs directly for textures. Added Ender Chest, but only for default terrain.png. Thanks to Sterling Babcock for bug reports and the Ender Chest texture addition.
- Version 2.15, 8/28/2012 - exe, source - Added "fatten lesser blocks" option, so that small features that are printed are less likely to snap off during manufacture. Removed "flatten blocks" option, since it's never turned off by anyone nowadays. Numerous minor tiled texture fixes. Fixed farmland output for printing. Added correct bed, cactus, and redstone repeater output for rendering and "lesser" 3D printing. Added sloped rails for 3D printing when "lesser" is on. Cauldrons with water levels added. Dragon egg geometry added. Command and beacon blocks added (default terrain.png only; beacon block is currently at 8,11), along with cobblestone walls, flower pots, carrots, potatoes, and wooden buttons.
- Version 2.14, 8/4/2012 - exe, source - Vines not exporting for 3D printing when the "lesser" feature was on. Fixed. Thanks to Sterling Babcock for reporting this bug.
- Version 2.13, 8/4/2012 - exe, source - Shapeways redesigned its upload page, now millimeters is the default model unit. Changed Mineways to export in millimeters by default, rewrote the documentation for Shapeways export.
- Version 2.12, 8/3/2012 - exe, source - critical bug fix for VRML export, I introduced a bug in version 2.11, in which the first few faces would not be exported. Thanks to Jonah Shafer for reporting this bug.
- Version 2.11, 8/2/2012 - exe, source - Added water and lava level export that matches Minecraft's; this always exports for rendering, and for 3D printing only when the "lesser" option is checked. Support sideways logs and upside-down levers in 1.3.1. Bug fixes: flipped tiles on "lesser" objects so they properly matched left and right. Rewrite of the UV texture coordinate system in anticipation of major changes for full support of Minecraft 1.3.1 (modest reduction of number of UV coordinates saved). Mineways will mostly work with MC 1.3.1, but note that 1.3.1 texture packs used with Mineways will make chests disappear (thanks, Mojang). Major rework is needed to fix this mismatch; the default texture pack will work fine for everything but Emerald blocks.
- Version 2.10, 7/24/2012 - exe, source - Fences, gates, doors, trapdoors, and sign posts are now exported for printing when the "lesser" option is used; see more details here. Options for tailoring OBJ export, and improved documentation on exporting to renderers.
- Version 2.09, 7/20/2012 - exe, source - Many new blocks have been added for rendering and for printing. These blocks are exported by default for rendering, and can be exported for 3D printing, by using the "Export lesser blocks" option. This feature is experimental (fences and fence gates are highly likely to break off, for example), and works with Sculpteo but not Shapeways. See more details here. Flowers, mushrooms, tall grass, dead bush, saplings, and stems now are visible on the map and print as flattened decals (if you don't like this, disable using a color scheme).
You can export again instantly with the same options and filename by using Control-X (or the File menu item). This is useful when adjusting bounds, fixing the world, reloading ("R"), or changing the color scheme and then re-exporting. File path is now retained for normal file export, also making adjusting easier. Material output has been simplified for OBJ, to improve import into Blender (though water now looks more boring in G3D - sorry; and just uncomment "illum" in the .mtl file). Absolute and relative OBJ have changed position on the file type selector, and 3D print firm names added when exporting for 3D printing. Changed default terrain.png to support all new Minecraft 1.3 blocks (note Emerald Block is shifted). Numerous fixes to [Block Test World] and block IDs added. Memory use has been considerably reduced, half or less of previous typical use.
Here's the list of blocks which now have correct geometry: slabs, stairs, fences and gates, farmland, signs, doors (but not for 3D print - too thin), pressure plates, buttons, snow, trapdoors, end portal frames, cocoa plants, and cake.
- Version 2.08, 7/9/2012 - exe, source - New features: individual block export and block test world added. See this section of the documentation. Bug fixes: fixed export of redstone torches and repeaters, made vines always properly cover the underside of blocks, and made the bed texturing slightly better.
- Version 2.07, 6/26/2012 - exe, source - bug fix: huge mushrooms were not textured correctly, now they are.
- Version 2.06, 6/19/2012 - exe, source - Improvements: The lower depth is now autoadjusted for every new selection, and autoadjustment can be turned off. VRML rendering output is now grouped by material, for a bit more Cinema 4D support. VRML now exports to solid color and single color formats, for Ponoko support - many thanks to Ariock for and Ponoko for their help. VRML files now write out squares instead of triangles, reducing ZIP file size by about 20%. VRML files are now generated by default again, for previewing (generating just the ZIP is good for utter newbies, but a pain for everyone else). Various format bug fixes, including making rich color and floating object debugging mode work again. Unknown block ID check added, to future-proof Mineways and warn users of unknown block types. Week24 beta block additions are unofficially supported, though I'm ignoring the cocoa plant, and block of emerald is semi-supported (it conflicts with the old chest lid texture location - grrr).
- Version 2.05, 4/12/2012 - exe, source - Minor fix for rendering, only: vines are all turned into billboards. Vines are still a little funky for printing, but you'll never notice.
- Version 2.04, 4/3/2012 - exe, source - New option: whether to create the model files themselves. By default, VRML printing now exports only the zip, because people often upload the wrong file to Shapeways. If you want to preview the model, just check the "Create files themselves" checkbox. Loading a new world turns off the selection and resets depths. All terrain textures now updated to 1.2.4.
- Version 2.03, 3/23/2012 - exe, source, Mac - Improvement: added a "Lower depth" slider to the user interface, making depth selection obvious and easier (thanks to Adrian Alan Brown for the suggestion). Misa textures updated to 1.2.4 (Coterie, Doku, LB, and Sphax have not been updated).
- Version 2.02, 3/22/2012 - source, Mac - Updated to 1.2.4: added circle brick, different wood planks, and sandstone variants. Fix: swap spruce and birch saplings.
- Version 2.01, 3/21/2012 - source, Mac - fixed various height bugs that slipped through the cracks. Wool now doesn't lose its color above height 127, for example.
- Version 2.00, 3/17/2012 - source, Mac - Anvil support: if you use Minecraft 1.2 or newer, use 2.x, else use 1.15. Hats off to Sean Kasun and some anonymous githubber, who did the heavy lifting in the conversion to Anvil. Source code uploaded to github. Old North is now East. Added redstone lamps, added Sphax PureBDcraft and LB Photorealism terrain.png files and updated the rest to Minecraft 1.2.3, as possible. Fixes: now uses a little less memory in a few places, to help large exports. Repeater/wire connection fixed so that wires properly attach to only the ends of repeaters, not the sides. What used to be East is now North (the sun changed where it rose some time ago).
- Version 1.15, 2/15/2012 - source, Mac -bug fix: scale error on warning of "too small" model for colored sandstone; Shapeways doesn't appear to enforce this rule, though. Fixed vines to export in a more reasonable fashion: composited with underlying objects and underneath trees, changed color, made background grass. However, vines still extend out beyond trees (see bug list). Removed right-mouse click for assigning "Bottom" height, as it's confusing and redundant; just use middle-mouse instead. Change "Z is up" to be default for i.materialise STL models. Add Show size in inches and centimeters in printout dialog. Fixed dragon egg tile location. Added beta jungle tile support in optional terrain_jungle.png: 9,9 wood, 4-5,12 leaves, 14,1 saplings. Replaced terrain.png with the game's default terrain.png plus flames, as it's better for printing. Added other terrain.png options. Removed alpha cleanup for print export, as it's unnecessary.
- Version 1.14, 2/4/2012 - minor bug fix: extremely large chunks (those with say 100 chests full of objects) would not decode; fixed by increasing CHUNK_INFLATE_MAX. Improve selection highlighting: the selected area is always shown, and if some blocks are not selected the user is warned and corrective action applied (moving Bottom depth down). Note that when the depth is moved down, it is conservative, including visibility down deep holes, for example. Improve texture pack import: avoid using bad water, lava, and file tiles in custom terrain.png files - see notes on terrain.png. Statistics about the print's cost are now optionally displayed at the end of export.
- Version 1.13, 1/28/2012 - exe, source, Mac - Improvements: you can reload your world by hitting the "R" key now. Loading a different world will recenter at spawn and unzoom the view. Bug fixes: Major fix is that wide characters are now supported on file read and write, which means characters such as "åëîõú" can be used in file names. These get simplified for material and texture file names, since those need to be UTF8 (well, more UTF7) for OBJ and WRL files. Fixed bugs with spaces in file paths. Resolved color mismatches for solid color output. Fixed a color problem with slabs when using solid colors (appeared in v1.12). Redstone torches were always flattened, now they appear properly in rendering output. Flames are now exported to be at the edge of blocks. OBJ export always has Y as up, for easier print preview with G3D. When exporting Magics STL without colors the header is made simpler, so the object does not preview as black.
- Version 1.12, 1/25/2012 - exe, source, Mac - Bug fixes: half slabs of wood, sandstone, and other materials were all showing up as stone. Stronghold bricks were never cracked or mossy. Enhancements: "true specification" OBJ files are now output by default, since I figured out how to turn on previewing in Blender (see the tutorial). Blocks are now 1 meter in size when output for rendering, a scale that most rendering systems prefer and that I originally meant to be there.
- Version 1.11, 1/19/2012 - exe, source, Mac - Bug fixes: spaces in texture file names baffles Shapeways' parser, so replaced with underlines; Wavefront OBJ "single material" output replaced by "true spec", where Ka and Kd are set to 0.2 and 1.0 for all materials - looks better in the SAP Viewer Complete. I also made "true spec" output absolute indices, for those readers that can't handle relative ones.
- Version 1.10, 1/18/2012 - exe, source, Mac - Bug fix: default texture output not set for printing single-material OBJ. Fixed terrain.png read error message. Features: added emitter Ke output for emitters, though currently always '0 0 0'; this makes for easy identification and editing of emitters. Added internally a static, absoluteIndices, to allow positive indices to be output for OBJ files.
- Version 1.09, 1/11/2012 - exe, source, Mac - Bug fix: was saving VRML PNG twice. Features: added Materialise Magics as a color STL export format, defaulting to the settings i.materialise prefers. All STL now defaults to mm units, as this seems to be a common choice.
- Version 1.08, 1/10/2012 - exe, source - Files zipped before errors reported, output only those textures needed (and RGB for 3D printing instead of RGBA). Added fire billboard (your terrain.png must include it). Added dead bush and fern billboards.
- Version 1.07, 1/9/2012 - exe, source - If blocks were turned off and "seal off entrances" was used, some of the hidden blocks would reappear; fixed, and guard code added. If a warning was flagged, a ZIP file is not created; changed so that the zip file is always created.
- Version 1.06, 1/8/2012 - exe, source, Mac - Major bug fixes: bubble population problem, group allocation, proper display of different neighboring transparent objects, sloped powered rails not displaying properly for printing, mushrooms not displaying as billboards for rendering. Added units selection for output. Added automatic ZIP creation for export. Separated cutouts from transparent blocks. Corrected export of Tf for OBJ material file. Added separation of textures into RGB and RGBA and alpha-only for better rendering import to 3DS MAX. Added "frosted detail" physical material.
- Version 1.05, 1/4/2012 - exe, source - Added two options: F7 makes little things like flowers and mushrooms visible on the map, and under File is "Select terrain.png for export", so a different terrain.png file can be used. Do not set the transmittance when using full textures for glass (assumes a cutout for glass). Other little menu cleanups, like what key selects the menu item.
- Version 1.04, 1/2/2012 - exe, source - Rendering gets some love: using "illum 4" kills Blender import, so back to "illum 2" for all but water, add "Tf" and remove "d" export; export "map_d" of the same texture map, making SAP Viewer work better with OBJ; change face offsets to be relative numbers instead of absolutes, so OBJ files can be added to each other.
- Version 1.03, 1/2/2012 - exe, source - Added check to see if world reads properly, warns if not; added snowy sides to grass blocks when covered with snow; changed to "illum 4" for Wavefront OBJ export.
- Version 1.02, 12/30/2011 - exe, source - added "hide all blocks" feature to color scheme dialog, fixed debug mode for separate parts so that it works properly if full textures are on (the textures get turned off) and so blocks always appear, don't export billboard torch if "Export all block types" is off.
- Version 1.01, 12/27/2011 - exe, source - fixed depth going to -1, added warnings about models being too large, increased map cache size, improved model summary information at top of model file.
- Version 1.00, 12/24/2011 - exe, source. Here's the announcement on Reddit.
Wish List
This is the wish list, in rough order of personal interest and bang for the buck. If you have a good idea, let me know. Most of these are frankly a ton of work to do for minor benefits, but I might as well keep track. If you want a feature and I can't or won't do it, consider adding it yourself! The code is open source on github. I'm happy to give advice and take pull requests. That said, the code's something that has grown over time and is obtuse in some areas.
- There are "phantom" blocks with no sections. Handling the memory for these better would be to the good. A bit tricky, as we need to carefully think out how this affects caching and reuse of "freed" blocks.
- Individual block export does not currently work with individual textures. It should; the logic's involved... (thanks to vktec for reporting this bug)
- USD: Glass (and water?) does not use a custom Minecraft.mdl type of exporter, which means edges of low-resolution textures are not sharp.
- Add a script-only epsilon control for redstone wire and glow lichen for how far they're offset from the surface below.
- Process beds the same as chests, at least adding the red bed in this way. Careful of 1.15 vs. 1.13 differences.
- Head, sign, and banner support (among others). Realistically, probably just head support, since the others would be a huge amount of work to emulate and could soak up a lot of texture memory.
- TileMaker could "bleed" real pixels' colors into areas where alpha == 0, i.e.,
- Better USD instancing for water and lava, as right now a full block is what gets generated. Use "level" attribute?
- Perhaps update redstone in 1.13 a bit with directionality and on/off, getting rid of distance. Can't do the "go up the side of the block" property, though, that would be 4 more bits. See next item:
- Contemplate someday moving to a 16-bit data value instead of 8, and maybe a 16-bit type data value. If done, blocks could more precisely be generated (e.g., walls could work perfectly, redstone dots would work) and instancing for USD could be much better supported. Should be done in conjunction with a "max height" dynamic allocation of chunks, freeing up memory that currently is entirely air.
- Multithreaded block loading, like Minutor does (or, well, did). This would make scrolling the map, making it huge, etc., much faster. Probably just a dream - hard work!
- For TileMaker, instead of a blocks directory, read the *.jar or an unzipped directory structure to get the blocks, chests, bed, end portal, barrier, and anything else directly from the structure. Allow reading in a series of .jars and overlaying (analyze each first to get the maximum resolution needed overall). Then get rid of TerrainBase.png.
- Consider reading in the chest, bed, and other elements (maybe shulker boxes - there are a lot of them, though) as separate textures in a separate zone (say, at the bottom) of the TerrainExt.png file, like in jmc2obj. Also allows direct export of these textures.
- Analyze name of file given on command line. If it's a world level.dat file (or single world directory), load that world. This functionality is easy enough to do by making a script that loads the world, but having the program figure this out would be a nice little usability addition.
- Add glTF export? Use this or, better yet, this. Really, though, it's easier to upload directly to SketchFab and then make the model downloadable, as glTF is one of the options.
- Zoom further out, allowing a wider view of the world. The main problems with this idea are that Mineways does not read blocks quickly and that selection becomes a bit imprecise.
- Export all exported model elements to a Mineways script file as text commands, so that they can be modified by scripts or text editors and reloaded.
- Use an installer for Mineways, such as INNO, so that vcredist.exe is properly installed. One more level of complication, though.
- Add Bedrock/Pocket Edition/Education Edition support. Right now MCC ToolChest PE and MCEdit properly reads such files. This addition turns out to be a large bit of work, as the file format (Google's LevelDB) is entirely different than the NBT format used in the Java version of Minecraft, not to mention that Bedrock differs from Classic Minecraft in a huge number of ways. See this page for details. Note that pymclevel, though it's in Python, may help in decoding the Pocket Edition format.
- Add a "Go to location" dialog, where you give a location and the view is centered on it.
- Almost out of space for composites. I've patched this by quadrupling the size of the texture output. Better would be to go to an "on demand" system, noting which tiles are used and outputting only these. That said, composites are used only for 3D printing, so we could aim to trim down that system.
- TileMaker should handle non-power-of-two tiles. Warn the user, as before, but it should give it a go and resize.
- Biome support: get biome color and use it to change terrain's output color. Currently only the biome at the center of the export is used to set the color of all blocks in the export. The hard part is blending (and saving all the resulting textures, a potentially large number) at biome margins.
- Various blocks could use more support, e.g., pumpkin and melon stems color, farmland wetness. This will use up more texture tiles, but that might be acceptable.
- JSON support. Version 1.8 of Minecraft supports JSON descriptions of block models. Supporting this would make adding new blocks fairly easy, as well as letting users make their own custom block descriptions. That said, it's a lot of work to add this.
- Entities: there are lots of entities. I'll probably never add these, as they involve a lot of additional textures. But, it's on the list.
- Full "lesser" block merging for 3D printing: right now smaller blocks such as fences are not merged properly with surrounding blocks to make a manifold, watertight mesh. This is done a bit for slabs and stairs and some other cases, by not generating a face if it's fully covered. However, for the most part I'm leaving it up to the 3D printer's software to properly merge these blocks together; I recommend using netfabb's free cloud solution for basic single-color-model cleanup. Some software does poorly with the current geometry, e.g., Sculpteo drops blocks. Adding a robust triangulator and the ability for a block to query its neighbor's face loops would begin to fix this problem. Insanely hard problem, so this is definitely in the "wish" category.
- Better color selection: this is a weakness with the original minutor. Yes, you have to put in hexadecimal numbers for the color.
- Vines should work better for 3D printing. When they hang down without anything next to them, they have to be blocks, but when they're adjacent to trunks or other blocks they should go flat. That said, this doesn't look quite right: a vine on a trunk will be flat, but then if it hangs in the air it will fill the "outside" block. I think the answer is to shift the vine inward from whatever block it's in to the one it's touching, but intervening properly is tricky.
- Shulker boxes would be nice to process from their separate composite image files, as we do with chests. Also, the "default" shulker_box should use its pale purple version.
- Export color per vertex for baked-in Minecraft lighting. This idea has issues, such as whether the time of day lighting should be combined with the local baked and ambient occlusion lighting.
Nightmare List
Just a joke name, but ideas I've pretty much ruled out at this point, and why. Listed in order from "some slight chance it could happen" to "extremely unlikely."
- In TileMaker, if there's an alpha for _e files, it should get folded in to make the color black as needed. For example, if an alpha is 0, set the _e for that pixel to 0. This will help avoid Tesellax pumpkin_face_on_e.png problem. But, really, Tesellax should fix its content.
- Beds should have separate colors. Or not. These would take up a lot of tiles and kinda overload Mineways' texture storage space.
- Consolidate flat areas of the mesh: large flat grassy areas are common in Minecraft worlds, as are large bodies of water. These could be merged into one giant polygon (for OBJ, with the assumption there's a good triangulator on the other end) or a better mesh that doesn't include all the interior vertices. There are two reasons that make me leery of this one, however. First, it won't work on the mosaiced single-tile texture output that Mineways uses by default, so it will only be useful for when exporting individual textures for every block face. For the giant single-texture mosaics used by default, the texture won't repeat on a simplified triangle mesh. Second, there's a question of whether to remove vertices along the edges of such areas. This will cause T-vertices, where the side of the block has a vertex but there's no vertex on the top of the block. This can lead to cracking artifacts when rendering. But, if you can remove the vertex on the side, too, then that's further savings. Basically, this problem can get pretty complex and tricky if you try to do a good job. Since it's only useful for the "individual texture" export mode, not the default for Mineways, this seems like a lot of work for few users. Most DCC apps already have such functionality anyway, e.g., see this for Blender. So, pass.
- Work on Mac and Linux: my code is a Windows beast. Currently, Mineways works on Linux under Wine on Linux and the Mac. If someone wanted to make a Qt version of this code, great. The MinewaysMap subdirectory shouldn't need much work, it's just the Win subdirectory that is platform-specific.
- Connected textures would give more continuous results for surfaces such as glass and bookshelves. One problem with this idea is that these are custom tiles, so this feature could be added for the default texture set, but not the various other texture packs. Not sure this is even still a thing at this point.
- Integration with Shapeways' API and i.materialise API: Mineways could save each user a few minutes by directly uploading the resulting model files to Shapeways or i.materialise. While manually zipping and uploading is not a big deal, it's a bit of a pain to set the default material, add "Minecraft" as a keyword, and so on. These APIs would set all this information for the user, as is done by MineToys, 3DTin, and TinkerCAD. That said, this option is at the bottom of the list because I think it's the wrong workflow. Normally you want to export from Mineways and then use MeshLab or other program to preview the model to make sure it looks right, then you want to upload. Not checking the model before uploading seems over-optimistic to me in most situations.
- Support for modded blocks. Sorry, no.
Links
Some links I commonly use.
- Subscribe to Mineways Google Group for new version announcements; no spam.
- Download the latest Windows version of Mineways. The following texture pack terrain PNG files are included for use with Mineways ("File | Choose Terrain File"), by permission of their creators (thanks!) - go here to see previews:
- Coterie Craft by Cpt. Corn
- DokuCraft by Hickerydickery
- Modern HD by Mikeyto1o
- Sphax PureBDCraft (just the 64x64 - there are other sizes) by Sphax84
- JG RTX" by Jason J. Gardner
- Other platforms: Mineways works on Linux and the Mac under Wine - see link below (and I suspect it also works on the Mac using a virtual machine like VirtualBox - let me know).
- Download the ancient version V5.10 for the Mac. Ported to the Mac OS X platform by using WINE. See the Mac guide.
- Download the source code (C/C++) - on github, free for just about any use; code contributions welcome!
- Minecraft forum thread
- Subreddit for Mineways - a place to show off your work and tutorials.
- Related tools on the Minecraft Wiki.
- Video Playlist - where in the first two minutes I install Mineways, export a model from our Minecraft world, preview the result, and then upload it to Shapeways. Tutorials:
- Mineways tutorial: The Basics
- Mineways tutorial: How to use the Mac version
- Mineways tutorial: 3D print cleanup
- Mineways with a RepRap home printer - the tutorial itself is here.
- How to make a Minecraft scene in Cinema 4D - also see the step-by-step tutorial here.
- Search YouTube for newer Mineways videos.
- Mineways Flickr group. Best photo so far: this one (not made in Mineways, but it could have been). Note: logging into Flickr appears to allow you to see more images in this group, due to their account review policy. If you submit images, I recommend submitting 5 or more (do some close ups) to avoid their limitations - less than 5 and your photos can only be seen by people signed into Flickr (goofy, I know).
- Search Shapeways for models tagged with "Minecraft" or "Mineways". You can also search via Google Images.
- My modest (non-profit) Shapeways shop shows some buildings I've exported and purchased, mostly for friends. You can look at photos, check prices, and download the models themselves.
- My even more modest Sculpteo shop shows a few test models. I'm extremely impressed by Sculpteo's website and technologies. Prices are a bit higher than Shapeways, but they work with the "Export lesser blocks" option extremely well.
- It's also possible to host models on Sketchfab, as I have done here.
- If you're using 3D printing and Minecraft in the classroom, one place to look for support is the Minecraft teachers Google Group.
- You can download some slidesets I've used in talks and workshops on 3D printing and Minecraft. Feel free to reuse them in reasonable, Fair Use ways.
- Things made at the Cambridge Science Festival and by Parts & Crafts workshop participants are here on the Shapeways site.
- Our world's homepage
Credits
The Mineways program is open source and is based on the (late, great) mapping program minutor written by Sean Kasun - his work gave me a huge head start. Mineways is a superset of his mapper, with a model exporter and other features added, though with slower map loading than his much-evolved version. I wrote this program just for fun, I'm not associated with Shapeways or Mojang; more about me here. There are other print services besides Shapeways that work with Mineways, such as Sculpteo, i.materialise and Ponoko, as well as home 3D printers.
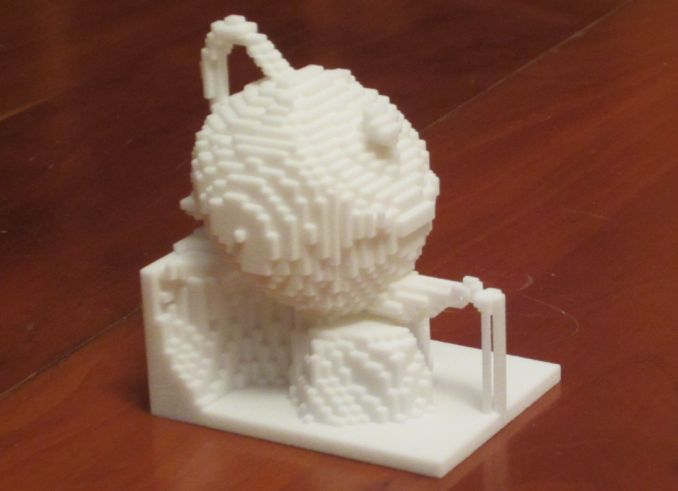
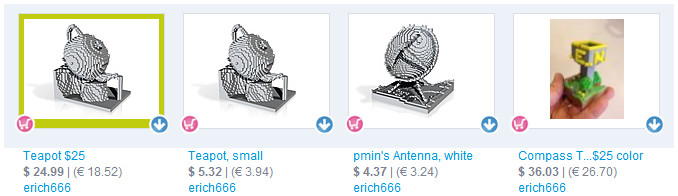
Minecraft Bedrock Edition Black Concrete Visible Texture Pack
Source: https://www.realtimerendering.com/erich/minecraft/public/mineways/mineways.html
0 Response to "Minecraft Bedrock Edition Black Concrete Visible Texture Pack"
Post a Comment